
Action Definition: To Define an Action for a Table
The following activity will walk you through the process of implementing an action for a table, which is represented by a button on the table toolbar.
Story
Suppose that you need to give the users the ability to update the following prices on the Repair Work Orders (RS301000) form after entering new prices on the Services and Prices (RS203000) form:
- The base prices of repair items on the Repair Items tab
- The default prices of labor items on the Labor tab
You need to define an action for each tab, along with the associated button on the table toolbar of the tab. These buttons will be available only if no invoice has been created for the repair work order selected on the form.
Process Overview
- Creating an action and the associated Update Prices button on the table toolbar of the Repair Items tab
- Creating an action and the associated Update Prices button on the table toolbar of the Labor tab
- Testing the Update Prices buttons and the associated actions
System Preparation
Make sure that you have configured your instance as described in Test Instance for Customization: To Deploy an Instance with Custom Maintenance and Data Entry Forms.
Step 1: Implementing the UpdateItemPrices Action
In this step, you will implement the UpdateItemPrices action in the
RSSVWorkOrderEntry graph.
You’ll specify the availability of the button related to the action in the RowSelected event handler of the same graph by using the SetEnabled() method of PXAction<>. You’ll hide the button from the form toolbar and the corresponding command from the More menu by setting the DisplayOnMainToolbar property of the PXButton attribute to false.
To implement the UpdateItemPrices action, do the following:
- In the Actions region of the
RSSVWorkOrderEntrygraph, add theUpdateItemPricesaction, as the following code shows.public PXAction<RSSVWorkOrder> UpdateItemPrices = null!; [PXButton(DisplayOnMainToolbar = false)] [PXUIField(DisplayName = "Update Prices", Enabled = true)] protected virtual void updateItemPrices() { var order = WorkOrders.Current; if (order.ServiceID == null || order.DeviceID == null) return; var repairItems = RepairItems.Select(); foreach (RSSVWorkOrderItem item in repairItems) { RSSVRepairItem origItem = SelectFrom<RSSVRepairItem>. Where<RSSVRepairItem.serviceID.IsEqual<@P.AsInt>. And<RSSVRepairItem.deviceID.IsEqual<@P.AsInt>>. And<RSSVRepairItem.inventoryID.IsEqual<@P.AsInt>>>. View.Select(this, order.ServiceID, order.DeviceID, item.InventoryID). FirstOrDefault(); if (origItem != null) { item.BasePrice = origItem.BasePrice; RepairItems.Update(item); } } Actions.PressSave(); }In the action method, you’ve selected a repair item specified on the Services and Prices (RS203000) form and assigned its price to a repair item specified on the Repair Work Orders (RS301000) form. (In the T220 Data Entry and Setup Forms training course, a similar scenario is implemented in the RowUpdated event handler of the RSSVWorkOrderEntry graph.)
In the action method, you don’t need to update the
RSSVWorkOrder.OrderTotalfield, which contains the total price of the work order. The value is updated automatically because the PXFormula attribute is specified for theRSSVWorkOrderItem.BasePricefield. - In the
RowSelectedevent handler, specify that the button associated with the action should be available only when no invoice has been created for the order, as the following code shows.UpdateItemPrices.SetEnabled(WorkOrders.Current.InvoiceNbr == null);
- Rebuild the project.
Step 2: Placing the Update Prices Button on the Repair Items Tab
In this step, you’ll place the Update Prices button on the
table toolbar of the Repair Items tab. To place the button,
in the RS301000.ts file, you will specify the
PXActionState property with the name of the
UpdateItemPrices action in the
RSSVWorkOrderItem view class.
Thus, to place the Update Prices button on the table toolbar of the Repair Items tab, you should modify the RS301000.ts file of the Repair Work Orders (RS301000) form. Do the following:
- Click the RS301000.ts file on the Modern UI Files page of the Customization Project Editor.
- In the Edit File dialog box, which opens, add PXActionState to the list of imports.
- In the
RSSVWorkOrderItemview class, specify the PXActionState property with the name of theUpdateItemPricesaction. TheRSSVWorkOrderItemview class should look as follows after you’ve completed these steps.@gridConfig({ preset: GridPreset.Details }) export class RSSVWorkOrderItem extends PXView { UpdateItemPrices: PXActionState; RepairItemType: PXFieldState; InventoryID: PXFieldState<PXFieldOptions.CommitChanges>; InventoryID_description: PXFieldState; BasePrice: PXFieldState; } - Save your changes by clicking the Save button of the dialog box.
- Publish the customization project.
Step 3: Placing the Update Prices Button on the Labor Tab—Self-Guided Exercise
In this self-guided exercise, you will implement the
UpdateLaborPrices action in the
RSSVWorkOrderEntry graph. You’ll configure the availability of
the button associated with the action on the form in the
RowSelected event handler of the same graph, hide the button
from the form toolbar (and the corresponding command from the More menu), and place
the button on the Labor tab of the Repair Work Orders
(RS301000) form.
In the action method, you’ll select a labor item specified on the Services and Prices (RS203000) form and assign its price to a labor item specified on the Repair Work Orders (RS301000) form.
In the RowSelected event handler, you’ll make the
UpdateLaborPrices action enabled when no invoice has been
created for the order.
To perform this step, use the skills you’ve learned in Steps 1 and 2 of this activity.
Step 4: Testing the Update Prices Buttons and Associated Actions
In this step, you will test the Update Prices buttons that you’ve added to the Repair Items and Labor tabs of the Repair Work Orders (RS301000) form. To test the buttons and the underlying actions, do the following:
- Modify the original repair and labor items by doing the following:
- On the Service and Prices (RS203000) form, open the record with the
following settings:
- Service: Battery Replacement
- Device: Nokia 3310
- On the Repair Items tab, in the row with the BAT3310 inventory ID, enter 25 in the Price column.
- On the Labor tab, in the row with the CONSULT inventory ID, enter 10 in the Default Price column.
- Save your changes.
- On the Service and Prices (RS203000) form, open the record with the
following settings:
- Update the prices by doing the following:
- Open the Repair Work Orders (RS301000) form.
- Select a repair work order for the Battery
Replacement service and the Nokia 3310 device. On the
Repair Items tab, make sure that the
Update Prices button is displayed, as shown
below.
Figure 1. The Update Prices button on the Repair Items tab 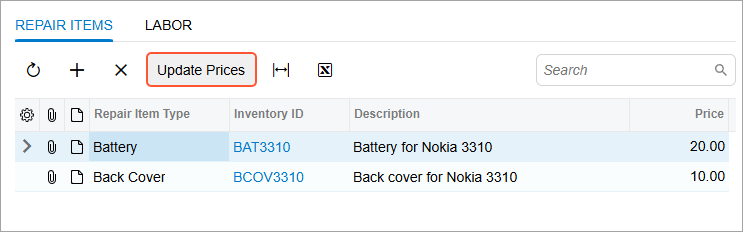
- On the Repair Items tab, notice the old price of the repair item with the BAT3310 inventory ID.
- On the table toolbar, click Update
Prices.
Notice that the item price has been updated and the Order Total in the Summary area of the form has been updated.
- On the Labor tab, notice the old price of the labor item with the CONSULT inventory ID.
- On the table toolbar, click Update
Prices.
Notice that the item price has been updated and the Order Total has been updated.