Diagram View: To Add the Auto-Run Action
The following activity will walk you through the process of creating an auto-run action (that is, an action that the system performs automatically when a particular condition is met).
Story
If the Owner box on the Opportunities (CR304000) form is filled and the
opportunity has the New status, the status of the opportunity should be
automatically changed to Assigned. Acting as the technical specialist, you
need to add another transition from the New state to the
Assigned state for the workflow used by the form. The
transition should be triggered automatically if the Owner box
is not empty.
Process Overview
By using the Conditions page, you will create a
condition that checks the Owner box. By using the Workflow (Diagram View) page, you will add a new
transition from the New state to the Assigned
state and create a hidden action that triggers the transition.
System Preparation
Before you begin performing the steps of this activity, do the following:
- Launch the MYOB Acumatica website with the U100 dataset preloaded, and sign in as system
administrator by using the gibbs username and the 123
password.Tip:The gibbs user is assigned the Administrator role, which has sufficient access rights to customize workflows.
- Make sure that you have learned how to add actions, as described in Action Configuration: General Information.
- Make sure that you have completed the Diagram View: To Add New Actions and Transitions activity.
Step 1: Creating a Condition
In this step, you will add a condition that checks the Owner box. In the Customization Project Editor for the Opportunities customization project, perform the following instructions:
- In the navigation pane, click . The Conditions: CR304000 (Opportunities) page opens.
- On the page toolbar, click Add New Record.
- In the Condition Properties dialog box, which opens, enter OwnerSpecified as the Condition Name.
- On the table toolbar, click Add Row, and specify the
following settings in the added row:
- Field Name: Owner
- Condition: Is Not Empty
- Click OK to save your changes and close the dialog
box.
The added condition appears in the table with the conditions on the page.
Step 2: Adding a New Transition Between States
To add a transition, in the Customization Project Editor for the Opportunities customization project, perform the following instructions:
- In the navigation pane, click .
The CR304000 (Opportunities) State Diagram: OpportunitiesAssigned page opens.
- On the page toolbar, click Diagram View to switch to the diagram view of the workflow.
- In the diagram, in the box with the
Newstate, click and hold the plus button, and draw a line from the box with theNewstate to the box with theAssignedstate. - In the Add Transition dialog box, which opens, click Create to add a new action.
- In the New Action dialog box, which opens, specify the
following settings:
- Action Name: AutoAssign
- Display Name: Auto-Assign
- Click OK to close the dialog box.
- In the Target State box of the Add Transition dialog box, make sure Assigned is selected.
- Click OK to close the dialog box.
- Save your changes.
Step 3: Modifying the Created Action
To make the created Auto-Assign action hidden on the Opportunities (CR304000) form of MYOB Acumatica and performed automatically when the Owner box of the form
is filled in, perform the following instructions:
- While you are still working with the diagram view of the CR304000 (Opportunities) State Diagram: OpportunitiesAssigned page, click the More button in the box with the New state, and click Edit State on the context menu.
- On the Actions tab of the State
dialog box, which opens, find the row with the
AutoAssignaction. In the Auto-Run Condition column, select OwnerSpecified. - Click OK to close the dialog box.
- Save your changes to the workflow.
- In the navigation pane of the Customization Project Editor, click .
The CR304000 (Opportunities) Actions page opens.
- In the table, click the AutoAssign link.
- In the Hidden box of the Action Properties dialog box, which opens, select True.
- Click OK to save your changes and close the dialog box.
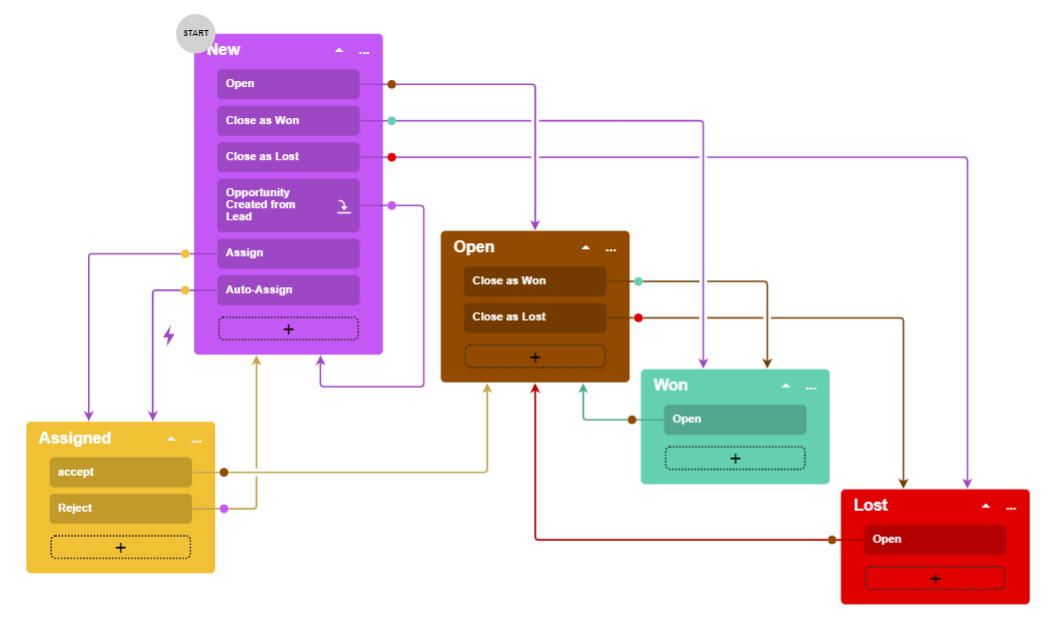
After you have performed these instructions and returned to the diagram view of the workflow, the diagram should look similar to the one in the following diagram. (The results may look slightly different on different devices.)