
Workflow Creation: To Add States
The following activity will walk you through the process of adding new and predefined states to the workflow.
Story
Acting as the technical specialist, you need to add predefined states and a new state to the workflow you have defined for the Task (CR306020) form.
Process Overview
By using the Workflow (Tree View) page, you will add the following predefined states to the Task workflow:
DraftProcessingCompletedOpen
You will also add the new Postponed state to the workflow.
System Preparation
Before you begin adding states to the workflow, do the following:
- Launch the MYOB Acumatica website with the U100 dataset preloaded, and sign in as system
administrator by using the gibbs username and the 123
password.Tip:The gibbs user is assigned the Administrator role, which has sufficient access rights to customize workflows.
- Make sure that you have completed the Workflow Creation: To Add a Workflow activity.
Step 1: Adding the Predefined States to Your Workflow
To add the predefined states to your workflow, in the Customization Project Editor for the TaskWorkflow project, do the following:
- In the navigation pane, click .
The CR306020 (Task) State Diagram: Task page opens.
- On the More menu, click Add Predefined State.
- In the Add Predefined State dialog box, which opens, select Draft in the State box. Leave the Parent State box empty.
- Click OK to close the dialog box.
The
Draftstate is added to the States and Transitions pane. Notice that theDraftstate has a two-character identifier on the State Properties tab. - By using instructions that are similar to Instructions 2–4, add the
Processing,Completed, andOpenpredefined states to the workflow.Each state will be added to the States and Transitions pane below the previous state and will have a two-character identifier on the State Properties tab.
- In the States and Transitions pane, click the
Draftstate, and on the State Properties tab, make sure that the Initial State of the Workflow check box is selected.This state will be the initial state in the workflow. That is, when a user creates a new task, this task will have the Draft status.
- On the page toolbar, click Save.
Step 2: Adding a New State to Your Workflow
In this step, you will add a new state to your workflow. While you are still working on the CR306020 (Task) State Diagram: Task page of the Customization Project Editor, do the following:
- On the page toolbar, click Add State.
- In the Add State dialog box, which opens, specify the
following settings:
- Identifier: PP
You use a two-character identifier for a custom state to have it in similar format as the predefined ones.
- Description: Postponed
- Parent State: Empty
The dialog box should look as shown in the following screenshot.
Figure 1. The Add State dialog box 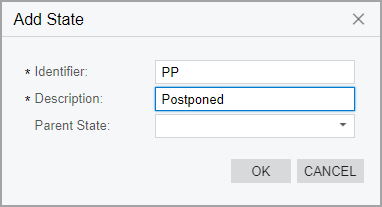
- Identifier: PP
- Click OK to close the dialog box and add the new state to the States and Transitions pane.
- On the page toolbar, click Save.
- In the navigation pane, click .
The CR306020 (Task) Fields page opens. Notice that the table contains a row with the UIStatus field, which is the state-identifying field specified for the screen on the Workflows page (see Item 1 in the screenshot below).
- On the page toolbar, click Combo Box Values.
- In the Combo Box Values dialog box, which is opened,
notice that the new value (Postponed) has been added to it (Item 2). When
a new state is added to a workflow, for the state-identifying field, the system
adds a value with the same name.
Figure 2. The Fields page with the added field 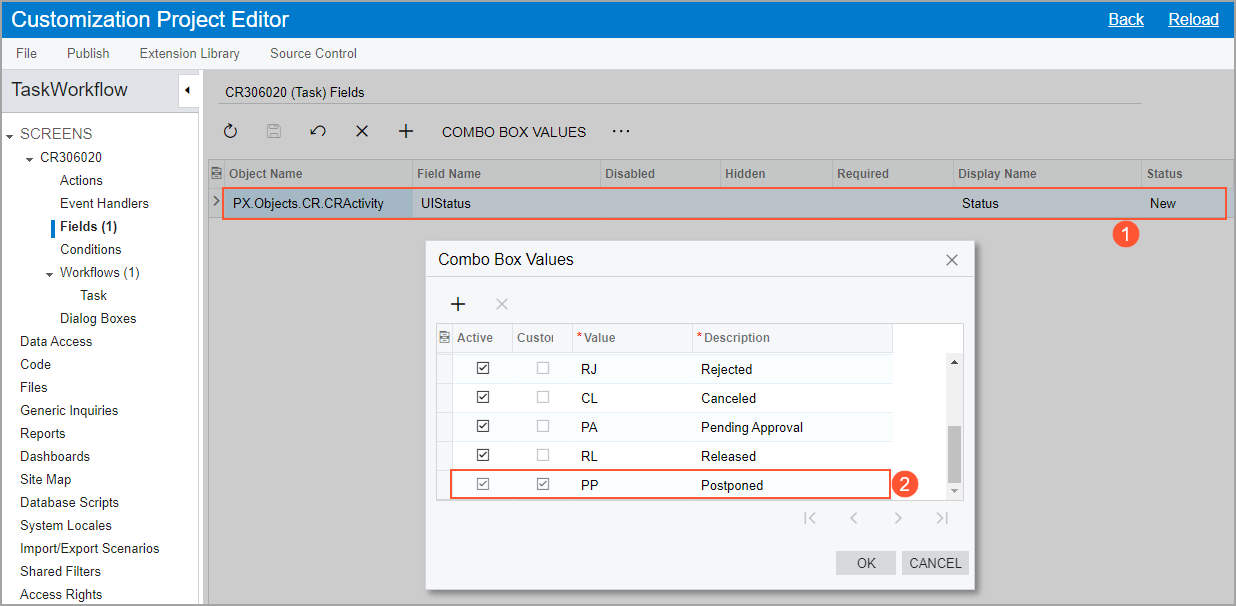
- Close the dialog box.