
UI Customization Development: To Add a Tab to an MYOB Acumatica Form
This activity will walk you through the process of adding a tab to an existing MYOB Acumatica form.
Story
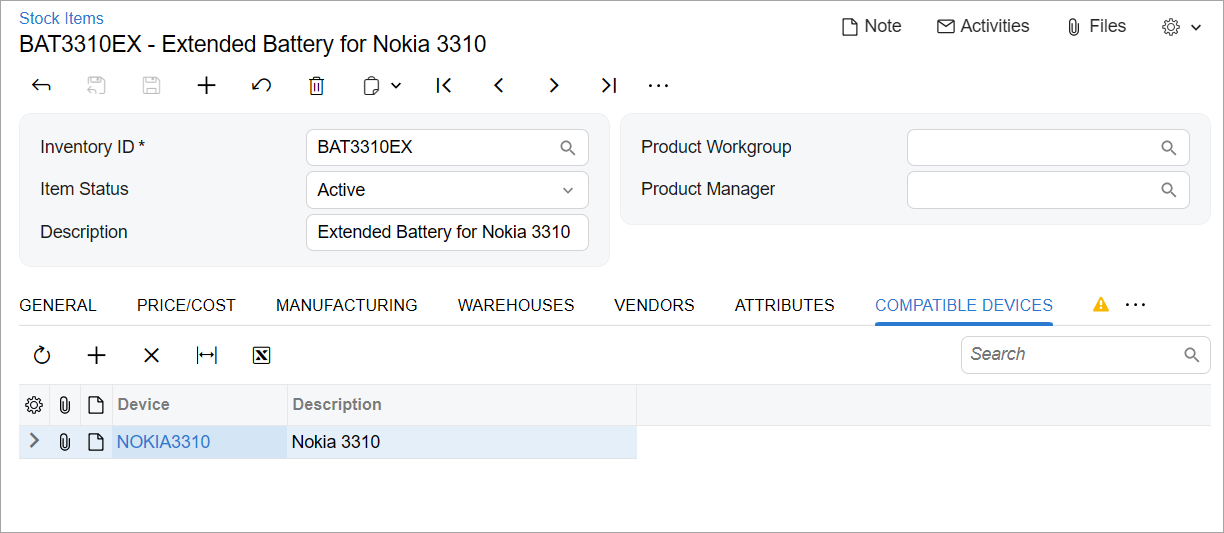
Suppose that you need to add the new Compatible Devices tab to the Stock Items (IN202500) form, as shown in the following screenshot. The tab will contain a table with the compatible serviceable devices for the selected repair item. On this tab, managers of the Smart Fix company will list the devices that can be serviced by using the item.
You have already implemented the backend of the form in the PhoneRepairShop customization project, which includes the following additions:
- The
RSSVStockItemDevicedata access class (DAC) - The CompatibleDevices data view in the InventoryItemMaint_Extension graph extension
- The RowSelected<InventoryItem> event handler in the InventoryItemMaint_Extension graph extension
You have also already added the RSSVStockItemDevice database table
to the application database.
Process Overview
You will modify the extension of the Modern UI of the Stock Items (IN202500) form in TypeScript and HTML, build the source code of the UI of the form, and test the changes.
System Preparation
Before you begin adding the tab to the UI of the Stock Items (IN202500) form, do the following:
- Complete the following prerequisite activity: Modern UI Development: To Deploy an Instance with Custom Forms and the Modern UI.
- Confirm that the prepared instance contains the following items:
- The CompatibleDevices data view and the RowSelected<InventoryItem> event handler in the InventoryItemMaint_Extension graph extension in the customization code
- The
RSSVStockItemDeviceDAC in the customization code - The
RSSVStockItemDevicedatabase table
- Complete the following prerequisite activity: Modern UI Development: To Build the Source Code of All MYOB Acumatica Forms for Modern UI Development.
- Customize the General tab of the form by performing the UI Customization Development: To Add Elements to an MYOB Acumatica Form prerequisite activity.
Step 1: Modifying the Screen Extension in TypeScript
To add a new tab to the Stock Items (IN202500) form in TypeScript, you need to modify the screen extension that you have added in UI Customization Development: To Add Elements to an MYOB Acumatica Form. Do the following:
- In the IN202500_PhoneRepairShop.ts file in the FrontendSources\screen\src\screens\IN\IN202500\extensions folder, add createCollection to the list of directives imported from client-controls.
- In the IN202500_PhoneRepairShop class, define the property
for the data view that corresponds to the table on the tab by using the
following code. Because the data view is used to display a table, you need to
initialize the property with the createCollection method. The
input parameter of this method is an instance of the view class that you will
define in the next
step.
export class IN202500_PhoneRepairShop {
    CompatibleDevices = createCollection(RSSVStockItemDevice);
}
Step 2: Defining the View Class for the Tab in TypeScript
You need to define the view class for the Compatible Devices tab of the Stock Items (IN202500) form in TypeScript. Proceed as follows:
- In the IN202500_PhoneRepairShop.ts file, add PXView, gridConfig, and GridPreset to the list of directives imported from client-controls.
- Define the
RSSVStockItemDeviceview class as follows.export class RSSVStockItemDevice extends PXView { DeviceID: PXFieldState<PXFieldOptions.CommitChanges>; DeviceID_description: PXFieldState; }For the
DeviceIDfield, changes should be committed to the server; therefore, you have used the PXFieldOptions.CommitChanges option for the property type. TheDeviceID_descriptionfield is the description that is available through the selector control of theDeviceIDfield. - Add the gridConfig decorator to the view class, as the
following code shows. In the gridConfig decorator, you must
specify the preset property. Because you need an editable
table on the tab, you use the Details
preset.
@gridConfig({ preset: GridPreset.Details }) export class RSSVStockItemDevice extends PXView { DeviceID: PXFieldState<PXFieldOptions.CommitChanges>; DeviceID_description: PXFieldState; } - Save your changes.
Step 3: Adjusting the Layout in HTML
You need to add the Compatible Devices tab after the Price/Cost tab on the Stock Items (IN202500) form. Do the following to adjust the layout in HTML:
- Review the IN202500.html file in the FrontendSources\screen\src\screens\IN\IN202500 folder, and locate the qp-tab tag inside the qp-tabbar tag that defines the Price/Cost tab. The qp-tab tag has the tab-PriceCost ID.
- In the IN202500_PhoneRepairShop.html file, add the
following code after the second field
tag.
  <qp-tab
    after="#tab-PriceCost"
    id="tab-CompatibleDevices"
    caption="Compatible Devices"
  >
    <qp-grid id="grid-CompatibleDevices" view.bind="CompatibleDevices">
    </qp-grid>
  </qp-tab>
You have inserted the tab after the last tab of the tab bar.
- Save your changes.
Step 4: Building the Source Code
Build the source code of the Modern UI of the Stock Items (IN202500) form, including the customization code, by executing the following command in the FrontendSources\screen folder.
npm run build-dev --- --env screenIds=IN202500Step 5: Testing the Changes
To test your changes, open the Stock Items (IN202500) form in the Modern UI and do the following:
- Select the BAT3310EX item and make sure that the Compatible Devices tab is displayed for it. (The tab is displayed because the Repair Item check box is selected on the General tab.)
- On the Compatible Devices tab, add the Nokia3310 device to the list.
- Save your changes.
- Select the HEADSET item and make sure that the Compatible Devices tab is not displayed for this item. (This is because the Repair Item check box is cleared.)