
UI Customization Development: To Add Elements to an MYOB Acumatica Form
This activity will walk you through the process of adding elements to an existing MYOB Acumatica form.
Story
That is, the customization of this form will include adding the following elements to the Item Defaults section of the General tab:
- The Repair Item check box, which will be used to indicate whether the selected stock item is a repair item.
- The Repair Item Type box, which will hold the repair item type to which the repair item belongs. The box will contain the following predefined options: Battery, Screen, Screen Cover, Back Cover, or Motherboard.
You have already implemented the backend of the form in the PhoneRepairShop customization project, which includes the following additions:
- Two custom field declarations in the extension of the IN.InventoryItem data access class (DAC).
- One custom event handler, which you have added to the extension of the InventoryItemMaint graph. You have used the RowSelected event handler to configure the UI presentation logic.
You have also already added the custom UsrRepairItem and
UsrRepairItemType columns to the InventoryItem
database table of the application database.
Process Overview
You will create an extension of the Modern UI of the Stock Items (IN202500) form in TypeScript and HTML, build the source code of the UI of the form, and test the changes.
System Preparation
Before you begin the customization of the UI of the Stock Items (IN202500) form, do the following:
- Complete the following prerequisite activity: Modern UI Development: To Deploy an Instance with Custom Forms and the Modern UI.
- Confirm that the prepared instance contains the following items:
- The
InventoryItemMaint_Extensiongraph extension in the customization code - The
InventoryItemExtDAC extension in the customization code - The
UsrRepairItemandUsrRepairItemTypecolumns in theInventoryItemdatabase table
- The
- Complete the following prerequisite activity: Modern UI Development: To Build the Source Code of All MYOB Acumatica Forms for Modern UI Development.
Step 1: Creating Files for the Extension
To create the Modern UI for the new UI elements on the Stock Items (IN202500) form, you need to create TypeScript and HTML files for the form.
In the FrontendSources\screen\src\screens\IN\IN202500\extensions folder, create the following files:
- IN202500_PhoneRepairShop.ts
- IN202500_PhoneRepairShop.html
Step 2: Extending the Screen Class in TypeScript
To customize the Stock Items (IN202500) form in TypeScript, you need to extend the screen class of the form. Do the following:
- In the IN202500_PhoneRepairShop.ts file, add the following import directive. The directive imports the IN202500 class, which is the screen class of the Stock Items form.
import { IN202500, } from "src/screens/IN/IN202500/IN202500"; - Define the interface that extends the IN202500 screen class of the form and the class with the same name as the interface name as follows.
export interface IN202500_PhoneRepairShop extends IN202500 { }
export class IN202500_PhoneRepairShop {

}
Step 3: Extending the View Class in TypeScript
To add elements to the Item Defaults section of the General tab of the Stock Items (IN202500) form in TypeScript, you need to extend the view class that provides data for the Item Defaults section. Proceed as follows:
- Review the IN202500.html file in the
FrontendSources\screen\src\screens\IN\IN202500 folder.
You can see that the property for the view class for the Item
Defaults section of the General tab of
the form is ItemSettings, as shown in the following
screenshot.
Figure 2. The property for the view class 
In the IN202500.ts file in the same folder, find the name of the view class that corresponds to this property (see the following screenshot).
Figure 3. The view class 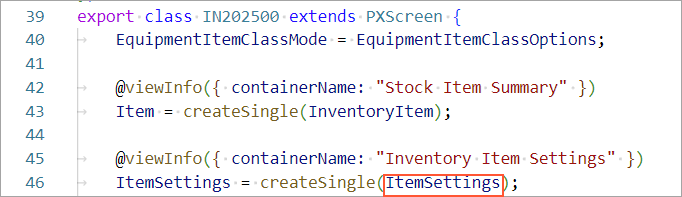
- In the IN202500_PhoneRepairShop.ts file, update the list of
import directives, as the following code
shows.
import { IN202500, ItemSettings } from "src/screens/IN/IN202500/IN202500"; import { PXFieldState, PXFieldOptions, } from "client-controls"; - Add an interface and a class for the extension data view as
follows.
export interface ItemSettings_PhoneRepairShop extends ItemSettings { } export class ItemSettings_PhoneRepairShop {} - In the
ItemSettings_PhoneRepairShopclass, specify the properties for theUsrRepairItemandUsrRepairItemTypefields of the data view, as shown below. You use the name of the data field as the property name.export class ItemSettings_PhoneRepairShop { UsrRepairItem: PXFieldState<PXFieldOptions.CommitChanges>; UsrRepairItemType: PXFieldState; }For the
UsrRepairItemfield, changes should be committed to the server; therefore, you have used the PXFieldOptions.CommitChanges option for the property type. - Save your changes.
Step 4: Adjusting the Layout in HTML
You need to add two elements after the Item Type box in the Item Defaults section of the General tab of the Stock Items (IN202500) form. Do the following to adjust the layout in HTML:
- Review the IN202500.html file in the
FrontendSources\screen\src\screens\IN\IN202500 folder
once again. You can see that the ItemType field is located in
the fieldset with the fsItemDefaults-General ID, as shown in the
following screenshot.
Figure 4. The ID of the fieldset 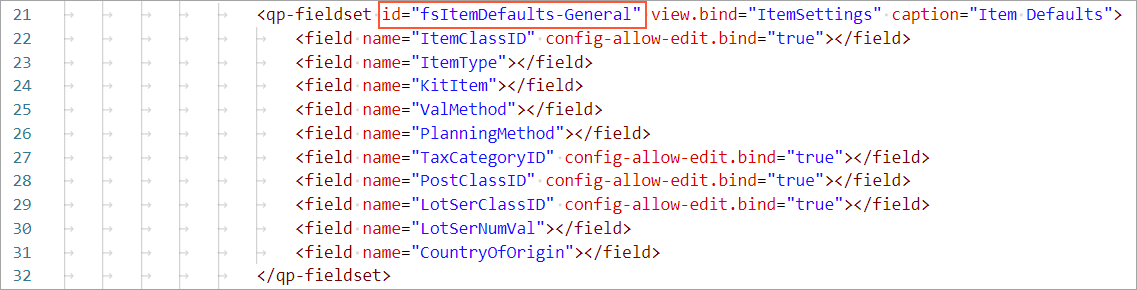
- In the IN202500_PhoneRepairShop.html file, which you have
created earlier in this activity, add the following
code.
<template>
  <field
    after="#fsItemDefaults-General [name='ItemType']"
    name="UsrRepairItem"
  ></field>
  <field
    after="#fsItemDefaults-General [name='UsrRepairItem']"
    name="UsrRepairItemType"
  ></field>
</template>
You have inserted the
UsrRepairItemfield after theItemTypefield of thefsItemDefaults-Generalfieldset, and theUsrRepairItemTypefield after theUsrRepairItemfield. - Save your changes.
Step 5: Building the Source Code
Build the source code of the Modern UI of the Stock Items (IN202500) form, including the customization code, by executing the following command in the FrontendSources\screen folder.
npm run build-dev --- --env screenIds=IN202500Step 6: Testing the Changes
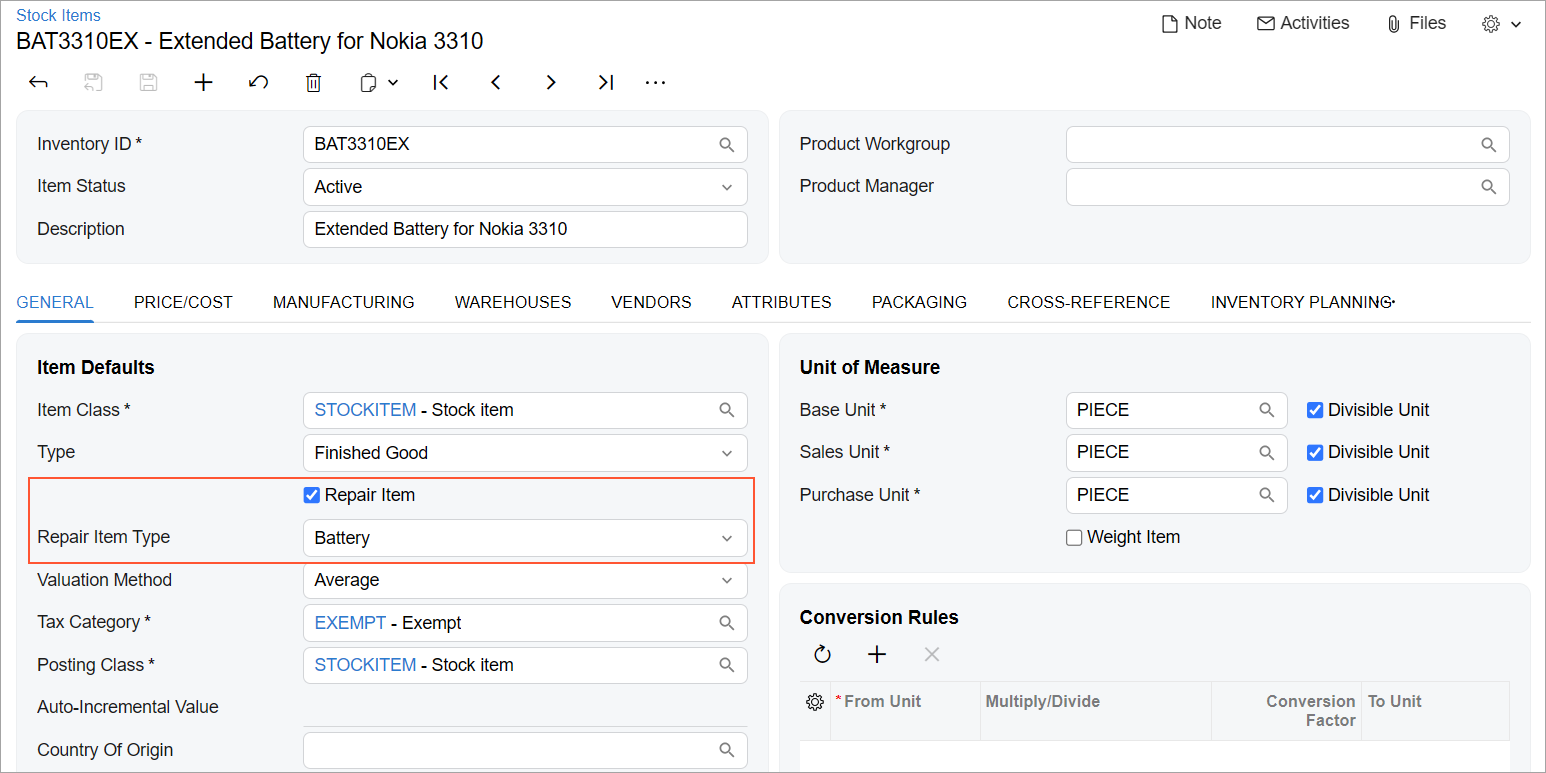
To test your changes, open the Stock Items (IN202500) form and do the following:
- While you are on the Classic UI of the form, click on the form title bar.
- Select the BAT3310EX item.
- Make sure that the Repair Item Type box in the Item Defaults section of the General tab is available because the Repair Item check box is selected.
- Clear the Repair Item check box and make sure that the Repair Item Type box becomes unavailable for editing. This functionality is implemented in the custom event handler in the backend code.
- Do not save your changes.