
Date and Time Control: Configuration
In this topic, you can learn how to adjust a date and time control.
Date and Time Control Definition
To define a date and time control, in the data access class (DAC), you need to add one of the date and time attributes (such as PXDate, PXDateAndTime, PXDBDate, PXDBTime, or PXDBDateAndTime) to the property field, as shown in the following code.
public abstract class effectiveAsOfDate :
  PX.Data.BQL.BqlDateTime.Field<effectiveAsOfDate> { }
[PXDBDate]
[PXUIField(DisplayName = "Effective As Of")]
public virtual DateTime? EffectiveAsOfDate { get; set; }
In the TypeScript and HTML code, you then define a field with no additional settings specified. For details, see UI Definition in HTML and TypeScript: General Information.
Separate Boxes for Date and Time
<field name="ContactsExportDate_Date">
  <qp-field
    class="col-3 no-label"
    control-state.bind=
      "EmailSyncAccountFilter.ContactsExportDate_Time"
    config-time-mode.bind="true">
  </qp-field>
</field>
Input Mask and Display Mask
The date and time mask configuration are taken from the locale preferences and do not require any additional setup. However, if you need to specify the input mask and the display mask, you specify the value of the InputMask or DisplayMask property of the date and time attribute that is assigned to the DAC property field. You use the standard and custom date and time format strings.
public abstract class parameter1 :
  PX.Data.BQL.BqlDateTime.Field<parameter1> { }
[PXDateAndTime(DisplayMask = "D", InputMask ="d")]
[PXUIField(DisplayName = "Parameter 1")]
public virtual DateTime? Parameter1 { get; set; }
Relative Dates
The date and time control can display relative dates—that is, values such as @Today or @WeekStart (shown below).
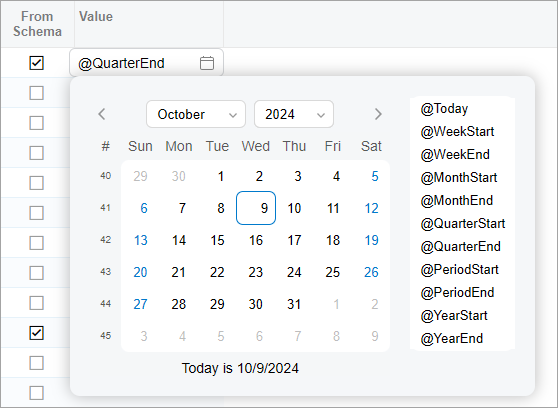
To specify that a user can enter relative dates in the control, you need to implement the RowSelected event handler. In the event handler, you call the PXDatetimeFieldState.showRelativeDates method to indicate that the values are allowed.
An example of such a handler is shown in the following code.
@handleEvent(CustomEventType.RowSelected, { view: "Rules" })
  onEPRuleConditionSelected(
    args: RowSelectedHandlerArgs<PXViewCollection<EPRuleCondition>>)
{
    const ar = args.viewModel.activeRow;

    ar.Value?.to(PXDatetimeFieldState).showRelativeDates();
}