Snapshots: To Take, Restore, and Delete a Snapshot
The following activity will walk you through the process of taking, restoring, and deleting a snapshot for the tenants of an instance.
Story
Suppose that the SweetLife Fruits & Jams company has a new hire, Alberto Jimenez, who should complete a training course during his probation period. To complete the training, the new employee needs a copy of the production tenant. Acting as a system administrator, you need to create a test tenant for the new employee. To save space, you will take a snapshot whose content is limited to the settings and business accounts of the production tenant, instead of copying all production data of the tenant. You will toggle the visibility of the snapshot and restore this snapshot for the test tenant. Then you will delete the snapshot.
Process Overview
You will use the Tenants (SM203520) form to create a test tenant. Then you will create a snapshot whose content is limited to settings and business accounts. You will toggle the snapshot's visibility and restore the snapshot to the test tenant.
On the same form, you will then delete the snapshot.
System Preparation
Launch the MYOB Advanced website, and sign in to the tenant with the U100 dataset preloaded (that is, the tenant you created for the course) as the system administrator by using the gibbs username and the 123 password.
Step 1: Creating a New Tenant
To create a new tenant, do the following:
- On the Tenants (SM203520) form, add a new record.
- In the Tenant Name box of the Summary area, type JimenezF100.
- In the Login Name box, type JimenezF100.
- On the form toolbar, click Save. Wait for the system to
complete the operation.Tip:
When you create a system tenant, you may or may not be signed out after its creation, depending on how many non-System tenants your MYOB Advanced instance has before the creation of the new tenant. When you have one non-System tenant (to which you are signed in) and you create a new one, the system signs you out to switch from single-tenant mode to multitenant mode. When the instance has more than one non-System tenant and you create another, it is already in multitenant mode. Instead of being signed out, you wait until the system completes the operation and then proceed.
- Reload the webpage.
- By using the User menu (on the right side of the top pane), switch to the JimenezF100 tenant.
- Verify that a few default workspaces are available in the tenant, as shown in
the following screenshot.
Figure 1. The new tenant with the default workspaces 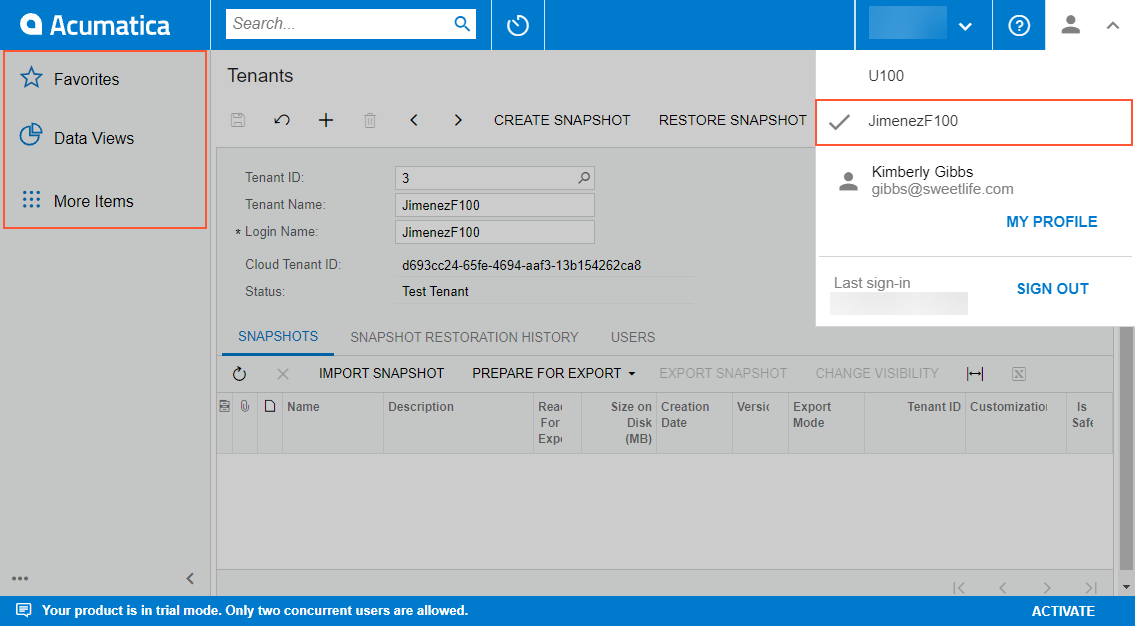
Step 2: Creating a Snapshot and Toggling Its Visibility
To create a snapshot for the new employee, do the following:
- While you are remaining on the Tenants (SM203520) form, use the User menu to switch to the U100 tenant.
- In the Tenant ID box of the Summary area, select the tenant with the U100 dataset preloaded (that is, the tenant you have created for performing the activities of this course).
- On the form toolbar, click Create Snapshot.
- In the Warning dialog box, which opens, click OK.
- In the Create Snapshot dialog box, specify the following
settings:
- Description: Snapshot for Jimenez
- Export Mode: Settings and Business Accounts
- Click OK. Wait for the system to complete the operation.
The system adds the record with the summary information of the snapshot to the
Snapshots tab. Notice that the tenant name in the
Tenant ID column is the name of the tenant used as
the source (see the following screenshot).
Figure 2. Name of the source tenant specified for the snapshot 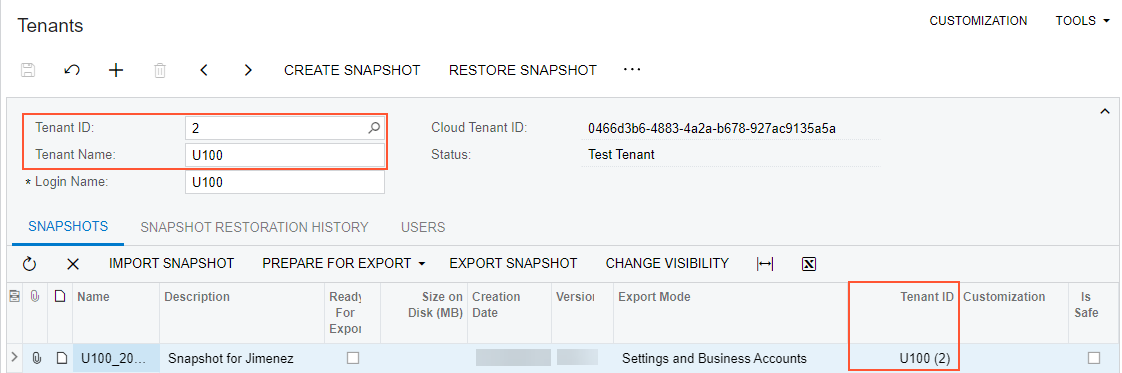
- On the table toolbar of the Snapshots tab, click
Change Visibility, and verify that the
Tenant ID column is empty for the snapshot. This
indicates that the snapshot has increased visibility. Tip: If no tenant is specified for a snapshot in the Tenant ID column on the Snapshots tab, the snapshot is available for export or restoration regardless of the tenant that you select in the Tenant ID box of the Summary area.
Step 3: Restoring the Snapshot
To restore the snapshot, do the following:
- While you are still on the Tenants (SM203520) form, open the JimenezF100 tenant.
- Verify that the snapshot with the Snapshot for Jimenez description is displayed for this tenant on the Snapshots tab.
- On the form toolbar, click Restore Snapshot.
- In the Warning dialog box, which opens, click Yes.
- In the Restore Snapshot dialog box, which opens, click OK. Wait until the system completes the snapshot restoration.
- Notice the list of workspaces in the source tenant (the one to which you are currently signed in).
- On the User menu, switch to the JimenezF100 tenant.
- Verify that the tenant has the same set of workspaces as the source tenant does,
as shown in the following screenshot.
Figure 3. A test tenant with the data from the restored snapshot 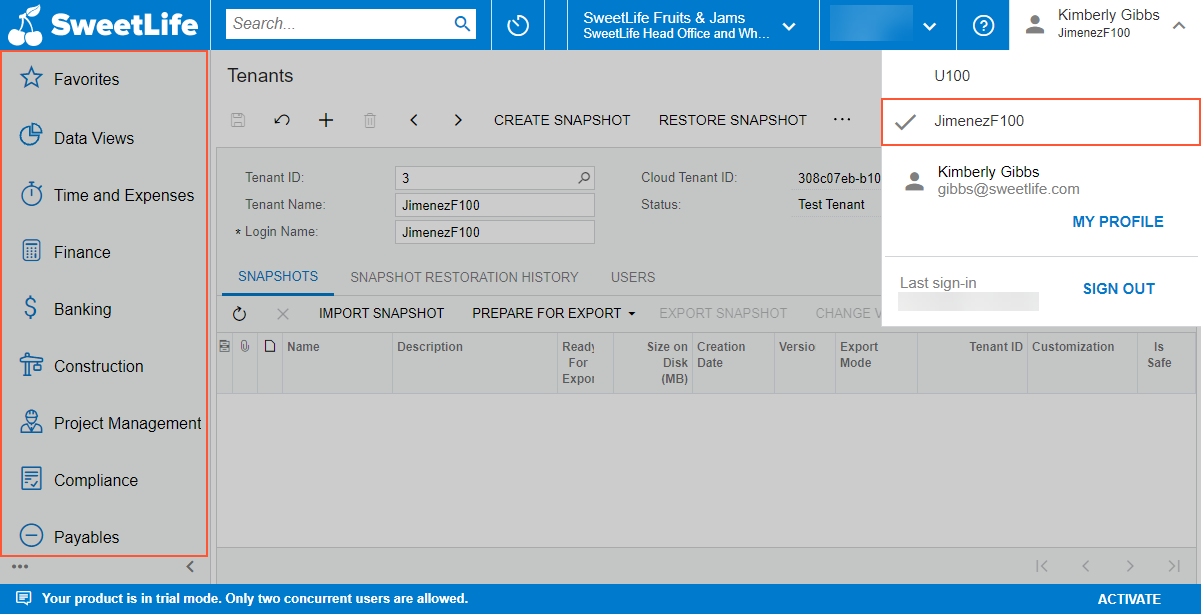
Step 4: Deleting the Snapshot
To delete the snapshot, do the following:
- On the User menu, switch to the tenant with the U100 dataset preloaded (the tenant you have created for this course).
- Open the Delete Snapshots and Tenants (SM503000) form.
- In the Action box in the Selection area, select Delete Snapshot.
- In the Included column, select the check box in the row with the snapshot you want to delete.
- On the form toolbar, click Process. Wait for the system to complete the operation.
- In the Processing dialog box, which opens, click Close.
In this activity, you have created a snapshot whose content is limited to settings and business accounts. Then you toggled the snapshot visibility, restored it to the test tenant, and deleted the snapshot.