Billing Rates: To Configure Employee- and Item-Specific Rates
In this activity, you will learn how you can define complex billing rates with rate tables that define different rates for different services, and for the same services provided by different employees.
Story
Suppose that the West BBQ Restaurant customer has ordered the service of juicer installation from the SweetLife Fruits & Jams company, along with the service of employee training on operating the juicer. The juicer has been installed. Also, Alberto Jimenez, a junior consultant, has provided two hours of training, and Todd Bloom, a senior consultant, has provided six hours of training. All of the project tasks must be billed at different rates. The installation work is provided at a price of $110 per hour; the accompanying installation work is provided at a price of $90 per hour. The standard rate of training, which applies to junior consultants, is $50 per hour, but the rate for the training provided by senior consultants, which is $60 per hour, must be set up.
Acting as the project accountant, Pam Brawner, you need to configure the rate table that will provide billing rates based on a combination of various settings.
Configuration Overview
In the U100 dataset, the following tasks have been performed for the purposes of this activity:
- On the Enable/Disable Features (CS100000) form, the Project Accounting feature has been enabled to provide the project accounting functionality.
- On the Project Tasks (PM302000) form, the INSTALL and TRAINING project tasks have been defined.
- On the Non-Stock Items (IN202000) form, the INSTALL and TRAINING non-stock items have been created.
- On the Employees (EP203000) form, the EP00000002 – Todd Bloom employee record has been created.
Process Overview
In this activity, you will create a rate type on the Rate Types (PM204100) form. Then on the Rate Lookup Rules (PM205000) form, you will define a rate sequence and the combination of settings that will be used for searching for the applicable billing rate. Then you will configure the rate table on the Rate Tables (PM206000) form and specify rate values for the different combinations of parameters. Finally, on the Billing Rules (PM207000) form, you will configure a billing rule that uses the rate table with the applicable billing rates.
System Preparation
Before you start configuring billing rates, you need to launch the MYOB Advanced website and sign in to a company with the U100 dataset preloaded. You should sign in as the project accountant by using the brawner username and the 123 password.
Step 1: Creating Rate Table and Rate Sequences
To create a rate table and specify rate sequences with item-specific and employee-specific billing rates, do the following:
- On the Rate Types (PM204100) form, click Add
Row on the form toolbar, and specify the following settings in
the row:
- Rate Table: TASKLABOR
- Description: Billing rate for installation and training
- Save the added rate type.
- On the Rate Lookup Rules (PM205000) form, add a new rate sequence
with the following settings:
- Rate Table: STANDARD
- Rate Type: TASKLABOR
- Click Add Row on the table toolbar, and specify the
following settings in the added row:
- Sequence: 1
- Description: Installation of juicers
- Project Task: Selected
- Inventory: Selected
- Again click Add Row on the table toolbar, and specify the
following settings in the row:
- Sequence: 2
- Description: Billing rates for other installation work
- Project Task: Selected
- Again click Add Row on the table toolbar, and specify the
following settings in the row:
- Sequence: 3
- Description: Training for employees
- Project Task: Selected
- Inventory: Selected
- Employee: Selected
- Again click Add Row on the table toolbar, and specify the
following settings in the row:
- Sequence: 4
- Description: Other work on training
- Project Task: Selected
The rate sequences should look as shown in the following screenshot.
Figure 1. The rate lookup rule 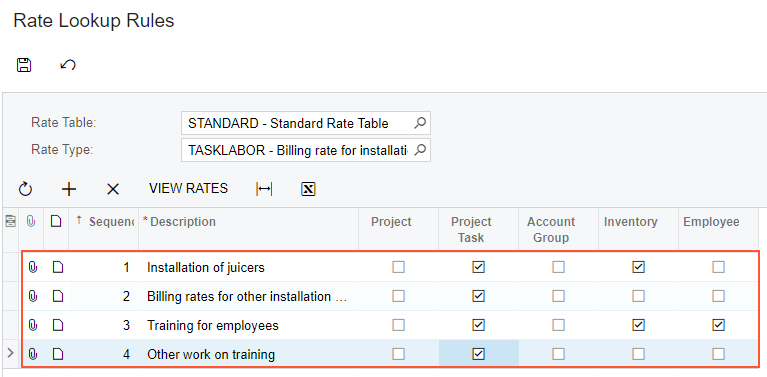
- Save the rate sequences you have created.
Step 2: Specifying Billing Rates
To specify billing rates for different groups of settings, do the following:
- On the Rate Tables (PM206000) form, to configure the labor
rates for installation work, do the following:
- In the Summary area, specify the following settings:
- Rate Table: STANDARD
- Rate Type: TASKLABOR
When you select the rate type, the system automatically inserts 1 as the Sequence.
- Rate Code: TASKLABOR
- Description: Labor rates for installation
- On the Rate tab, click Add
Row on the table toolbar, and specify the following
settings in the row:
- Start Date: 1/1/2023
- Rate: 110.00
- On the Tasks tab, on the table toolbar, click Add Row, and in the row, select INSTALL as the Project Task.
- On the Inventory tab, on the table toolbar, click Add Row, and in the row, select INSTALL as the Inventory ID.
- Save the rate table.
- In the Summary area, specify the following settings:
- To configure the rates for the other installation work, do the following:
- On the form toolbar, click Add New Record, and in
the Summary area, specify the following settings:
- Sequence: 2
- Rate Code: TASKLABOR
- Description: Labor rates for other installation work
- On the Rate tab, click Add
Row on the table toolbar, and specify the following
settings in the added row:
- Start Date: 1/1/2023
- Rate: 90.00
- On the Tasks tab, on the table toolbar, click Add Row, and in the row, select INSTALL as the Project Task.
- Save the rate table.
- On the form toolbar, click Add New Record, and in
the Summary area, specify the following settings:
- To configure the billing rates for training, do the following:
- On the form toolbar, click Add New Record, and in
the Summary area, specify the following settings in the Summary area:
- Sequence: 3
- Rate Code: TASKLABOR
- Description: Labor rates for training
- On the Rate tab, click Add
Row on the table toolbar, and specify the following
settings in the row:
- Start Date: 1/1/2023
- Rate: 60.00
- On the Tasks tab, on the table toolbar, click Add Row, and in the row, select TRAINING as the Project Task.
- On the Inventory tab, on the table toolbar, click Add Row, and in the row, select TRAINING as the Inventory ID.
- On the Employee tab, on the table toolbar, click Add Row, and in the row, select EP00000002 (Todd Bloom) as the Employee ID.
- Save the rate table.
- On the form toolbar, click Add New Record, and in
the Summary area, specify the following settings in the Summary area:
- To configure rates for other training work, do the following:
- On the form toolbar, click Add New Record, and in
the Summary area, specify the following settings:
- Sequence: 4
- Rate Code: TASKLABOR
- Description: Labor rates for other training work
- On the Rate tab, click Add
Row on the table toolbar, and specify the following
settings in the row:
- Start Date: 1/1/2023
- Rate: 50.00
- On the Tasks tab, on the table toolbar, click Add Row, and in the row, select TRAINING as the Project Task.
- Save the rates.
- On the form toolbar, click Add New Record, and in
the Summary area, specify the following settings:
Step 3: Creating a Billing Rule
To create a billing rule that uses the employee- and item-specific billing rates that you have configured, do the following:
- On the Billing Rules (PM207000) form, add a new record, and
enter the following settings in the Summary area:
- Billing Rule ID: TASKLABOR
- Description: Time and material with @Rate
- In the left pane, click Add Row on the table toolbar, and
specify the following settings in the row:
- Step ID: 10
- Description: Installation and training
- In the right pane, specify the following settings for the step selected in the
left pane:
- Billing Type: Time and Material
- Account Group: LABOR
- Rate Type: TASKLABOR
- If @Rate is Not Defined: Raise Error
If no rate has been found, the corresponding project transaction will not be presented in the invoice. With the Raise Error option selected, the error is raised during billing. This prevents project costs from being omitted.
- Invoice Description Formula: ='Invoice for '+[PMProject.ContractCD]
- Line Quantity Formula:
=[PMTran.BillableQty]
The invoice line quantity will be equal to the project transaction line quantity.
- Line Amount Formula:
=[PMTran.BillableQty]*@Rate
The amount of the invoice line is calculated as the billable quantity of the project transaction line multiplied by the corresponding rate value.
- Line Description Formula: =[PMTran.Description]
- Use Sales Account From: Billing Rule
- Sales Account: 40000 - Sales Revenue
- Create Lines with Zero Amount and Quantity: Cleared
- Save the billing rule.
You have configured billing rates that are based on various settings and a billing rule that will use these rates for billing.
To bill a project that will use these rates, perform the Billing Rates: To Bill a Project with Employee-Specific Rates activity.