The following activity will walk you through the process of adding a section to a tab
of a form and then adding UI elements to this section.
Story
Suppose that management has determined that MYOB Acumatica would better fit the needs of your company if employees could find a customer's
currency settings more easily on the Financial tab of the
Customers form. You need to organize the
currency-related UI elements on this tab so that they are grouped in a new
Currency section, which should be placed below the
Financial Settings section on the tab.
By using the control tree of the Screen Editor page, you will do the following:
Add a new Currency section, and move the
Currency ID, Curr. Rate Type,
Enable Currency Override, and Enable Rate
Override boxes to it.
Move the Pay by Line check box above the
Currency section and below the Apply
Overdue Charges box. You will also move the Enable
Write-Offs check box next to the Write-Off
Limit box.
You will then publish the customization project. Finally, you will
test the new layout on the Customers form.
System Preparation
Before you begin performing the steps of this activity, do the following:
Prepare an MYOB Acumatica instance by performing the Customization Projects: To Deploy an Instance
prerequisite
[1]Tatiana.DavydovaThis activity includes signing-in, change of password, and branch selection2023/09/2014:32:06+03:00activity.
On the page toolbar, click Customize Existing
Screen.
The Customize Existing Screen
dialog box opens.
In the Select Screen box of the dialog box, click the
magnifier button. In the lookup table, type CR303000 in
the Search box, and double-click the Customers form.
Click OK to close the dialog box.
The Customers (AR303000) form is
added to the list of forms on the Customized Screens page, and the Screen Editor: CR303000 (Customers page opens.
Step 2: Adding Section
Elements
To add a new Currency section to the
Financial tab of the Customers (AR303000) form, do the following:
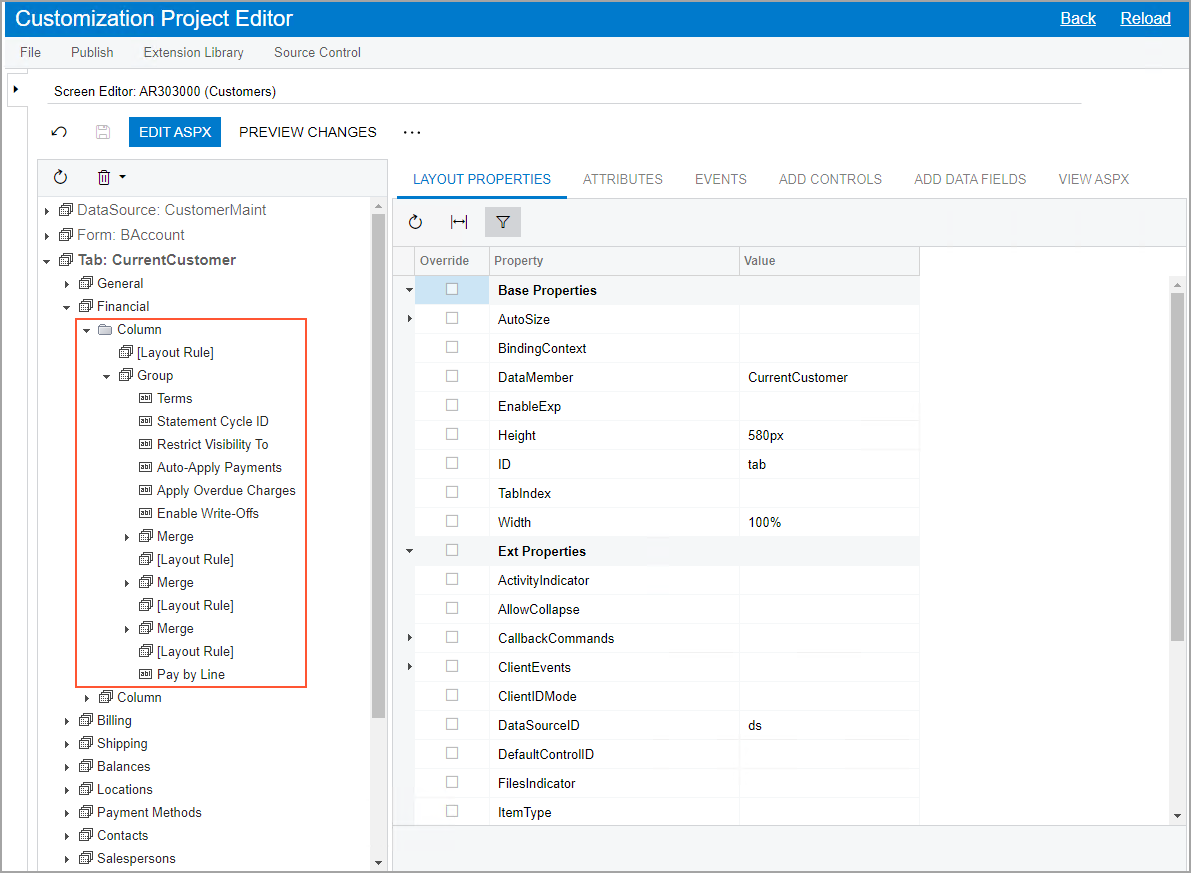
In the control tree of the page, expand the Tab:
CurrentCustomer node and then the
Financial node.
The elements of the
Financial tab are organized into two columns with
the Column layout rule (as shown by the two
Column nodes beneath the
Financial node).
Expand the first Column node, and then the first
Group node to view the elements inside it (see the
following screenshot).Figure 1. Elements of the first Column node [2]TanyaRemoved:
The elements of the GL Accounts tab are organized into one column by using the Column layout rule. Some of the elements are in the Form: DefLocation element, which also contains the Column element but appears in the same column. This is because the Column elements are nested: The Column element in the Form:DefLocation node organizes the elements of the Form:DefLocation container into a single column.2021/09/1414:36:49+03:00
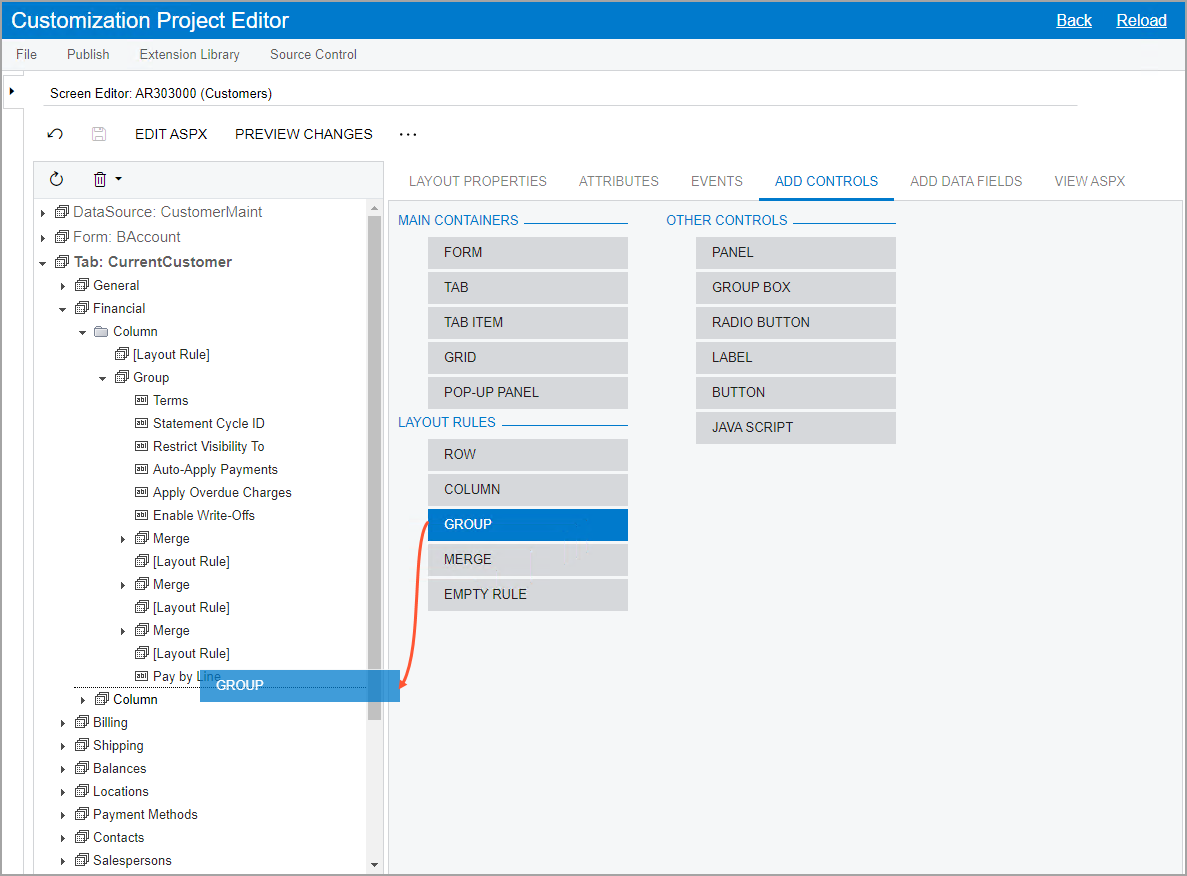
On the Add Controls tab, drag a
Group element (in the Layout
Rules section) to the control tree and place it after the
Group element of the Financial
node, as shown in the following screenshot. Figure 2. The Group element being dragged
A group in the control tree defines a section on the tab of a
form.
On the Add Controls tab, drag a
Merge element onto the Group
element that you added.
Drag another Merge element to the
Group element you added. (You need to add two
Merge elements.)
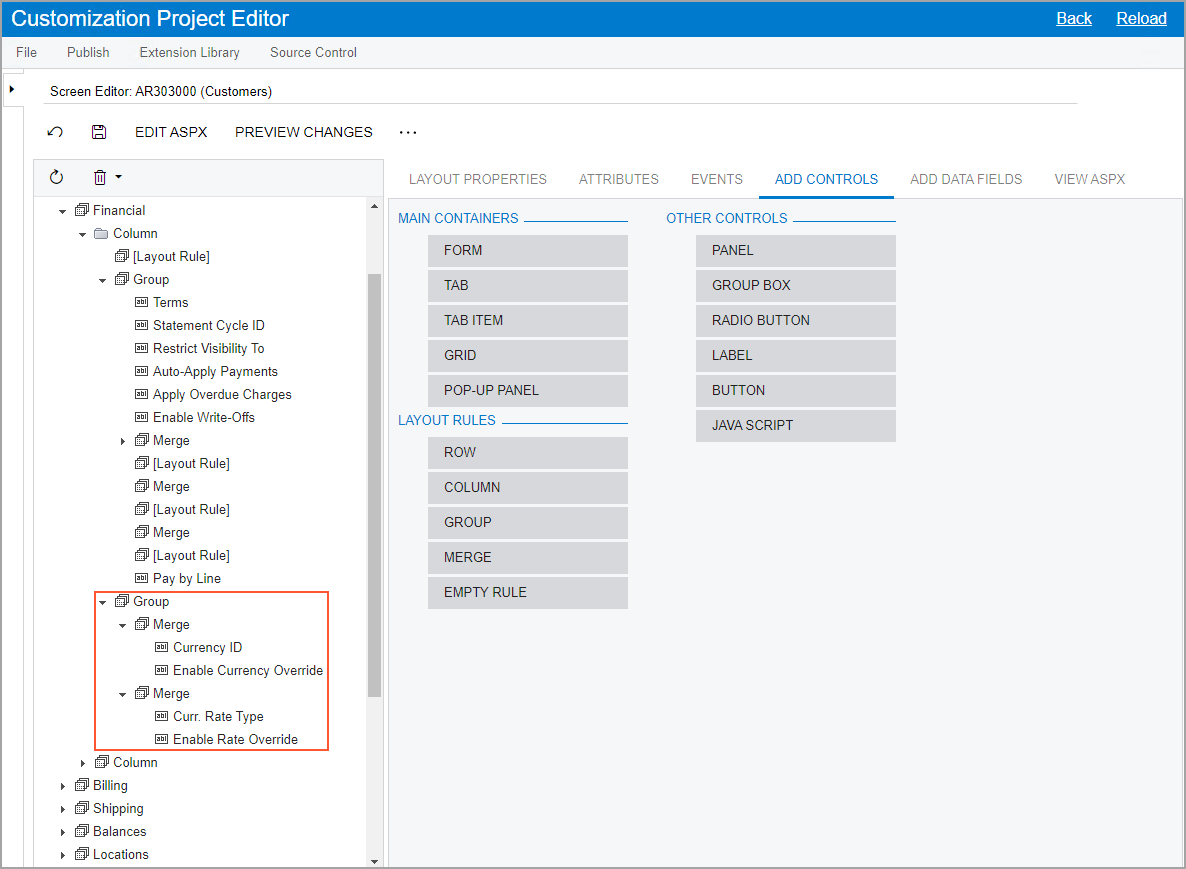
In the control tree, drag the following elements from the second
Merge element of the first
Group node of the Financial
node to the first added Merge element in the second
Group node (see the screenshot below):
Currency ID
Enable Currency Override
In the control tree, drag the following elements from the third
Merge element of the first
Group node of the Financial
node to the second added Merge element in the second
Group node (see the screenshot below):
Curr. Rate Type
Enable Rate Override
Figure 3. The relocated elements of the second Group node
Specify the name of the Group element that you have added
as follows:
In the control tree, click the Group
element.
On the Layout Properties tab, enter
Currency as the
GroupCaption property value.
Save your changes.
Step 3: Adjusting the
Position of the Added Elements
While you are still working on the Screen Editor page
for the Customers (AR303000) form, you need to
adjust the positions of the added elements as follows:
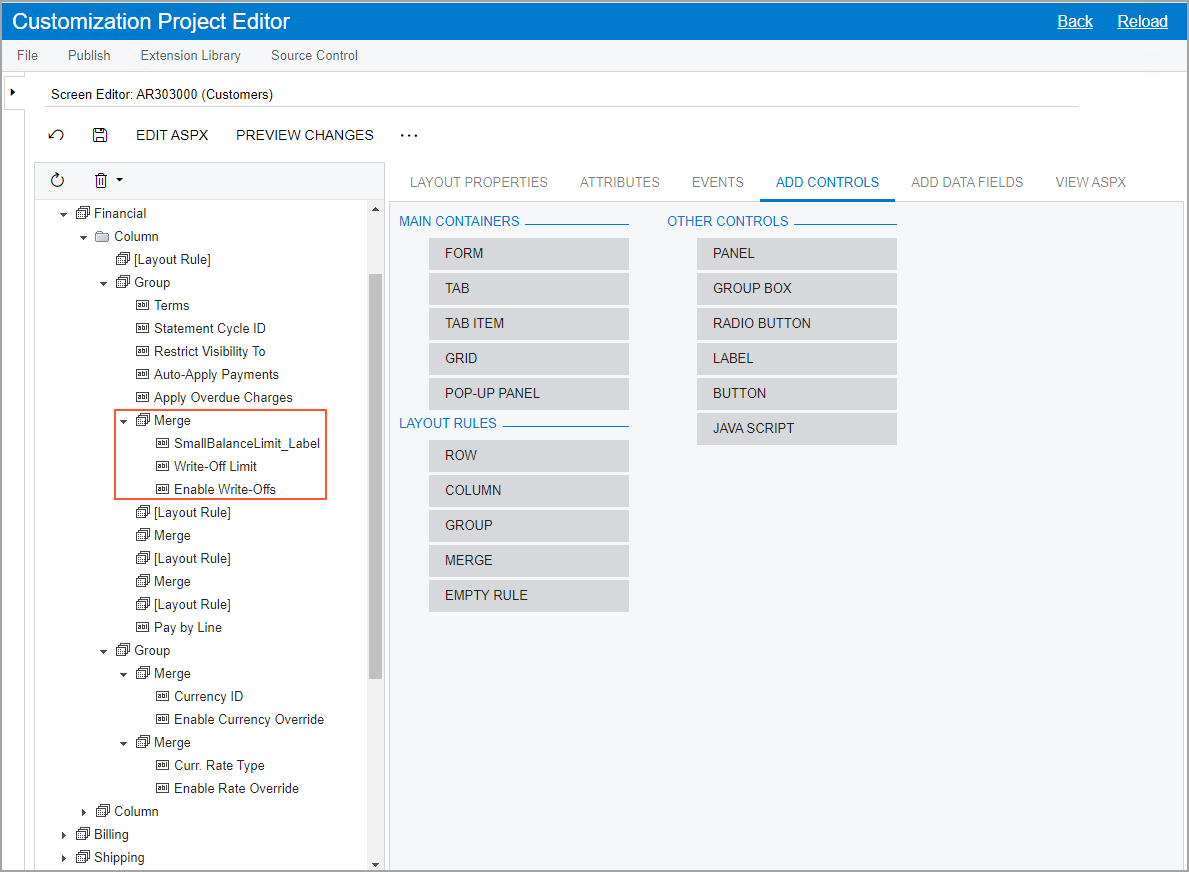
In the Financial node of the control tree, drag the
Enable Write-Offs element from the first
Group node to the first Merge
element in the same node, and place the Enable Write-Offs
element below the Write-Off Limit element, as shown in
the following screenshot.Figure 4. The relocated elements of the first Merge node
In the control tree, drag the Pay By Line element, and
place it below the Apply Overdue Charges element.
Remove each empty Merge and [Layout
Rule] elements by clicking the element and then clicking
Remove on the control tree toolbar.
On the page toolbar, click
Save.
To preview the resulting layout, click Preview Changes on
the page toolbar.
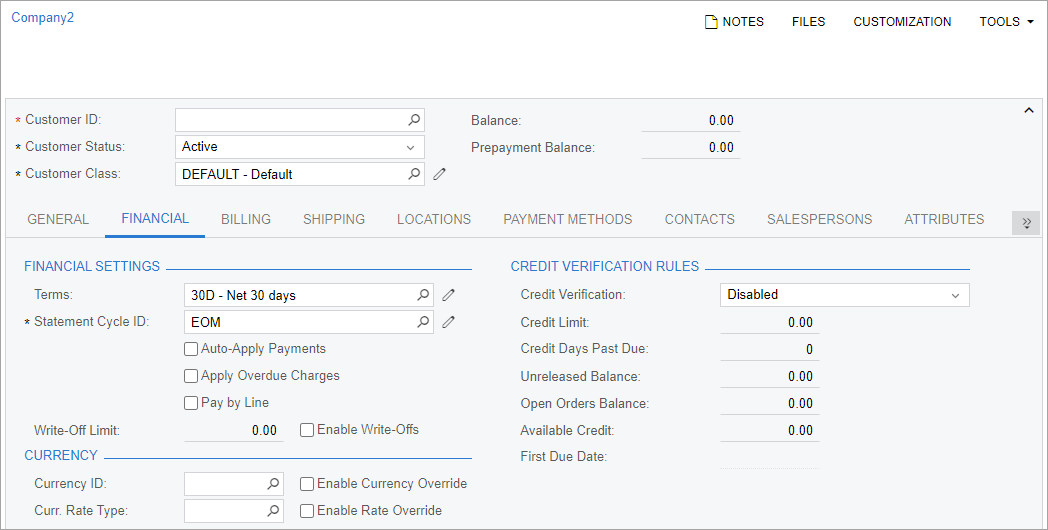
The Financial tab of the Customers form should look as shown in the
following screenshot.
Figure 5. The Financial tab
To apply the changes to the instance, on the main menu of the Customization
Project Editor, click Publish > Publish Current Project.
Wait until the Website updated row appears in the
Compilation pane, and click Close
Compilation Pane.
Step 4: Testing the
Layout
Now that you have published the customization project, you can test the layout on the
Customers (AR303000) form of MYOB Acumatica by doing the following:
Open the record with the C000000001 customer ID.
Important: If
the record is already open, refresh the page.
On the Financial tab, review the layout and make sure
that the following criteria are met:
The Currency section contains the following
elements:
The Currency ID box
The Curr. Rate Type box
The Enable Currency Override check
box
The Enable Rate Override check box
The Financial Settings section has the elements
grouped as follows:
The Pay by Line check box is located
below the Apply Overdue Charges check
box.
The Enable Write-Offs check box is
located to the right of the Write-Off
Limit box.