
- Contents
- Index
- Search

Show results that include all search words
M-Powered Invoices
MYOB M-Powered Invoices is an invoicing tool that lets you access a variety of customer-friendly payment options. Using M-Powered Invoices, your debtors can pay you via BPAY®, credit card online or by phone, or any Australia Post outlet. The M-Powered Invoices process works as follows:
-
MYOB EXO Business is set up to use M-Powered services.
-
M-Powered Invoices are generated and sent to Debtors.
-
Debtors make payments, which are processed by MYOB.
-
Customer Payments files are supplied by MYOB, so that payments can be imported into EXO Business as Debtor Payments.
Note: The M-Powered Invoices service is only available in Australia.
Setting up M-Powered Invoices
M-Powered Invoices must be set up before the feature can be used in MYOB EXO Business.
It is highly recommended that you use the latest EXO Business Installer to set up program files. If you just copy the executables manually, it is easy to miss out additional files that are necessary to connect to the M-Powered services database. If you run the EXO Business Installer, these files will be copied to the right location automatically.
Also, the registered company name in the EXO Business Configurator cannot contain any characters that Windows would not allow for a filename, i.e. \ / : * ? ," |
The reason for this is that the first time an M-Powered Services database is created from EXO Business, it will create a .box file to hold the M-Powered database. This box file will have a name that matches the Company Name recorded in the EXO Business Configurator at Company > Company Details.
If you need to change you company name, contact the MYOB licensing department for new EXO Business registration codes and also contact the M-Powered Services team for the new licensing and user login codes.
Activating M-Powered Options
Select Setup > M-Powered Details.
Note: If this menu option is not available, you may need to add it using the EXO Business Configuration Assistant at Staff > Menus.
The MYOB M-Powered Services window appears:
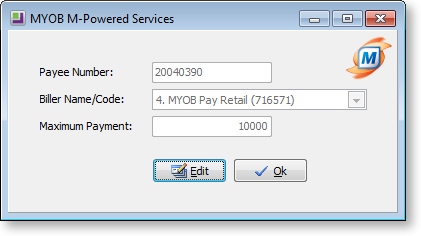
If you do not have an M-Powered Payee Number, click the Sign Up button to open a web browser to the MYOB M-Powered Services signup page.
If you have a Payee Number, click the Edit button to make the fields on this window editable.
|
Field |
Description |
|
Payee Number |
Enter the Payee Number you obtained when you signed up for MYOB M-Powered Services. |
|
Biller Name/Code |
Select the Biller Name or Biller Code to be used on M-Powered Invoices. This appears in the "How to Pay" section of the invoice. |
|
Maximum Payment |
This optional value applies to credit card transactions only, and is the maximum payment amount per invoice. |
Set up Debtors
For all Debtor accounts that you want to use M-Powered Invoices:
-
Open the Debtor account and select the Details 2 tab.
-
Select "M-POWERED" for the Invoice Type property.
Alternatively, all Debtor accounts can be set to "M-POWERED" by enabling a profile setting (see below).
Set up Profiles
The following profile settings can be configured in the EXO Business Configuration Assistant to customise M-Powered Invoices:
-
Enable MYOB M-Powered invoice as the default invoice type for all accounts (Company profile) - If this option is ticked, all Debtor accounts have their Invoice Type set to "M-POWERED".
-
Default payment type for import of M-Powered Invoice data (User profile) - Select the default Payment Type for payments that are imported as Customer Payments.
Generating M-Powered Invoices
M-Powered Invoices are generated in the same way as standard Debtors Invoices.
The invoices contain an extra "How To Pay" section, which gives the Debtor instructions for how to pay the invoice.

Importing Customer Payments
You will receive two Customer Payments files by email, detailing all payments made by your Debtors, and the total amount credited to your nominated bank account:
- An M-Powered Payment File, with an extension of .MYC.
- A Payment Advice file in PDF format. This file lists each payment received and the invoice it relates to.
To import the payments into EXO Business as Debtor Payments:
-
Save the two Customer Payments files to a convenient location.
-
Click the M-Powered button at the top of the window.
-
Browse to the location of the .MYC file that you want to import. Select it and click OK.
-
All valid transactions are automatically imported and appear on the Debtors Payment/Receipt Batch Entry window.
Note: If any invoice numbers in the .MYC file are not found by the import function, a window detailing the unsuccessful imports appears. Click the Print button to produce a hard copy for your records, and then click the Close button to continue with the accepted transactions. If you want to reject the entire import, then click the Cancel button on the main window's toolbar.
-
Change the General Ledger code of the Bank Account if you need to. This will have defaulted to the GL code specified in the Payment Group that the "M-POWERED" Payment Type belongs to.
Note: Payment Groups and Payment Types are set up in the EXO Business Configuration Assistant.
-
Check the Post to GL box if you want to post the transactions to the General Ledger when you save this batch, or leave it clear to post the transactions to the Debtors Ledger only now, and defer the posting to GL.
-
Check the Auto Allocate box to automatically allocate payments which match by value. Payments which do not match by value will invoke the Allocation window.
-
Click the Save button to save the batch.
Note: As an alternative to importing payments from the .MYC file, you can enter them manually by clicking the New button and entering the information from the Payment Advice file. This method is intended for backup or troubleshooting purposes.