
- Contents
- Index
- Search

Show results that include all search words
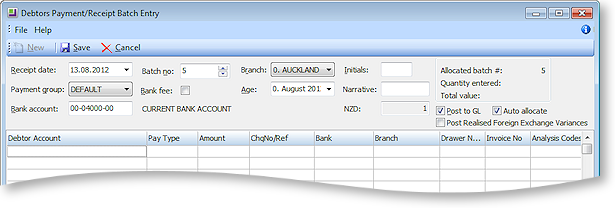
Receiving Multiple Debtor Payments
Transactions > Debtors Receipts > Debtors Receipt Batch Entry
The batch entry option allows you to receive multiple payments as a single batch. We recommend you use this window to record all receipts per payment type per day to easily manage your bank reconciliation.
For MYOB EXO POS users, you can choose to align your banking batches with shifts by setting the Align Banking Batches to Shifts profile setting in the MYOB EXO Business Configuration Assistant.
Note: By default, you can post both individual debtor receipts and debtor receipt batches to the General Ledger. If you only want to allow debtor receipt batches to be posted to the General Ledger, enable the Company-level profile setting Post Debtors Payments to GL as Batches.
-
Click New to create a new debtor receipt batch. A new banking batch number will be automatically created.
-
Enter the receipt header information as follows:
Field
Description
Receipt Date
The date you want to record as the receipt date of this batch.
Note: You can filter the list of debtor receipts that is displayed using the Configuration Assistant profile setting Default Banking Batch Search Date Range. By default, it displays today's receipts, but this can be changed to the last 7 days, to All, or to custom range.
Payment Group
Payment group defines the GL account to use, whether it’s bankable or not, and the corresponding bank fees to use.
Bank account
The GL account of your current bank account.
Batch no
The batch number of this Debtor Receipt batch. Automatically generated.
Bank fee
Tick this checkbox to be able to enter bank fees for the batch in the Post Bank Batch to GL window that is displayed when you save the batch.
Branch
Branch number and description.
Age
The current period.
Initials
The initials of the user creating this debtor receipt batch.
Narrative
Any further text you want to add to annotate this batch.
(AUD/NZD)
The currency of the GL account.
Post to GL
Tick to post the batch to GL. When you save, this will display the Post Bank Batch to GL window, which summarises the batch details before posting.
Auto allocate
Ticking this checkbox will display the Allocation window, where you can allocate the debtor payment to the relevant invoice(s).
Post Realised Foreign Exchange Variances
This checkbox is available if multiple currencies are enabled. Ticking this checkbox means that any realised foreign exchange gains or losses that are a part of the batched receipts will be posted to the General Ledger.
Note: The availability of this option and the Post to GL option is controlled by the Allow posting to GL from debtor receipt screens User-level profile setting.
-
Enter the debtor payment details. Right-click on a line to select the payment type for the line. When you enter a debtor account number in the Debtor Account field, the aged balances of that debtor are displayed at the bottom of the window.
-
To change the Stop Credit status of a debtor account in this window, right-click on the payment line for the debtor account and choose Stop Credit Status to toggle the tick beside the menu option. When the tick is cleared, the background colour of the line is returned to white.
-
Click Save to save the batch payment transactions. If you have ticked the Post to GL checkbox, the Post Bank Batch to GL window is displayed, which summarises the batch details for review before final posting, and is also used to enter any bank fees.
-
You are also prompted to print the payment batch report, which lists all debtor payments in the batch.