- Contents
- Index
- Search

Show results that include all search words
Sending Emails
Email functions are available on many windows in Exo Business. For example, you can:
-
Send emails to Contacts by clicking the
 button on the Contacts
window.
button on the Contacts
window. -
Select Email Invoice or Email Statement from the Actions menu on the Transactions tab of the Debtor Account Details window.
-
Select Email from the Actions menu on the Sales Orders or Purchases Orders windows.
-
Use the Mailshot function to bulk send emails to Debtors or Creditors.
-
Schedule and automatically send emails using the Exo Email Service.
You can also add the Send E-Mail menu item using Exo Business Configurator. You can send emails from the Actions menu of certain Exo Business modules.
Note: When emails are sent from Exo Business (via SMTP or the user’s local email client), they are automatically saved to the Documents tab of the account.
Email Setup
The method that you use to send emails is determined by the Email client User-level profile setting:
-
Disabled - Emails are not sent.
-
EXO SMTP - Emails are sent via SMTP using the Exo Business Email Sender (better for sending large batches of emails). An external SMTP server is required.
Note: When using Microsoft Exchange Server, the SMTP service must be active. The Exo Business Email Sender uses the SMTP protocol, not the IMAP protocol used by Microsoft Outlook.
-
Default Email Client - Emails are sent using the user’s default email software (suitable for smaller batches of emails).
SMTP Server Settings
When using the EXO SMTP option, you must enter details of the SMTP server being used before you can send emails. The SMTP Server Settings window displays the first time you try to send an email using the Exo Business Email Sender. You can access it later by clicking the Setup button on the Email Sender window.
You can configure these server settings:
|
Setting |
Description |
|
Server Address |
Specify the host SMTP server. The entry can be a server or service name (Local Area Network host only), a URL, or an IP address. Note: IP addresses are usually only used with internal mail servers or ones that have no public DNS entry (registered domain). Ideally, a name or URL should be used. |
|
Server Port |
Specify the number of the port to send emails on. Consult your mail service provider or IT department for information on which port to use. This may depend on whether to use TLS or SSL encryption (see below). |
|
Requires Authentication |
If your mail server requires authentication to send mail, select this option and enter a password for your account. |
|
Server User ID |
For an internal mail server (such as Exchange Server) this is the user ID configured for the user account in the Mail program. For ISP-hosted mail accounts, this is the account name. |
|
Password |
Only active or required if Requires Authentication is selected. This is the password for your mail account. Select Show character to show the characters of the password; if this option is not selected, the password is masked with asterisks. |
|
Use
TLS |
Select these boxes to secure emails using TLS or SSL encryption, if the SMTP server supports them. Note: SSL takes precedence over TLS; if both boxes are checked, SSL encryption will be used. |
|
From Name |
The name that appears in the Sender field of emails. |
|
From Address |
Your email address. |
|
Reply Address |
Enter an address to send replies from a different email address than the From Address. If this field is left blank, the reply address is the From Address. |
|
BCC Address |
The blind carbon copy email address. If you enter an email address here, all emails you send using this client are also sent to this address. |
|
File Directory |
The default directory used in the Open dialog when the you click the Attach File button. |
Other Settings
You might need to configure these email-related settings:
-
The Clarity Form profile settings to specify whether or not to send Clarity forms by email, and how to attach the forms to emails.
-
Options to email remittance advice to Creditors or to use the Mailshot function on the Payment Processor General Setup window.
-
You can configure the Show email before sending option on the Direct Debits General Setup window.
Using the Exo Business Email Sender
If Exo Business is configured to use the Email Sender, this window displays when you send an email:
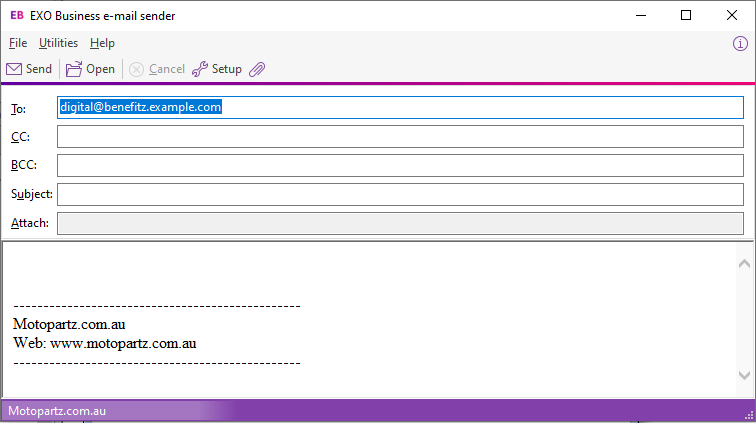
Some fields may be filled in automatically, depending on where the email is being sent from. For example, when sending an email to a Contact, the Contact's email address is automatically entered in the To: field.
Enter all details and click Send to send the email.
Click the Attach File button to add an attachment to the email.
Click the Setup button to open the SMTP Server Settings window.
Dragging and Dropping Emails
You can drag and drop emails in Microsoft Outlook onto any MYOB Exo Business window with a Documents tab This includes Company accounts, Stock items, Contacts, Opportunities, Jobs and Serviceable Units.
To drag and drop emails from Outlook to Exo Business, open the record to copy the email to, then drag the email from Outlook to the open record window in Exo Business. A copy of the email is saved to the window’s Documents tab.
Note: The Outlook client must be running on the same computer or Terminal Server session as Exo Business. You can't, for example, drag emails from Outlook on your computer to Exo Business running in a Terminal Server session.