- Contents
- Index
- Search

Show results that include all search words
Business Alerts
You can set up custom business rules and notifications for events in Exo Business. You can attach rules using custom conditions to a list of system events. When a rule’s conditions are met, a message can display and Exo Business can send a device notification or email to one or more recipients.
Custom rules are triggered when one of these events occurs:
|
|
Note: Alerts on Debtor and Creditor Invoices are only triggered from Invoice Entry screens — for example, the Creditor Invoice Entry screen or the Invoice Entry screen in Exo Job Costing. They are not triggered when creating the invoice from another screen — for example, when creating a Debtor Invoice from a Sales Order. Creating an Opportunity by copying an existing one does not trigger alerts on Opportunities.
Set up Business Alerts in Exo Business Configurator under System > Event Log > Business Alerts:
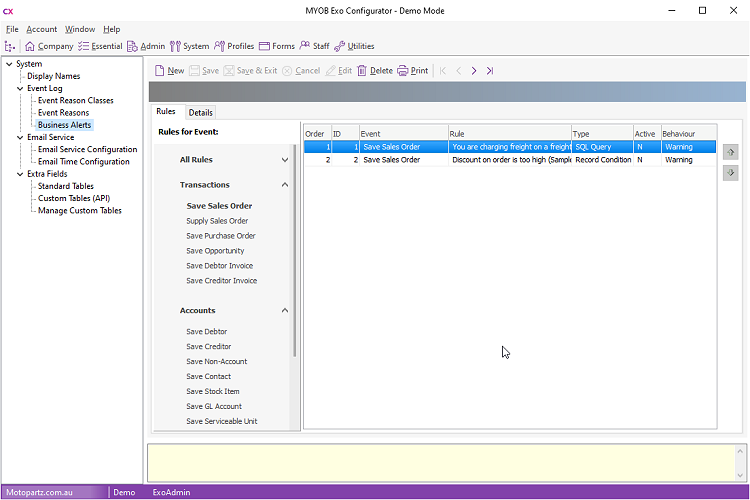
The Rules tab displays all events on the right. Rules defined for the selected event display on the left. Rules are listed in order of priority —to change priorities, move rules up or down using the up and down arrow buttons.
Double click on a rule to edit it or click New to create a rule for an event. When adding or editing a rule, the Details tab is enabled. The Options sub-tab displays the conditions that must be met to activate the rule.
A rule's status can be:
- Active - the rule is applied to the selected event whenever it occurs.
- Inactive - the rule is be applied.
- Sub Rule - the rule is applied when it is used as part of a composite rule. If it is not part of a composite rule, it is not applied.
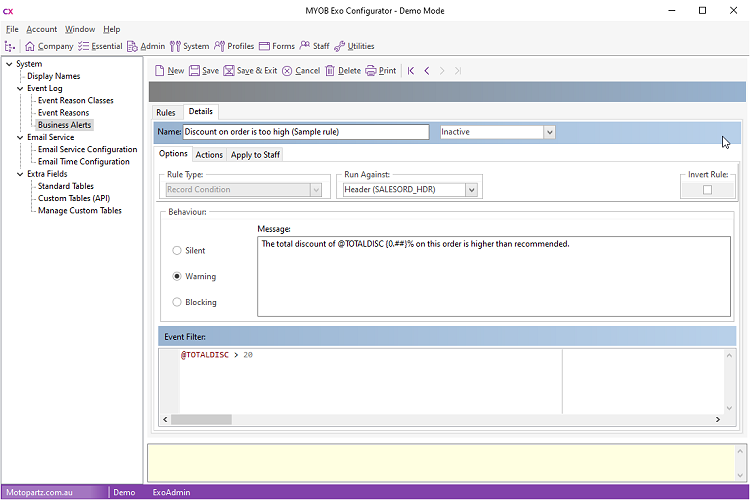
The Rule Type option determines how the rule's conditions are applied:
- Record Condition - applies simple filter conditions against the record, checking the data set before writing it to the database.
- SQL Query - applies a SQL query to data that is already in the database. Each line is queried.
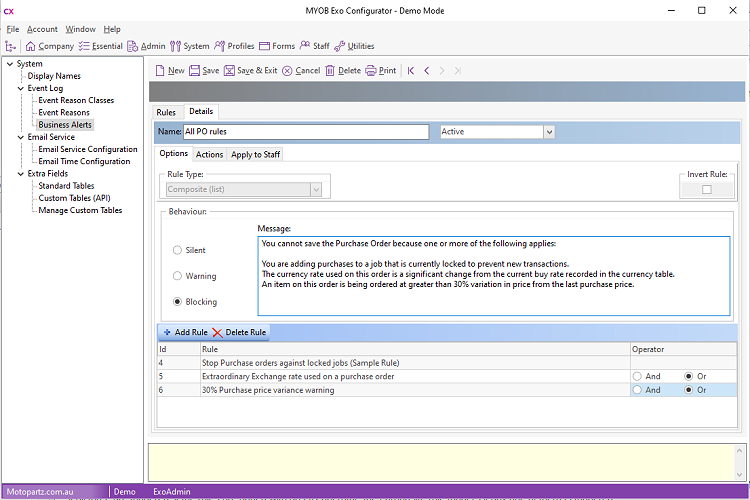
- Composite (list) - uses a list of other Business Rules, which are evaluated together.
Note: You cannot change this property after you save the rule.
The Run Against option determines whether the rule should be applied to all lines related to the record, or to the record header.
Select the Invert Rule option to trigger the alert when the inverse of the rule conditions are met.
The Behaviour section specifies what should happen in the Exo Business interface when the rule is triggered:
- Silent - no message displays to the user. The triggering of the rule is logged.
- Warning - a warning message displays with Yes and No options. Click Yes to proceed with the action or No to cancel.
- Blocking - a message displays indicating that the action cannot proceed.
For Warning or Blocking rules, enter the message to display to the user in the section below. This message can contain the same parameters that are used to build rule conditions.
Rule Conditions
Enter the conditions that must be met to trigger the rule in the bottom section of the Details tab. You can enter rules with the type Record Condition in the form of a filter that can include the parameters in the table below.
Enter rules with the type SQL Query in the form of a SQL statement to run against the Exo Business database. You can use the parameters in the table below in SQL statements.
|
Parameter |
Meaning |
|
General (available for all rules) |
|
|
@CURRENT_USER |
The ID number of the logged on user. |
|
@STAFFNAME |
The name of the logged on user. |
|
@NOW |
The current date and time. |
|
@NOW_STR |
The current date and time as a string in the format 'yyyy-mm-dd hh:MM:ss' (including quote marks). |
|
@TODAY |
The current date. |
|
@TODAY_STR |
The current date as a string in the format 'yyyy-mm-dd' (including quote marks). |
|
@COMPANYEMAIL |
The email address of the associated Debtor account. |
|
@EXOLINK |
A formatted exo:// protocol hyperlink to the transaction— for example, exo://saleorder(10001). Can be used in notification emails. |
|
Sales Orders (saving or supplying) |
|
|
@ACCNO |
The ID number of the Debtor account on the Sales Order. |
|
@ACCOUNTNAME |
The name of the Debtor account on the Sales Order. |
|
@FREIGHTFREE |
Returns 'Y' if the transaction is freight free; otherwise returns 'N'. |
|
@ORDERNO |
The ID number of the Sales Order. |
|
@SALESNO |
The ID number of the salesperson on the Sales Order. |
|
@SUBTOTAL |
The Sub Total amount on the Sales Order. |
|
@TAXTOTAL |
The GST Total amount on the Sales Order. |
|
@TOTALDISC |
The total discount on the Sales Order. |
|
@UNDISCOUNTED |
The undiscounted total of the Sales Order. |
|
@H |
A specified field from the SALESORD_HDR table — for example, @H.DUEDATE. |
|
@L |
A specified field from the SALESORD_LINES table — for example, @L.STOCKCODE. |
|
Purchase Orders |
|
|
@PURCHORDNO |
The ID number of the Purchase Order. |
|
@ACCNO |
The ID number of the Creditor account on the Sales Order. |
|
@ACCOUNTNAME |
The name of the Creditor account on the Sales Order. |
|
@SALESPERSON |
The ID number of the staff member in the Purchase Order’s Ordered by field. |
|
@H |
A specified field from the PURCHORD_HDR table — for example, @H.ORDERDATE. |
|
@L |
A specified field from the PURCHORD_LINES table — for example, @L.UNITPRICE. |
|
Debtor Invoices |
|
|
@SEQNO |
The ID number of the invoice. |
|
@ACCNO |
The ID number of the Debtor account on the invoice. |
|
@ACCOUNTNAME |
The name of the Debtor account on the invoice. |
|
@FREIGHTFREE |
Returns 'Y' if the transaction is freight free; otherwise returns 'N'. |
|
@H |
A specified field from the DR_TRANS table — for example, @H.SUBTOTAL. |
|
@L |
A specified field from the DR_INVLINES table — for example, @L.DISCOUNT. |
|
Creditor Invoices |
|
|
@SEQNO |
The ID number of the invoice. |
|
@ACCNO |
The ID number of the Creditor account on the invoice. |
|
@ACCOUNTNAME |
The name of the Creditor account on the invoice. |
|
@H |
A specified field from the CR_TRANS table — for example, @H.TRANSDATE. |
|
@L |
A specified field from the CR_INVLINES table — for example, @L.TAXRATE. |
|
Company Accounts |
|
|
@ACCNO |
The Debtor, Creditor or Non Account's ID number. |
|
@ALPHACODE |
The Debtor or Creditor account's name. (Not available for Non Accounts.) |
|
@H |
A specified field from the DR_ACCS, CR_ACCS or PROSPECTS table. |
|
Contacts |
|
|
@CONTACTID |
The contact record's ID number. |
|
@ACCOUNTNAME |
The name of the company account that the contact is associated with. |
|
@C |
A specified field from the CONTACTS table — for example, @C.FIRSTNAME. |
|
General Ledger Accounts |
|
|
@ACCNO |
The GL account's ID number. |
|
@H |
A specified field from the GLACCS table — for example, @H.BALANCE. |
|
Stock Items |
|
|
@STOCKCODE |
The Stock item's ID code. |
|
@ACCNO |
The ID number of the stock item's supplier. |
|
@H |
A specified field from the STOCK_ITEMS table — for example, @H.SELLPRICE1. |
|
Jobs |
|
|
@ACCNO |
The ID number of the Debtor account on the job. |
|
@ACCOUNTNAME |
The name of the Debtor account on the job. |
|
@JOBNO |
The job number. |
|
@H |
A specified field from the JOBCOST_HDR table — for example, @H.STATUS. |
|
@F |
A specified field from the JOBCOST_FLAGS table — for example, @F.ISACTIVE. |
|
@Q |
A specified field from the JOBCOST_LINES table — for example, @Q.STOCKCODE. |
|
@T |
A specified field from the JOB_TRANSACTIONS table — for example, @T.QUANTITY. |
|
Serviceable Units |
|
|
@UNITNAME |
The Serviceable Unit's name. |
|
@STOCKCODE |
The ID code of the stock item on the unit (this may be null). |
|
@H |
A specified field from the SU_MAIN table — for example, @H.UNITDESC. |
|
@W |
A specified field from the SU_WARRANTY table — for example, @W.WARRANTY_REF. |
|
Opportunities |
|
|
@ACCNO |
The ID number of the company account on the opportunity. |
|
@ACCOUNTNAME |
The name of the company account on the opportunity. |
|
@OPPORTUNITYID |
The ID number of the opportunity, or “New” if it has not been saved yet. |
|
@CONTACTID |
The ID number of the contact associated with the opportunity. |
|
@CONTACTNAME |
The name of the contact associated with the opportunity. |
|
@H |
A specified field from the OPPORTUNITY table — for example, @H.PROBABILITY. |
|
@L |
A specified field from the OPPORTUNITY_QUOTE table — for example, @L.QUANTITY. |
Use the alias parameters that give access to the fields of a table (@H, L@, and the like) to access Extra Fields. Computed fields are not supported in Business Alerts.
Note: While these parameters are not case-sensitive, the values of table fields are – for example, @F.ISACTIVE looks for the value "Y", not "y".
Composite Rules
When you select Composite (list) as the Rule Type, set up the list of Business Rules that are evaluated together to trigger this rule in the bottom section of the Details tab. Click Add Rule to select an existing rule to add to the composite rule.
You can select any rule for the same event as the composite rule that has its status set to Sub Rule.
Select an Operator (AND or OR) to determine how to evaluate the rule with the other rules on the list. For example, if rules A, B and C are added with the AND operator, the composite rule triggers if all three are triggered. If the rules are added with an OR operator, the composite rule triggers if any one of them is triggered.
Rule Actions
The Actions sub-tab defines a list of actions to perform when the rule is triggered:
- Sending an email to specified recipients using the Exo Email Service.
- Sending a notification to a mobile device running the Exo OnTheGo mobile app.
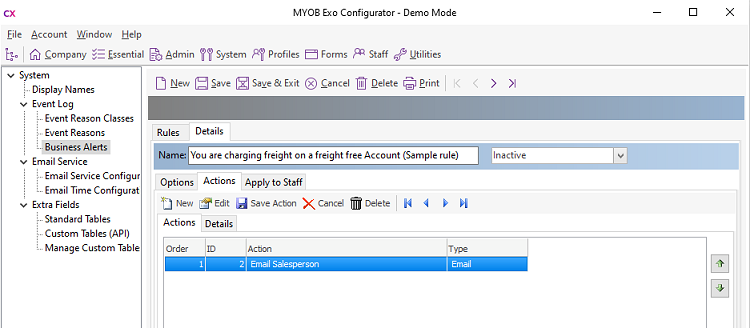
Actions display in the order that they are applied. You can order them by clicking the arrow buttons on the right. Click New to create a action.
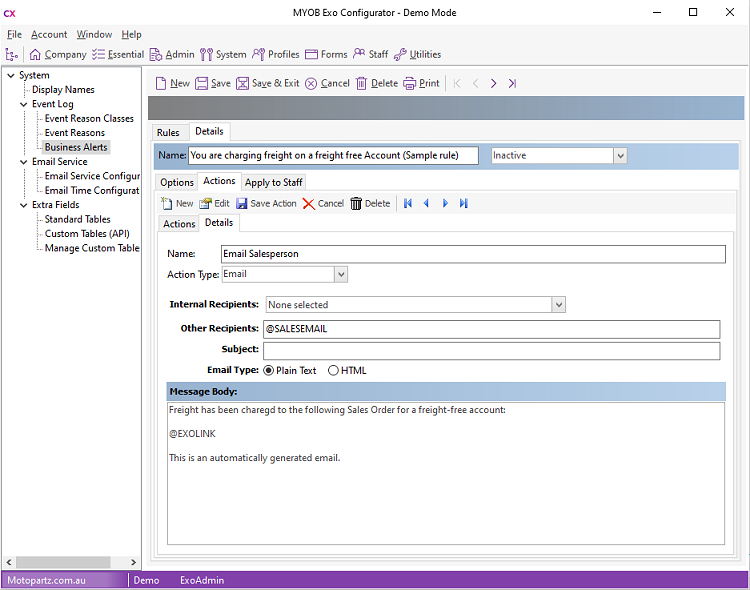
On the Details sub-tab, enter a name for the action, then select an Action Type: Email or Notification. The settings differ depending on the action type. Click Save Action to add the action to the rule.
Note: Clicking Save Action adds the action to the rule, but does not save the rule. Click the Save button on the main toolbar to save the rule and all of its actions . Rules that have been added but not yet saved are listed on the Actions sub-tab with the ID New.
Email Settings
When sending an email, first specify who to send the email to. You can select or more Exo Business staff members as recipients from the Internal Recipients dropdown. You can enter other email addresses in the Other Recipients field. You can also enter email address parameters in the Other Recipients field.
Note: The Other Recipients field can also contain parameters that allow the email to be sent to an email address associated with the record that generated the alert.
Enter a subject line and the text of the message to send. The message body can include any of the parameters for the rule.
Notification Settings
When sending a device notification, select who to send the notification to. You can select or more Exo Business staff members as recipients from the Recipients dropdown, which contains all staff members who have the Allow OnTheGo Access option enabled on the Staff screen in the Exo Business Configurator. Each staff member can have up to two devices configured for them, Notifications are sent to all devices configured for each staff member.
When a notification arrives in the OnTheGo app, you can tap it to open a record. Use the On Arrival dropdown to specify what record to open when a staff member taps the notification. The options depend on the kind of rule being configured. For example, a rule on the Save Sales Order event has the option of opening the Sales Order, the Debtor account on the Sales Order, or the stock item on a Sales Order line.
Enter the text of the message to send. The message body can include any of the parameters for the rule.
Email Parameters
You can send Business Alerts to an email address associated with the record that generated the alert. Enter email address parameters into the Other Recipients field. When the alert is triggered, the parameter is replaced with the email address for the record.
You can use these email parameters:
|
Parameter |
Meaning |
|
General |
|
|
@COMPANYEMAIL |
The email address for the company (Debtor or Creditor) associated with the record. |
|
@DEFAULTCONTACTEMAIL |
The email address for the default Contact of the company associated with the record. |
|
@CONTACTEMAIL |
The email address for the Contact associated with the record (not available for Purchase Orders or Creditor Invoices). |
|
Sales Orders |
|
|
@SALESEMAIL |
The email address for the Salesperson associated with the Sales Order. |
|
@STATEMENTCONTACTEMAIL |
The email address for the Statement Contact of the Debtor associated with the Sales Order. |
|
Purchase Orders |
|
|
@SALESEMAIL |
The email address for the staff member associated with the Purchase Order. |
|
@STATEMENTCONTACTEMAIL |
The email address for the Remittance Contact of the Creditor associated with the Purchase Order. |
|
Debtor Invoices |
|
|
@SALESEMAIL |
The email address for the Salesperson associated with the invoice. |
|
@STATEMENTCONTACTEMAIL |
The email address for the Statement Contact of the Debtor associated with the invoice. |
|
Creditor Invoices |
|
|
@STATEMENTCONTACTEMAIL |
The email address for the Remittance Contact of the Creditor associated with the invoice. |
|
Jobs |
|
|
@SOLDBYEMAIL |
The email address for the staff member who entered the job (JOBCOST_HDR.STAFFNO). |
|
@ACTIONBYEMAIL |
The email address for the staff member who is set as the job’s manager (JOBCOST_HDR.ACTIONBY). |
|
Opportunities |
|
|
@ASSIGNEDBYEMAIL |
The email address for the staff member in the Opportunity’s Assigned By field. |
|
@ASSIGNEDTOEMAIL |
The email address for the staff member in the Opportunity’s Assigned To field. |
|
@CREATEDBYEMAIL |
The email address for the staff member who created the Opportunity. |
Applying Rules to Users
Use the Apply To sub-tab to specify which Exo Business staff members the rule applies to:
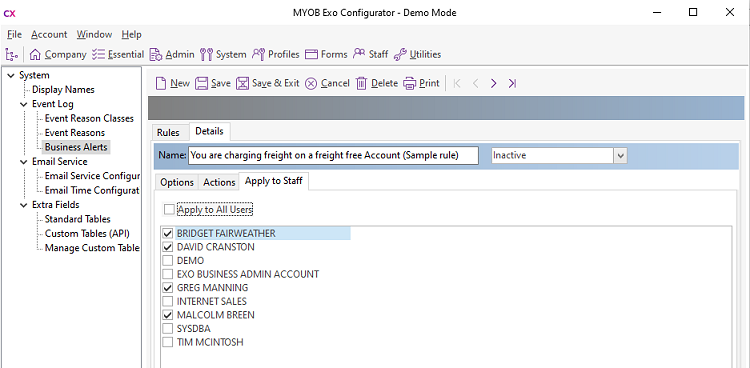
Select the users to whom this rule applies, or select Apply To All Users.
Event Rule Auditing
Every time a Business Alert is triggered, an entry is recorded in the REASON_EVENTS table used by the Event Log. New Reason Classes are created automatically for each type of event that alerts can be created for.
For alerts that send a message, an entry is also stored in the new EVENTS_SCHEDULE table. Entries include the values of all parameters relating to the rule.