Viewing the Transaction History of an Account
You can view the transaction history of a creditor or debtor account on the Transactions tab of the account.
On this tab, you can also:
-
Create an invoice
-
Create a credit note
-
Create a payment
-
Allocate transactions for the account
-
Issue credit notes
-
Search for an invoice number
-
Email debtor invoices and statements
In this Topic
Field Descriptions | Menu commands | Shortcut Menu | Search Options | Transaction Age Numbering
The transaction history for a creditor or debtor is period-based, typically (but not always) monthly periods.
To view the transactions for a creditor or debtor:
-
In the Creditor/Debtor Account Details (search) window, double-clicking the name of the creditor or debtor account.
-
Click the Transactions tab on the Creditor or Debtor Account Details windows.
The Transactions tab displays:

Field Descriptions
The grid header fields are:
|
Field |
Description |
|
Trans # |
The unique transaction ID. |
|
Date |
The date the transaction was created. |
|
Pd stat seq |
The unique period number for the period, also identifying the period as Creditors, Debtors, GL or Stock. |
|
Age |
The period number of the transaction. For example, if 0 is the current month of July, 1 is June, 2 is May, and so on. |
|
Transaction |
The transaction type, such as Invoice or Payment. |
|
InvNo |
The invoice number. |
|
Ref 1 |
Reference text/number that varies according to the kind of transaction. For example, if a sales order, the sales order number displays. If a payment, the payment type displays. |
|
Ref 2 |
Reference text/number that varies according to the kind of transaction. For example customer reference number if invoice, or cheque number if Ref 1 is Cheque. |
|
Ref 3 |
Reference text/number that varies according to the kind of transaction. For example, if cheque payment type, then the bank name displays. If invoice, then invoice displays. |
|
Branch Code |
The branch code of the transaction, such as SYD or AKL. |
|
Due Date |
The due date of the invoice, based on the credit terms of the creditor account. |
|
Amount |
The total amount of the invoice. |
|
Outstanding |
The outstanding amount of the invoice. |
|
Status |
The allocation status of the invoice — for example, Unallocated, Partly Allocated, Allocated. |
|
Branch Account |
If this is a branch account, this is the branch account number. If not, this column displays -1. |
|
GLBatchNo |
The GL batch number if this was posted to GL as part of a GL batch. |
|
Exchrate |
If multiple currencies are being used, the exchange rate used for this transaction. The local currency is 1. Otherwise, the actual exchange rate used displays as a decimal — for example, 0.83. |
|
Debtor transactions only |
|
|
Gateway TrxID |
Each transaction processed by the gateway service provider is issued a reference known as a TrxID. This is a long alphanumeric code. |
|
Batch No |
This is the batch number of the banking batch. |
|
Gateway No |
The is the number of the defined gateway for this transaction. |
|
? |
Right-click on the transaction line and choose Toggle Query Status to put a question mark on the transaction, to reflect that the transaction is in question. This can then be reported on. |
|
Creditor transactions only |
|
|
Auth |
The authorisation status of the invoice |
|
Paystatus |
The payment status of this invoice, for example, Released, paid. |
New Menu
These options are under the New menu on the toolbar:
-
New Invoice: Create a Creditor invoice or Debtor invoice.
-
New Payment: Enter a Payment on a Creditor invoice or receive a Debtor payment.
-
Generate Credit: Enter a credit note for a Creditor or create a credit note for a Debtor.
Actions Menu
These options are under the Actions menu on the toolbar:
-
Allocate: Enter a payment on a Creditor invoice or allocate a Debtor receipt to an invoice.
-
Automatically allocate payment to oldest invoice: (Debtors only). This will also allocate credits (negative value invoices) and refunds (negative payments) and zero value transactions.
-
Invoice search: Search for an invoice.
-
Refresh: Provides an updated transaction list.
-
Email Invoice: Click this button to email the selected invoice to the Debtor as a PDF attachment.
-
Email Statement: Click this button to email a statement to the Debtor as a PDF attachment.
Shortcut Menu
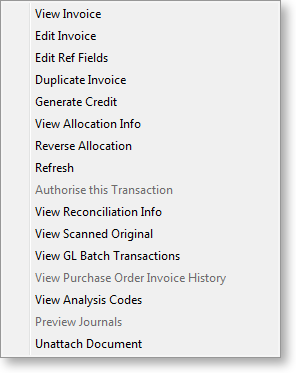
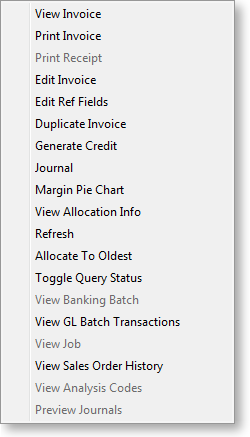
Right clicking on any invoice summary line opens the following shortcut window.
|
|
|
|
Creditor shortcut menu |
Debtor shortcut menu |
This table details what the shortcut commands do:
|
Shortcut Command |
Description |
|
View the invoice in a report format. |
|
|
Print Invoice |
|
|
Print Receipt |
Prints a payment receipt. Only available for a payment transaction. |
|
Edit Invoice |
Opens the invoice to edit its details. This option is only available if the Permitted level of access to debtor transaction editing or Permitted level of access to creditor transaction editing User-level profile setting is set to Full invoice editing allowed. |
|
Edit Ref Fields |
Edit the transaction reference fields for the invoice. This option is only available if the Permitted level of access to debtor transaction editing or Permitted level of access to creditor transaction editing User-level profile setting is set to Full invoice editing allowed" or Invoice header fields editing allowed. |
|
Duplicate Invoice |
Select to create a duplicate of a Debtor invoice. |
|
Generate Credit |
Provides a copy of the negative invoice. |
|
Reverse Payment |
|
|
Journal |
Opens the Debtors Adjustment Entry window to make a Debtors journal adjustment entry transaction. |
|
Margin Pie Chart |
Displays a graph for the invoice showing margins. |
|
View Allocation Info |
Displays a list with the allocation information in a separate window. |
|
Reverse Allocation |
Reverse all allocations associated with this transaction (payment or invoice). This option is only available if the Allow reversal of debtor/creditor allocations User-level profile setting is enabled. This option is not available for transactions with deposits or foreign currencies. |
|
Refresh |
Updates the entire transaction list. |
|
Authorise this Transaction |
Where M-Powered Payments are used, this option authorises the selected transaction. |
|
View Reconciliation Info |
Provides a list with the reconciliation information. |
|
View Scanned Original |
This option is only available if a document has been attached to the transaction. Selecting it opens the document. |
|
View Purchase Order Invoice History |
Displays the Purchase Order History window. |
|
Allocate To Oldest |
Allocates a payment transaction to the oldest outstanding invoice. |
|
Toggle Query Status (?) |
Puts a question mark on the transaction, to reflect that the transaction is in question. This can then be reported on. You may need to add the ? column by right-clicking on the column header and selecting Select visible columns. |
|
View Banking Batch |
Opens the Debtors Banking Batches window. |
|
View GL Batch Transactions |
Opens the GL Batch Transactions window, showing all GL transactions associated with this transaction. This option is only available for transactions that have been posted to the GL, and requires the Allow Sub ledgers drill through to GL Transactions User-level profile setting to be enabled. |
|
View Job |
Where the Job Costing add-on module is used, displays the job associated with the transaction. |
|
View Sales Order History |
Displays the Sales Order History window. |
|
View Analysis Codes |
Displays the Analysis Codes associated with the transaction. |
|
Preview Journals |
Displays the GL Batch Transactions window, showing the Debtor Ledger and Stock Ledger transactions that will be generated for the transaction. This is a preview only - no transactions are saved when the window is closed. |
|
Attach/Unattach Document |
Enables you to select a document to attach to the transaction — for example, a scanned copy of the original transaction document. If a document has already been attached, this option lets you remove it. |
Search Options
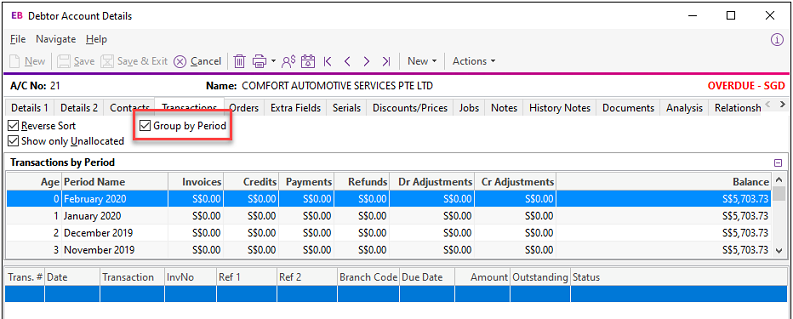
Group by Period
Checking the Group by Period checkbox groups the transactions by period:

Clicking on a period line lists all the transactions for that period
in the grid in the area below the period groups. Once the group has been
selected it can be minimised by clicking the minimise icon (![]() ).
Maximise this view by clicking the icon again. Minimising this view provides
a greater display area for the group's individual transactions in the
grid below.
).
Maximise this view by clicking the icon again. Minimising this view provides
a greater display area for the group's individual transactions in the
grid below.
The transactions by Period grid has its own grid fields, which are defined in the table below:
|
Shortcut Command |
Description |
|
Age |
In MYOB Exo Business, transaction ages are numbered from current (0) backwards. See for details on this numbering system. |
|
Period Name |
This is the period name that correlates to the |
|
Invoices |
This is a total for all invoices submitted over this period. |
|
Credits |
This is the total for the credits issued to this debtor over this period. |
|
Payments |
This is the total for all types of payments received from the debtor for this period. |
|
Refunds |
This is the total for all refunds issued to the debtor for this period. |
|
Dr Adjustments |
This is the total for all debtor adjustment transactions for the selected period. |
|
Cr adjustments |
This is the total for all creditor adjustment transactions for the selected period. Creditor adjustments are similar to Creditors Payment Entry, this function creates adjustment entries against a creditor account, with predefined reasons for the adjustment. |
|
Balance |
The current debtor account balance for the selected period. |
Show Only Unallocated
Checking the Show only unallocated checkbox filters the transaction list to display only the transactions that are not allocated to an account. This is useful when it is necessary to allocate transactions that have not been previously allocated.
Transaction Page Numbering
While Exo Business stores transaction dates, it is not a purely date-based system. It does not rely on dates for critical procedures such as transaction ageing and posting between ledgers, nor are dates used by any of the standard reports to calculate control totals.
Exo Business tags all transactions with a nominated period number at the time of posting. As an extra validation, Exo Business can ensure that the transaction date given is valid for the period that the transaction is being posted to. This method is used to avoid the traditional problems associated with incorrectly entered dates and extra processing overhead required to ‘age’ transactions into periods which often makes purely date based solutions very limited in scale.
Transaction ages are numbered from current (0) backwards.
Example:
0 = current period
1 = One period ago (last month)
2 = Two periods ago
54 = Fifty-four periods ago etc.
Exo Business knows which period in the period table is the current one, and uses this as a point of reference to display the name of the period on reports and within data entry screens.


