- Contents
- Index
- Search

Show results that include all search words
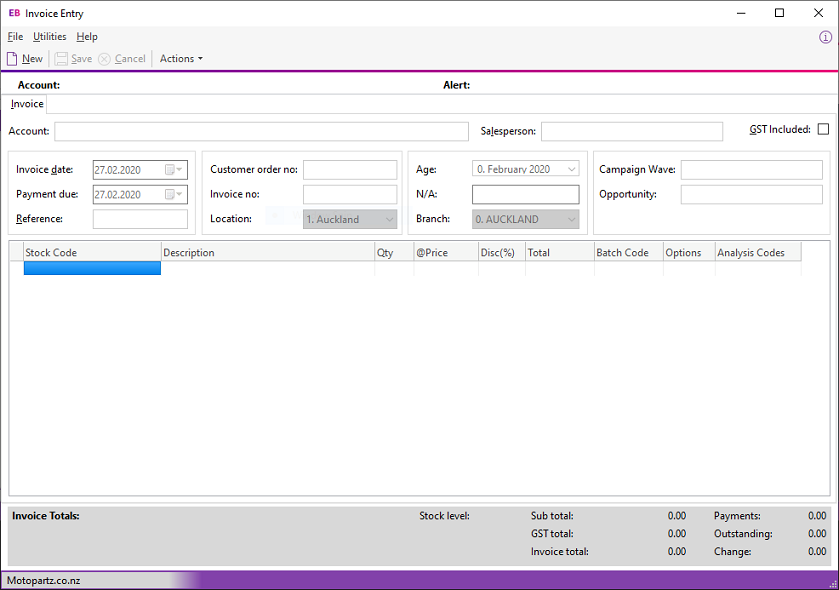
Creating a Debtor Invoice
Transactions > Debtors Invoice
You can create a Debtor Invoice either in the Invoice Entry window or as part of the Sales Order supply process. Use the Debtor Invoice Entry window to sell stock and to create an invoice without creating a sales order.
To create a Debtor Invoice:
-
Click New.
-
Enter the debtor account number in the Account field, or type ? and press Tab to search for the account.
-
Enter the details of the invoice:
Field
Description
Salesperson
Select the staff member who made the sale.
GST Included
Select this option to include GST in the selling price. You can override this on an invoice line by clicking the ellipsis icon for the invoice line and changing the tax rate.
If you have Exo Business Configurator, you can disable this option at the invoice and invoice line levels, so that all debtor invoices follow the GST inclusive rule that has been set for your company.
Invoice Date
The invoice date. This must be within the period specified by the Age field.
Payment Due
The date on which payment is due, calculated using the credit terms entered for the debtor.
Reference
An additional reference you can record for the invoice, such as the name of the customer's project or cost centre.
Customer order no.
The customer's order number.
Invoice no.
Exo Business generates the invoice number when you save the invoice. You can enable a profile setting in the Configuration Assistant so that you can enter your own invoice number.
Location
Select a location from this list.
Age
If the Post to Past Periods User-level profile setting is enabled, you can select the period in which to generate the invoice. If the profile setting is disabled, this field is read-only and always shows the current period.
(currency)
If you operate in multiple currencies, this is the currency specified for the Debtor account— for example, AUD, NZD. If you don't operate in multiple currencies, this field displays N/A and is read only.
For Debtor accounts that are in a foreign currency, enter ? into this field and press Tab to open a search window containing the exchange rates that were used in the first transaction on or before the Invoice Date entered for this invoice.
Note: If you enter an exchange rate with a percentage that's higher than the defined threshold, a warning displays. Click OK on the warning.
Branch
Select the branch of the transaction. Branches are cost centres in MYOB Exo Business.
Campaign Wave
If the Exo Business CRM module is installed, you can associate invoices with a campaign wave to track sales against a marketing campaign.
Opportunity
This field is enabled if the Exo Business CRM module is installed.
If the invoice was generated from an Opportunity, the Opportunity displays here. You can also enter or search for one.
-
Enter the details of stock items being sold:
Field
Description
Stock Code
The Stock item code. Type ? in this field and press Tab to select stock item from a list.
Note: If the Enable GL code entry into the stock code field on a debtors invoice profile setting is enabled, you can enter a GL Code into this field by entering @ and then the code (or enter @ and press the enter key to search for a GL code).
Description
The description of the stock item. This field is read only.
Qty
The quantity of the stock item you are selling.
@Price
The price of the stock item. Double click on this field to open the Price Formulation window, which lists price policies that apply to this stock item or debtor.
Disc (%)
The discount percentage on this line. Enter the percentage of the discount. The discount amount is removed from the invoice line total
Total
The total amount for the invoice line.
Options
Click the ellipsis button to display the Invoice Line Periscope, which summarises transaction information for the line. You can change the tax and discount information for the line.
-
To check the quantity in stock of the highlighted stock item in each of your locations, right-click in the window and choose Stock Level. This lists stock on hand, free stock, not for sale, committed, and on back order.
-
To check how the tax has been calculated on an invoice line, click Tax Rates to display a summary of the tax rates in use. The difference between automatically calculated rates and overridden rates also displays.
-
To add comments to the invoice, click the Narrative button.
-
When you're creating an invoice, you can create a one-off stock item. A one-off stock item is used for one-off sales, where you don't intend to keep the stock item in inventory, or even sell that stock item again.
Note: If there are restrictions attached to a debtor or alerts defined, a warning message displays — for example, Do not accept cheque, or This account on STOP CREDIT.
-
Click Save.
-
If your company ships goods, the Dispatch Method window displays. Select the method for shipping the goods and click OK.
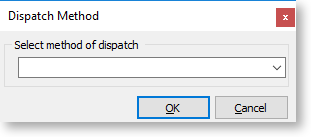
This is controlled by the User-level profile setting Prompt for dispatch information for debtor invoices & sales orders, which you must enable to display this window.
-
Choose the invoice template to use for this debtor and click Yes.
Note: You can batch print multiple invoices from the Invoice Batch Printing window.
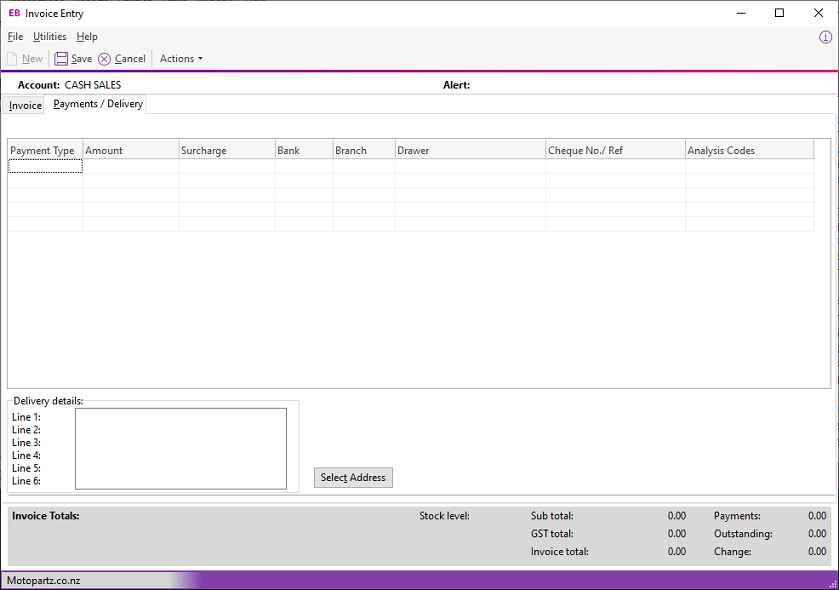
Receive a Payment on a New Invoice
You can receive debtor payments:
-
on the Payments/Delivery tab of the Debtor Invoice Entry window,
-
in the Debtor Receipts window, and
-
in the Debtor Batch Receipt window.
To receive payment on a new invoice on the Payments/Delivery tab:
Note: If the Payments/Delivery tab does not display in the Debtor Invoice window for a new invoice, then you must enable the profile setting Allow Debtor Payments Entry in the Configuration Assistant.
-
Select the Payments/Delivery tab.
-
Enter the payment type in the Payment Type field either by typing the name of the payment type, or by typing ? in the field and selecting from the list that displays. You can use multiple lines to pay with multiple payment types.
-
Press the spacebar in the Amount field to display the total invoice amount.
-
Enter the remaining payment details.
-
Click Save.
Enter Delivery Details for an Invoice
To enter delivery details for an invoice:
Note: If the Payments/Delivery tab does not display in the Debtor Invoice window for a new invoice, then you must enable the profile setting Allow Debtor Payments Entry in the Configuration Assistant.
-
The delivery address for an account displays in the Delivery details of the frame. If the account has multiple delivery addresses, click the Select Address button. The Extra Delivery Addresses window displays, where you can add extra delivery addresses.
-
Select the delivery address and Save.