- Contents
- Index
- Search

Display results with all search words
Exporting to Excel
Clarity reports can be exported as Microsoft Excel files (XLS). Three different output types are available for Excel export:
- XLSReport, which presents the report in a pictorial format, with the emphasis on preserving the appearance/layout of the report. To export to this format, select Export to Excel > Export to XLS Report on the Clarity Report Parameters window.
- XLSData, which presents the report in a strictly columnar format, with the emphasis on ensuring the data is formatted to allow further data manipulation. This format preserves the formatting of the original of the original report, including column widths, colours, text formatting and any data formatting like the number of decimal places or percentage signs. To export to this format, select Export to Excel > Export Data to Excel 97 – 2003 (XLS) on the Clarity Report Parameters window.
- XLSXData, which functions in the same way as the XLSData format, but produces an .XLSX file, rather than an .XLS file. To export to this format, select Export to Excel > Export Data to Excel 2007 and later (XLSX) on the Clarity Report Parameters window.
When exporting to XLSData or XLSXData, Exo Clarity analyses the report and automatically formats it. By setting up the Excel output in Exo Clarity, you can override the automatic process and specify exactly how the output Excel file should be formatted.
Note: Video-based Help is available for this topic on the Exo Business Education Centre.
Setting up Excel Output
You can set either of the XLS formats as the default by setting the report's DefaultFileDeviceType property to "XLSReport", "XLSXData" or "XLSData". This property is available under Generation on the Design tab.
Additional settings that relate to XLS output are available in the XLSSettings section under Output - File.
XLSReport Settings
The XLSReport format uses the setup on the Design tab. When printed, the XLS output replicates the original report, including merged cells.
The file type to export to is specified by the DeviceType property under Generation.
The default filename and location for the exported file are specified by the TextFileName property under Output - File.
XLSData and XLSXData Settings
The XLSData and XLSXData formats are set up using the Print to File Setup window. This window is opened by selecting Print to File Setup from the File menu when on the Design tab.
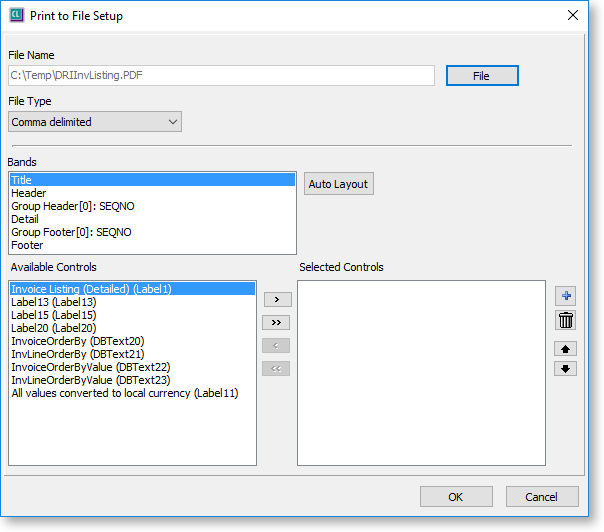
To specify which columns should appear in the Excel file when the report is exported in the XLSData or XLSXData formats:
- Select a report band from the Bands section. All components that appear in that band appear in the Available Controls section below.
- Select the components that should appear as columns in the Excel file and use the arrow buttons to move them to the Select Controls section on the right.
- Repeat for each band that has columns you want to include in the Excel export.
You can use the Auto Layout button to automatically populate the Selected Controls pane. The system analyses the report, then selects and orders columns for optimal output. The report data columns are sorted to the top of the pane (meaning they will appear on the left of the Excel file) and the titles, labels, etc. are sorted to the end. You can then delete any unnecessary columns or re-order them as necessary.
The  and
and  buttons let you add and remove blank columns in the Excel output. This
can be useful for bands that contain section totals - you can include
only those columns that you want to be totalled, and tell the output to
skip the other columns by adding blank columns in their place.
buttons let you add and remove blank columns in the Excel output. This
can be useful for bands that contain section totals - you can include
only those columns that you want to be totalled, and tell the output to
skip the other columns by adding blank columns in their place.
For each field included in the export, the SaveLength property on the Design tab under Output - File can be used to specify that field's column width in characters. If this property is left at the default value of zero, the column will autosize based on the maximum content length. If the property is set to a value that is shorter that the maximum content length, the content will appear truncated in Excel (the content is not actually truncated – it can be viewed by resizing the column in Excel). The minimum (non-zero) value for the property is 8 characters.
GL Reports
When exporting a GL Report to Excel (i.e. when the Deliver to Excel option is ticked on the Run GL Report window), if the selected Clarity report’s DefaultFileDeviceType property is set to “XLSData”, the report will be exported to XLSData; otherwise it will be exported in the XLSReport format.
Automatic Formatting Process
Exo Clarity uses an automatic process to determine how Excel files should be formatted when exporting in the XLSData or XSLXData formats. This process is used when:
- A report is exported using one of these formats, if no configuration has been set up on the Print to File Setup window.
- The Auto Layout button on the Print to File Setup window is clicked (this sets up the configuration of the window, which you can then customise as necessary).
The automatic process works as follows:
- Exo Clarity sets up the columns. It starts by looking at the bottom of the Header band, which is where column headings are most commonly located. It goes from left to right, looking for label components, which are added as columns to the Excel file in the order they appear.
- It then works its way back up Header band and adds any other components it finds as extra columns to the right of the file, on the assumption that these are usually titles and parameter labels that aren’t part of the main report data.
- The data fields from the Detail band are then taken from left to right, and used to populate the values under each column heading.