Viewing Purchase Orders
Transactions > Purchase Orders > Purchase Orders
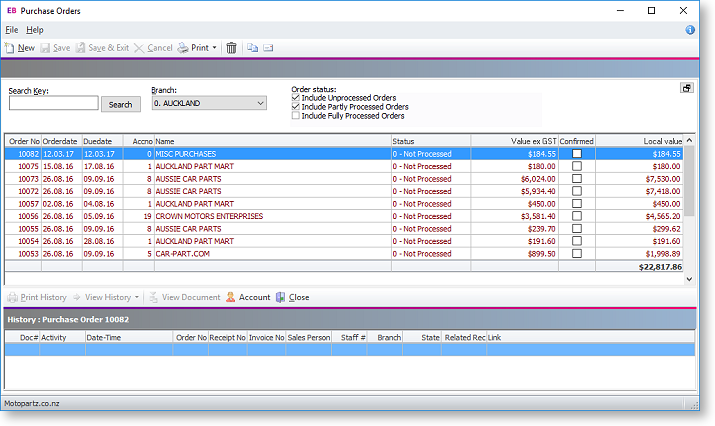
Purchase Orders may be used to instigate the purchasing cycle. This functionality allows the entry, searching, editing, and receipting of Purchase Orders, which can later be "converted" into Creditor Invoices to assist in keeping the purchases cycle accurate.

To view existing orders:
-
Enter text in the Search Key field.
-
Select a Branch from the drop-down box
-
Filter by the Order status
-
Click Search.
Double-click on the appropriate row to drill-down and open the order. Or right-click and select Edit the Selected Order.
The table below details all the fields and functions within this window.
|
Field |
Description |
|
Search Key |
This restricts the Purchase Order grid to display orders whose creditor names have part of the search string in their name. E.g. MAR for will list Purchase Orders with the word Mart and Market in its name. Alternatively if you have details related to the Purchase Order as the Order No, Account No or the Name, enter this information in the Search Key field and click the Search button. This provides you with a list of Purchase Orders that match the search criteria. |
|
Branch |
This filters the grid to display orders that originated at a certain branch only. If <All Branches> is selected this effectively nullifies this filter. |
|
Each of these checkboxes will allow the inclusion of the described order in the grid.
If the Enable extended Purchase Order statuses Company-level profile setting is enabled, two additional statuses are available:
|
|
|
|
This toggles the display of the Purchase Order history window. By default the history grid is not displayed. However when toggled, the window will retain the last setting, i.e. if it was set to display in the last session, it will continue to do so until it is turned off again. |
|
Grid |
The grid is the area that displays a list of the service orders as defined by the search and filter criteria. Right clicking on the Grid header will open a generic popup menu. Right-clicking inside the grid opens a specific popup menu. The order items in the grid are colour coded to provide easy identification or the order progress:
|
|
Order No |
The order number. |
|
Order Date |
The date that the order was processed. |
|
Due date |
The expected date to receive the order. |
|
Accno |
The creditor account number. |
|
Name |
The name of the creditor. This relates to the account number. |
|
Status |
This is the order status: 0 - Not Processed (This has 2 sub categories, current and overdue), 1 - Partly Processed, 2 - Fully Processed. |
|
Value Ex GST |
This is the combined total of the order, excluding GST. |
|
Confirmed |
This checkbox indicates that the supplier/creditor has acknowledged the order. |
|
Local value |
This is the combined total of the order, converted to the local currency. |
|
Edit the selected order |
Takes you to the Order (Entry) window for the selected order. However, you cannot edit a Fully Processed order. This can also be accomplished by double clicking on the order. |
|
Set Status to Fully Processed |
Forces the selected order into the "Fully Processed" status, even if it has not been dispatched or invoiced. |
|
Authorise the Selected Order |
Authorises an order with status "Awaiting Authorisation". This status is only available if the Enable extended Purchase Order statuses Company-level profile setting is enabled. Staff members can only authorise an order if the order total does not exceed their authorisation limit. |
|
Convert Quote to Order |
Changes a Purchase Order Quote (order with the status "Quote") to "Not Processed" to accept a quote. Note: Quotes are only available if the Enable extended Purchase Order statuses Company-level profile setting is enabled. |
|
Delete |
Deletes the order in any status. |
|
Copy Order |
Copies the selected order. |
|
View Purchase Order History |
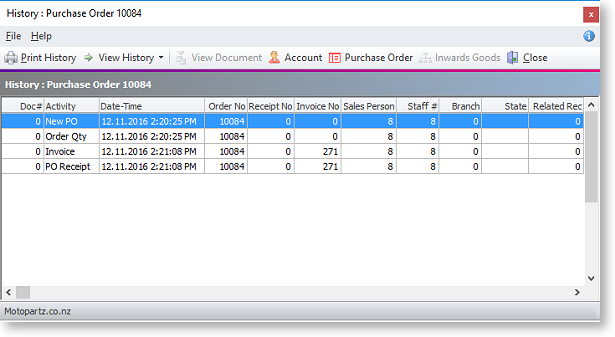
This opens the Purchase Order history (usually displayed at the bottom of the main Purchase Order window) in a separate window:
|
|
Whether the Purchase Order history is docked in the main Purchase Order interface or opened as a separate window, the function and behaviour is still the same. The only difference with the docked version is that the menu functions are available from the right-click menu and not on the main toolbar. Note: To aid performance on large databases when scrolling the search grid you may care to minimise (hide) the History panel, as in this mode the history is not queried from the database. |
|
|
Doc# |
A system-generated number |
|
Activity |
For example New Order, Order Qty. |
|
Date-Time |
The date and time of the activity. |
|
Order No |
Purchase Order Number as selected from top grid. |
|
Receipt No |
The receipt number of the Purchase Order. |
|
Invoice No |
The invoice number of the Purchase Order. |
|
Sales Person |
The salesperson for the Purchase Order line activity. |
|
Staff# |
The Staff # of the salesperson for the Purchase Order line activity. |
|
Branch |
The branch where this sales order was created. |
|
State |
The state of the Purchase Order. |
|
Related Rec |
Any related records to this Purchase Order. |
|
Link |
Displays any documents that have been linked to the Purchase Order, such as PDF invoices or statements. |
|
History Window Right-click Menu |
|
|
Account |
This opens the creditor account details window for the selected history transaction. |
|
Purchase Order |
This opens the Purchase Order for the selected history transaction. |
|
Inwards Goods |
This opens the inward goods window to enter any details for inward goods. |
|
View Document |
This opens a print preview copy of the Purchase Order receipt. |
|
View History |
Allows the user to swap the filter on the window to a different class for the highlighted line. For instance you may wish to drill in from a creditors invoice, locate the Purchase Order(s) that it came from and then see what other events may exist for that Purchase Order (e.g. other receipts or invoices where partial shipment has occurred). |
|
Print History |
This opens a print ready print preview of the Purchase Order History report for the selected history transaction. |
Toolbar

-
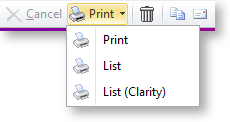
Print
-
Print: This prints the selected order.
-
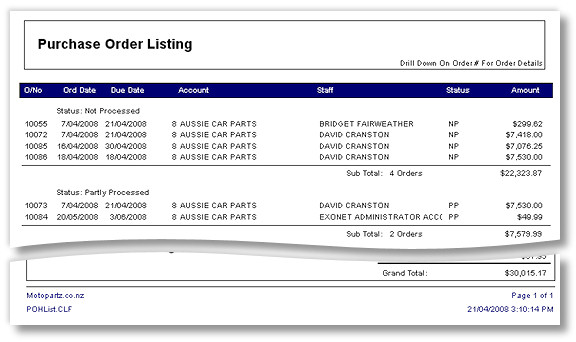
List: This prints the list defined by the search result.
-
List (Clarity): This prints the list to a clarity preview window, click here to see a sample.
-
Delete Order: Clicking this icon marks the order as deleted.
-
Copy Order: This opens the copy order window, providing options to copy selected components of this order. In the Copy To: fields, the order number is automatically assigned to the next one in the list. Choose the account to copy to, note you can use the ? > Tab shortcut to open the account search window. Choose whether to copy the contents of the Header narratives and / or the Line narratives by checking the appropriate checkboxes.
-
Email Order: This emails the selected order directly to the associated Creditor as a PDF attachment.
Note: If the Confirm before sending email profile setting is enabled, the email will appear before sending, giving you the opportunity to edit it. If the setting is disabled, the email will be sent automatically without being displayed.


