Entering a Creditor Invoice
Account > Creditors > {double Click the creditor's name} > (Transactions) > [New Invoice]
You can create an invoice for an existing creditor through the Invoice Entry window. Invoices can be for stock and non-stock transactions.
Creditors Invoice Entry allows invoices from creditors to be entered into MYOB Exo Business, either by manual entry (supporting both stock and GL code entry), or by automatically pulling information from inwards goods receipts or purchase orders.
Non-stock Transactions
To enter a creditor invoice for a non-stock transaction:
- From the Creditor Account Details window, click the Transactions tab. The Transactions page is displayed.
- Click the New Invoice
button on the main toolbar (
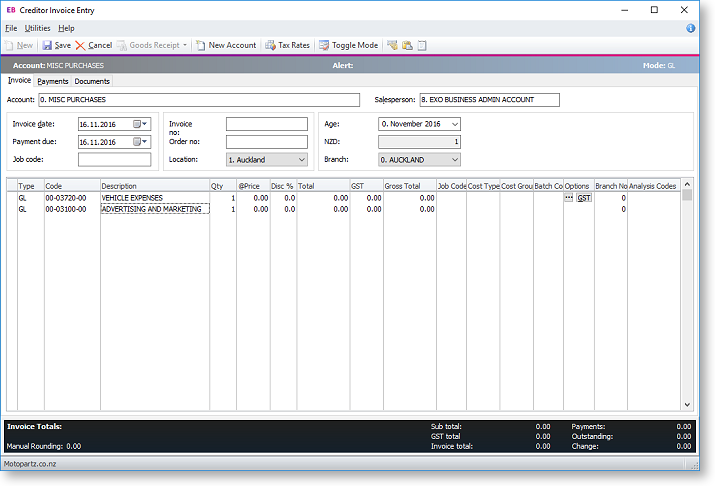
 ). The Creditor Invoice Entry window is displayed.
Tip: You can also open the Invoice Entry window by clicking the Creditors Invoice option in the Transactions menu of the main Exo Business window.

Field Descriptions
|
Field |
Description |
|
Account |
The name of the account. If you have specified a default account in MYOB Exo Business at Config > Admin > Creditors > Creditor Account Groups, the default is displayed here. |
|
Salesperson |
The name of the person who is entering the invoice. You can type the name or select from the list. |
|
Invoice date |
The date of the invoice. This defaults to the current system date but this can be altered by selecting another from the attached calendar. |
|
Payment due |
The date the payment is due. |
|
Job code |
If you are using the Exo Job Costing module, you can enter a job code here to associate the invoice with a job. |
|
Invoice no |
The invoice number. If you do not enter an invoice number, the system will not allow you to save the invoice entry. |
|
Customer order no |
The customer order number. |
|
Location |
The location where the invoice is being generated. |
|
Age |
The relevant financial period from the list. |
|
(currency) |
If you operate in multiple currencies, this is the currency specified for the debtor account, e.g. 'AUD', 'NZD'. If you don't operate in multiple currencies, this field displays as 'N/A' and cannot be edited. |
|
Branch |
The name of the branch where the transaction took place. |
|
Type |
The code for the type of transaction. This is changed by clicking the toggle mode button. It will be GL for direct coding to General Ledger or Stock for stock item purchases. |
|
Code |
Either the GL or Stock code for the item being invoiced. If you do not know the GL or Stock code, press ? + TAB for a list of GL codes and select the one you require. This will automatically enter the description, quantity, price and total fields. |
|
Description |
The description of the item. Once you enter the code, the default description is displayed. If you wish to change this, you can overtype the displayed description. |
|
Qty |
The required quantity. The default is 1 but you can change to the required quantity. |
|
Price |
The unit price of this line item. Whether the price you enter is inclusive or exclusive of GST depends on whether you have selected Creditors GST Inclusive Pricing in MYOB Exo Business at Config > Essential > General Setup. |
|
Total |
The invoice line total. |
Once you have entered all details on the Invoice tab, you can click the Payment tab to enter the payment on the invoice, or click the Documents tab to attach a document to the invoice, e.g. a scanned copy of the original invoice document. Click Save to save the invoice to the creditor’s account.
Notes
-
You can copy an invoice line by pressing ALT + INSERT on your keyboard. This will copy the line that the cursor is in.
-
Use the Paste Invoice Lines button if the invoice lines have been prepared in another Windows application (e.g. spreadsheet), and are to be pasted into the grid.
-
RIGHT CLICK on the line details window to create a one-off stock item. (One-off items allow quick creation of a stock code based on template items, for things such as trade-in items, or creating items as needed from large parts catalogues.)
-
Creditors Invoice maximum limit is 400 rows.
-
The menu item Creditors Invoice Entry from Stock can be used if stock codes are used more frequently than GL codes on a creditors invoice.
-
The Payments tab can be disabled by unticking the Allow entry of creditor payments profile setting in Exo Business Config.
-
Only one document can be attached to each Creditor Invoice. Adding a document to an invoice that already has one attached will result in the new document replacing the existing one. To view the document attached to an invoice, right-click on it on the Transactions tab of the Creditor Account Details window and select View Scanned Original.
Stock Transactions
To enter a creditor’s invoice for a stock transaction:
-
From the Creditor Account Details window, click the Transactions tab. The Transactions page is displayed.
-
Click the New Invoice button. The Creditor Invoice Entry window is displayed.
-
If the Mode field displays "GL", click the Toggle Mode button so that is displays "STOCK".
-
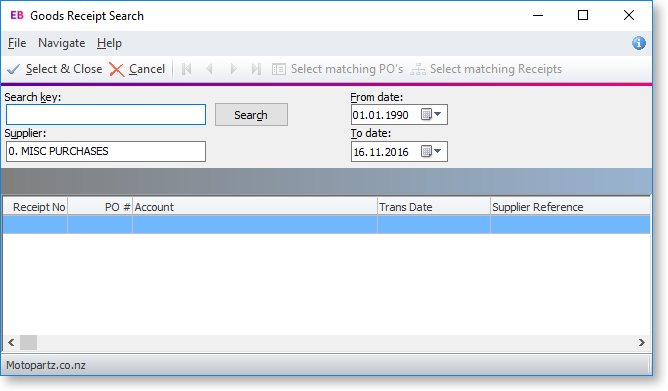
Click the Goods Receipt button. The Goods Receipt Search window opens:

-
You can now receipt multiple purchase orders for one supplier to one Goods Received Note, and then add the landed costs.
In step 4, the Goods Receipt button has two options:

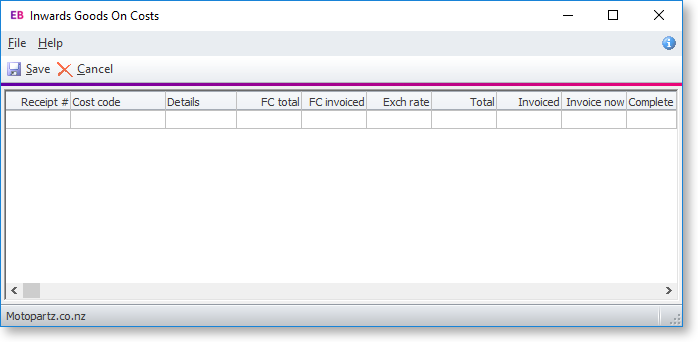
If the On Costs option is selected, the Inwards Goods On Costs window opens:

