Printing Reports
![]()
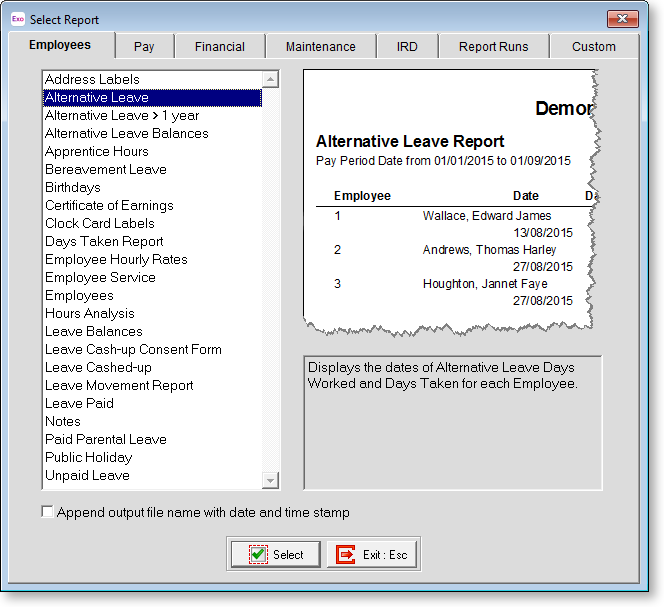
Selecting Print Reports from the Reports menu or clicking the Print Reports button on the toolbar or Pay Cycle opens the Select Report window.

This screen shows the list of reports you can print information from, arranged into tabs. This also shows you what each report is used for.
Ticking the Append output file name with date and time stamp option adds date and time information to the filenames of all report files you generate.
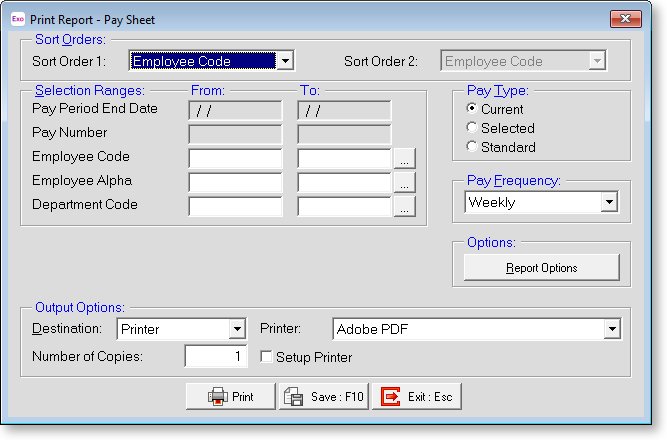
Double-click on the report that you want to print or highlight it and click Select. This opens the Print Report options screen:

Reports can be printed in a variety of ways, depending on the options selected here.
Sort Orders
Sort Order 1 If a choice of primary sort order is available for a particular report, the first choice will be highlighted. The options in the list could include:
- Employee Code
- Employee Alpha
- Department
- Cost Centre
- Allowance
Sort Order 2 If a secondary sort order is available, the first choice will be highlighted. This means that the Sort Order 2 option will only be available if you have something other than Employee Code or Alpha highlighted in Sort Order 1, e.g. Department. The options in the list could include:
- Employee Code
- Employee Alpha
- Department
Selection Ranges
Pay Period Date The From: and To: dates are only available if the pay frequency is other than the Current Pay Period. All Period reports (such as Pay Sheet, Payslips etc) will default to the Current Pay Frequency and as such do not require a date range.
If the screen has defaulted to Current (for example) and you wish to select a particular date range, go to Pay Type and click on Selected. The Cursor will then move to the Pay Period Date (From/To). Enter the from date (01/11/98 or 1998) and press Enter. Fill in the To date (30/11/98 or 1998) and press Enter.
The other choices under Selection Range would normally be left blank to ensure that all items in the range are included.
Employee Code/Employee Alpha Enter values here if you want a report for a particular employee or range of employees. These fields validate that you have entered a correct code. To look up a list of employee codes, enter zero here.
Department Enter values here if you want a report for a particular department or range of departments. These fields validate that you have entered a correct code. To look up a list of department codes, enter zero here.
Default Cost Centre Enter values here if you want a report for a particular Cost Centre or range of Cost Centres. These fields validate that you have entered a correct Cost Centre code. To look up a list of department codes, enter zero here.
Pay Number Each Pay Period is numbered. Enter values here if you want a report for a particular Pay Number.
Pay Type
This determines the date\pay period to which the report relates. Select the type required. Choose from:
- Current - The Current Pay Period
- Selected - A selected date range
- Standard - The Standard Pay
Pay Frequency
Select the desired pay frequency from:
- Weekly
- Fortnightly
- Bi-Monthly
- 4 Weekly
- Monthly
- Any - This option will provide a report on any frequency used within the period the report is called for. This option is only available if you select "Selected" or "Standard" for the Pay Type.
Options
If the report has other options specific to that report, these can be accessed by clicking the Report Options button.
Additional Input
These fields are only available on some reports, e.g. Payslips. They allow you to put in notes for the selected employee(s).
NOTE: These notes are not printed if the employee already has a Payslip Note specified in the Current Pay.
Output Options
Destination Select where the report should be directed to. Choose from:
- Printer
- Screen
- File (PDF)
- CSV Output
- Excel Output (XLSX)
- MyStaffInfo, if the MYOB MyStaffInfo product is installed
- Distribution - this option lets you print, email and/or upload payslips to all or some employees in a single operation.
NOTE: See the MyStaffInfo Help for information on sending reports and payslips to MyStaffInfo.
The custom payslip report offers an additional Email option, which emails the report to all employees who have an email address defined.
Printer This displays the name of the printer that you are printing to. Select the Setup Print option to display printing options before the report is printed; otherwise the report will be sent directly to the printer using the default options.
File Name This displays the name of the file that will be created when "File" or "CSV Output" are selected.
Number of copies The default number of copies is 1. Enter the number of copies you require.
