Variables and Expressions: To Add a Variable and an Expression
In the following activity, you will learn how to use variables and expressions in a report.
Story
Suppose that you are a technical specialist in your company who is working on simple customizations. A sales manager of your company has requested a report that displays data about vendors, so that vendors are grouped by vendor class. In each class, vendors should be numbered sequentially. You know that a colleague has created such a report, but without numbering. You decide to change the report that your colleague has created.
Process Overview
In the Report Designer, you will open the AP6550C6.RPX report, which is a modified copy of the Vendor Summary (AP6550C6) report. In the section in which vendors are listed, you will add two variables. The first variable will calculate the visibility of a vendor. The second variable will calculate the sequential number of a vendor in a particular class and will be incremented by one for only the vendors that are visible.
System Preparation
Before you perform the steps of this activity, make sure that the following tasks have been performed:
- You have installed the MYOB Acumatica Report Designer, as described in Report Designer: To Install the MYOB Acumatica Report Designer.
- You have installed an MYOB Acumatica instance with the U100 dataset, or a system administrator has performed this task for you.
- You have signed in to MYOB Acumatica as the system administrator by using the gibbs username and the
123 password.Tip:The gibbs user is assigned the Administrator role and the Report Designer role. Thus, this user has sufficient access rights to manage system configuration and to preview, save, and publish reports.
Also, to prepare for use the file that is intended for this activity, do the following:
- Download the AP6550C6.rpx file.
- Open the downloaded file in the Report Designer.
- On the Report Designer menu bar, select , which opens the Save Report on Server dialog box.
- In the dialog box, specify the connection string and sign-in credentials of your
MYOB Acumatica instance, type AP6550C6 as the report name, and click
OK.
The report is saved on the server.
Step 1: Adding Variables to a Report Section
To add variables to a section of the AP6550C6 report, do the following:
- In the Report Designer, make sure that the AP6550C6 report (which you have saved to the server) is open.
- Select the
groupHeaderSection1 (Header of group1)section. In the Properties pane, in the property of the Properties tab, click the More button.The ReportVariable Collection Editor opens, where you can add variables to the report and define their properties.
- In the Members pane of the ReportVariable Collection Editor, click Add to add a new variable.
- In the property on the right pane, type IsGroup1Visible to specify the name of the variable. You will use this variable to calculate the visibility of a vendor.
- In the property, click the More button.
The Expression Editor opens.
- In the bottom pane of the Expression Editor, enter the following expression:
=IIF([@SupressZeroBal]=True AND Sum([APHistory.FinYtdBalance]) =
0, False, True) AND IIF([@SupressInactiveVendors]=True AND [Vendor.Status] =
'I', False, True).
This is a visibility expression of the
groupHeaderSection1 (Header of group1)section. This expression is true if the summary balance of the vendor is not zero and the status of the vendor is not inactive.You can type this expression in the bottom pane of the Expression Editor or you can compose the expression by selecting necessary components from the left, middle, and right panes of the Expression Editor.
- Click OK to close the Expression Editor.
- In the Members pane of the ReportVariable Collection Editor, click Add to add a new variable.
- In the property on the right pane, type Num, which is the name of the second variable.
- In the property, leave the default option—that is, WhileRead. This option directs the system to process the values of variables while reading these variables.
- In the property, select NewGroup to reset the value of the
Numvariable.This means that in the
NewGroupgroup, the variable should be calculated locally. If you have selected this property, for each instance of the specified group, the variable has an independent value. At the end of each group, the variable is reset. - In the property, type =$Num + IIF($IsGroup1Visible, 1,
0).
This means that the value of the
Numvariable will be incremented by 1 only if theIsGroup1Visiblevariable is true.As with the
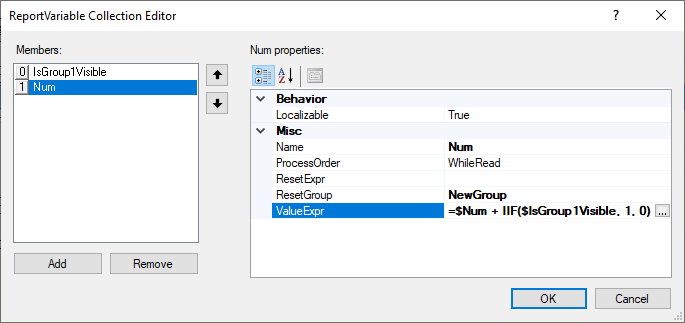
IsGroup1Visiblevariable, you can compose the expression in the Expression Editor. Notice that you have specifiedIsGroup1Visiblefirst andNumsecond because theNumvalue is calculated by using theIsGroup1Visiblevalue.The following screenshot shows the variables added to
groupHeaderSection1(Header of group1).Figure 1. Variables in the ReportVariables Collection Editor 
- Click OK to save your changes and close the ReportVariable Collection Editor.
- On the Report Designer window toolbar, click Save.
Step 2: Adding a Text Box to Display Numbers
To add a text box to display the numbers for the vendors, while you are still working with the AP6550C6 report in the Report Designer, do the following:
- From the Tools pane, drag the TextBox element to the left side of the
groupHeaderSection1 (Header of group1)section, and enter the =$Num value for the added text box. - Optional: To set a uniform style for text boxes in the section, while the text box is selected, in the property on the Properties tab, type Normal.
- On the Report Designer window toolbar, click Save to save the report on the server.
The report in design mode is shown in the following screenshot.

Step 3: Viewing the Report
To view the report, do the following:
- In MYOB Acumatica, open the S150 Vendor Summary (AP6550C6) report form by searching for its
identifier.Tip:This report, which you have modified in this activity, has been published in the U100 dataset. That is, it has been added to the Site Map (SM200520) form, and you can access it in MYOB Acumatica.
- On the report form toolbar, click Run Report.
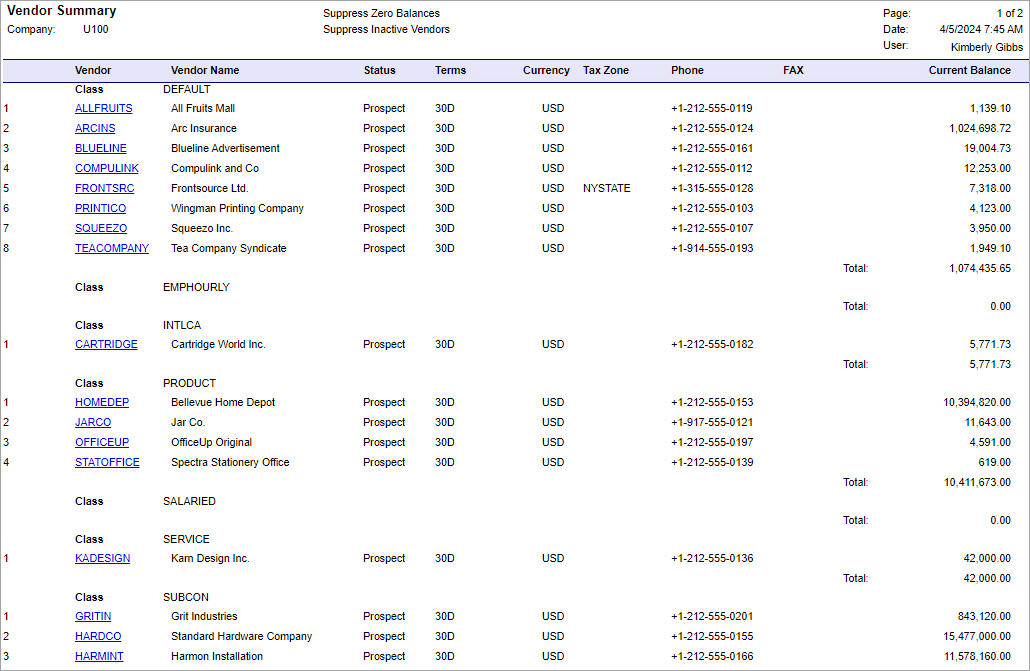
The resulting report is shown in the following screenshot.

