Asynchronous Operations: To Implement an Asynchronous Operation
The following activity will walk you through the process of implementing a long-running action and executing it asynchronously.
Story
Suppose that as part of the PhoneRepairShop customization project, you need to create an action that users can invoke to validate the prices of the repair items. These items are listed on the Repair Items tab of the Services and Prices (RS203000) form. Price validation will be performed by an external service and may take a long time to complete—so it should be executed asynchronously.
To implement this, you need to define an action in the graph of the form and configure the associated button on the table toolbar. You also need to write the code that will validate the prices and execute this code asynchronously by using the LongOperationManager.StartOperation method.
Process Overview
- Adding the
IsPriceValidatedfield (which you’ll add to the database during system preparation) to theRSSVRepairItemDAC, and updating the TypeScript file of the Services and Prices (RS203000) form. The system will display this field as the Price Validated column in the table on the Repair Items tab. - Defining the logic that validates the repair item prices in the
ValidatePricesmethod, implementing theValidateItemPricesaction to run theValidatePricesmethod asynchronously, and creating the associated Validate Prices button on the table toolbar. - Testing the Validate Prices button and the underlying action.
System Preparation
Before you begin performing the steps of this activity, do the following:
- Prepare an MYOB Acumatica instance by performing the Test Instance for Customization: To Deploy an Instance with Custom Maintenance and Data Entry Forms prerequisite activity.
- In SQL Server Management Studio, execute the
T230_AddColumn_RSSVRepairItem.sql script.Tip: The script is provided in the Customization\T230\SourceFiles\DBScripts folder, which you’ve downloaded from Acumatica GitHub.
- To update the customization project, do the following in the Customization
Project Editor opened for the PhoneRepairShop project:
- In the navigation pane, click Database Scripts.
- On the More menu of the Database Scripts page, which opens, click Reload from Database.
Step 1: Updating the Services and Prices (RS203000) Form to Display the Price Validated Column and the Validate Prices Button
In this step, you’ll add the IsPriceValidated field to the
RSSVRepairItem DAC. You’ll also update the corresponding
TypeScript file to show the Price Validated column in the
table and the Validate Prices button on the table toolbar of
the Repair Items tab. Do the following:
- Add the following code to the
RSSVRepairItem.csfile after theBasePricefield definition.#region IsPriceValidated [PXDBBool] [PXDefault(false)] [PXUIField(DisplayName = "Price Validated", Enabled = false)] public virtual bool? IsPriceValidated { get; set; } public abstract class isPriceValidated : PX.Data.BQL.BqlBool.Field<isPriceValidated> { } #endregionNote that the field is disabled in the UI because it will be updated by an external service. The value is set to
falseby default. - Open the RS203000.ts file in the Modern UI
Files node of the Customization Project Editor, and do the
following:
- Add the following code in the
RSSVRepairItemview class after theBasePricefield.IsPriceValidated: PXFieldState;
This code has added the Price Validated column—which is represented by the
IsPriceValidatedDAC field—to the table on the Repair Items tab. - Specify the PXActionState property with the name of
the
ValidateItemPricesaction (which you’ll declare in Step 3) in theRSSVRepairItemview class, as shown in the following code.ValidateItemPrices: PXActionState;
The code above adds the Validate Prices button to the table toolbar of the Repair Items tab.
- Add PXActionState to the list of imports if it has not been added yet.
- Add the following code in the
- Save your changes.
Step 2: Defining the Logic Used to Validate Prices
Next, you’ll define the method in which the repair items prices are validated, and then you’ll call this method in the LongOperationManager.StartOperation method.
To define the method in which the repair items prices are validated, do the following:
- Add the
ValidatePricesstatic method to theRSSVRepairPriceMaintgraph. TheValidatePricesmethod validates the repair items prices for the selected record on the Services and Prices (RS203000) form.private static void ValidatePrices(RSSVRepairPrice repairPriceItem) { // Create an instance of the RSSVRepairPriceMaint graph // and set the Current property of its RepairPrices view. var priceMaint = PXGraph.CreateInstance<RSSVRepairPriceMaint>(); priceMaint.RepairPrices.Current = priceMaint.RepairPrices. Search<RSSVRepairPrice.serviceID, RSSVRepairPrice.deviceID> (repairPriceItem.ServiceID, repairPriceItem.DeviceID); // Set a delay to mimic connecting to an external service to validate the // repair item prices. // In a real world scenario, you would connect to an actual external // service and make an API request to validate the prices for // the repair items. Thread.Sleep(3000); // Update the Price Validated field for each repair item on // the Repair Items tab: // Here we are assuming that the validation was successful from the // external service and are setting IsPriceValidated to true for // each repair item. foreach (RSSVRepairItem item in priceMaint.RepairItems.Select()) { // Set IsPriceValidated to true for each repair item. item.IsPriceValidated = true; // Update the cache with the above change for each repair item. priceMaint.RepairItems.Update(item); } // Trigger the Save action to save the changes stored in the cache // to the database. priceMaint.Actions.PressSave(); } - Make sure the following
usingdirectives have been added to theRSSVRepairPriceMaint.csfile.using System.Collections; using System.Collections.Generic; using System.Threading;
Step 3: Defining the ValidateItemPrices Action
Now you’ll define the ValidateItemPrices action, which:
- Defines the underlying action for the Validate Prices button on the table toolbar of the Repair Items tab
- Invokes the LongOperationManager.StartOperation method, which
executes the
ValidatePricesmethod asynchronously.
Add the following code to the RSSVRepairPriceMaint graph.
        #region Actions
        public PXAction<RSSVRepairPrice> ValidateItemPrices = null!;
        [PXButton(DisplayOnMainToolbar = false, CommitChanges = true)]
        [PXUIField(DisplayName = "Validate Prices", Enabled = true)]
        protected virtual IEnumerable validateItemPrices(PXAdapter adapter)
        {
            // Populate a local list variable.
            List<RSSVRepairPrice> list = new List<RSSVRepairPrice>();
            foreach (RSSVRepairPrice repairItemPrice in adapter.Get<RSSVRepairPrice>())
            {
                list.Add(repairItemPrice);
            }

            // Trigger the Save action to save changes in the database.
            Actions.PressSave();

            var repairPriceItem = RepairPrices.Current;
            // Execute the ValidatePrices method asynchronously by
            // using LongOperationManager.StartOperation
             LongOperationManager.StartOperation(cancellationToken =>
             {
                ValidatePrices(repairPriceItem);
             });

            // Return the local list variable.
            return list;
        }
        #endregion
Step 4: Testing the Validate Prices Button and the Associated Action
To test the Validate Prices button and the underlying action, do the following:
- Rebuild the
PhoneRepairShop_Codeproject in Visual Studio. - In the Customization Project Editor, publish the customization project.
- In MYOB Acumatica, open the Services and Prices (RS203000) form.
- Open any record that doesn’t have the Price
Validated check box selected for any of the items on the
Repair Items tab.
Confirm that the Validate Prices button is available on the table toolbar of the Repair Items tab.
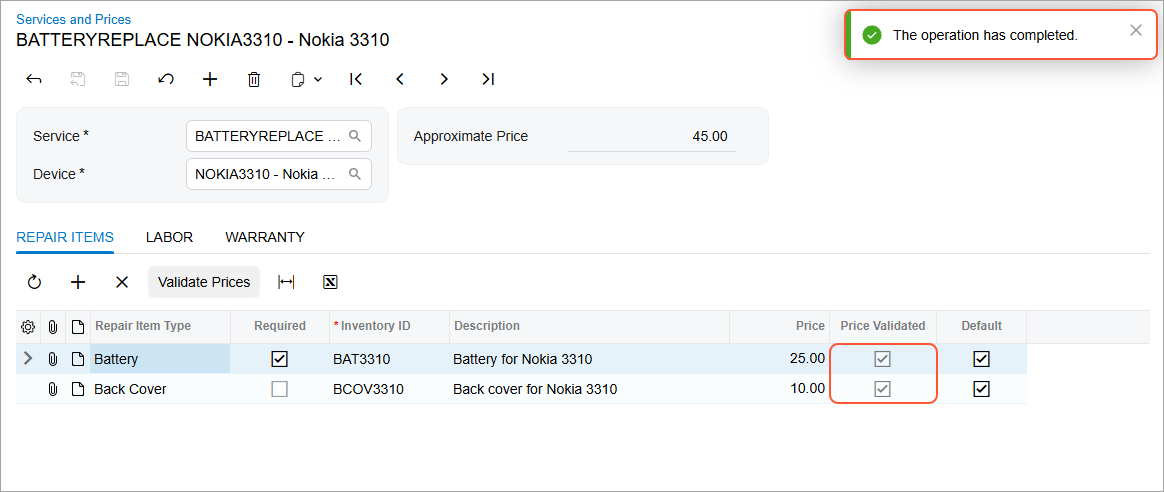
- On the table toolbar, click Validate Prices.
A notification appears indicating the status of the processing, as shown below.
Figure 1. Validation of the prices of repair items 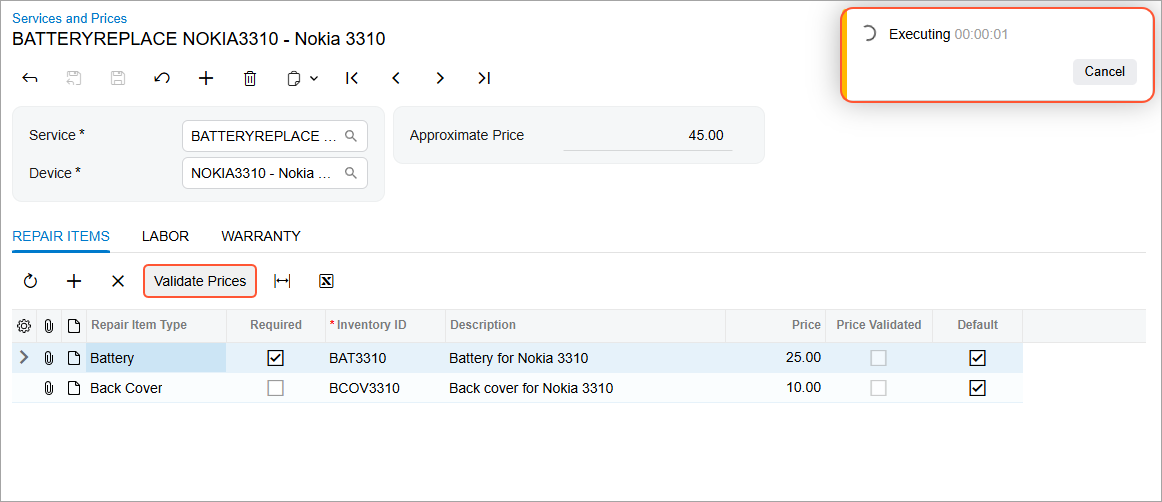
When the process is complete, the Price Validated check box for each repair item is selected on the Repair Items tab, as shown below.
Figure 2. Update of the Price Validated column