
Register a Customer Credit Card
In this example, through the contract-based REST API, you will
create a customer payment method that corresponds to a customer credit
card. To create this customer payment method, you will use
the PUT HTTP method and the
CustomerPaymentMethod entity of the Default/25.200.001 endpoint.
You will submit the customer profile ID and the payment profile ID of the customer in Authorize.Net to the Customer Payment Methods (AR303010) form through the contract-based REST API. The customer profile ID and the payment profile ID are used to identify the customer and the customer's card, respectively, across the payment gateway and MYOB Acumatica. The payment profile ID, instead of any information specific to the card, is saved to the customer payment method in MYOB Acumatica.
System Preparation
Before you test the code below, you need to do the following to configure your client application and the MYOB Acumatica instance to be used:
- Deploy a new MYOB Acumatica instance with the T100 dataset. For details on deploying an instance, see Instance Deployment: To Deploy an Instance with Demo Data.
- If you are using Postman as the client application for testing, in the IntegrationDevelopmentGuide.postman_collection.json collection, make sure that the collection’s variables have the proper values. This collection is located in the IntegrationDevelopment\Help folder of the Help-and-Training-Examples repository on GitHub.
- To sign in to the instance in the client application, use the tenant name (which you specified when you created the instance) and the MYSTORE branch.
- Make sure that you have configured the HTTPS connection.
- To get a test account at the Authorize.Net payment gateway, create a sandbox
account at https://developer.authorize.net/hello_world.html.
After you create this account, you will get the credentials to be used in payment processing (that is, the API login ID and transaction key). After these credentials are generated, you can view the API login ID and generate a new transaction key and signature key on the API Credentials & Keys page of your account on https://sandbox.authorize.net/. (You go to this page as follows: ; see the following screenshots.)
Figure 1. Sandbox account settings 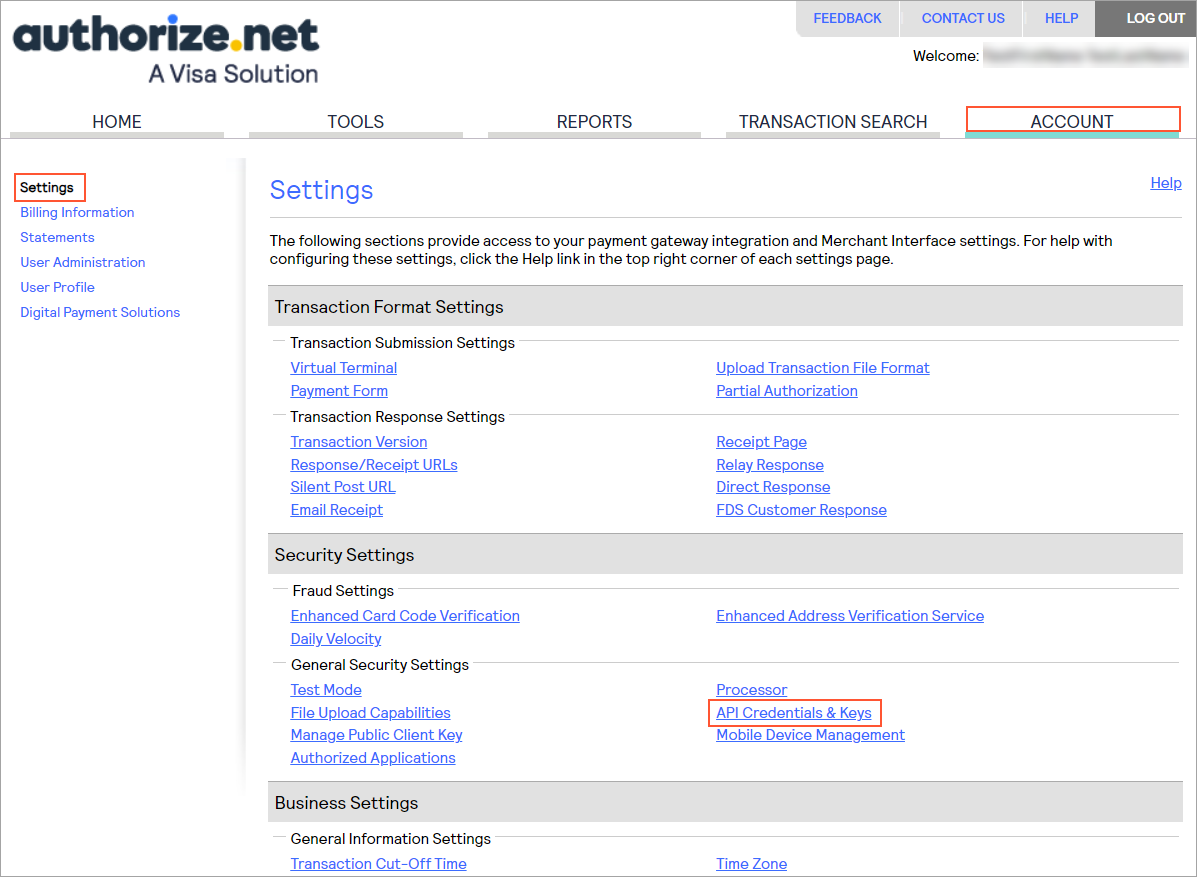
Figure 2. API Credentials & Keys page 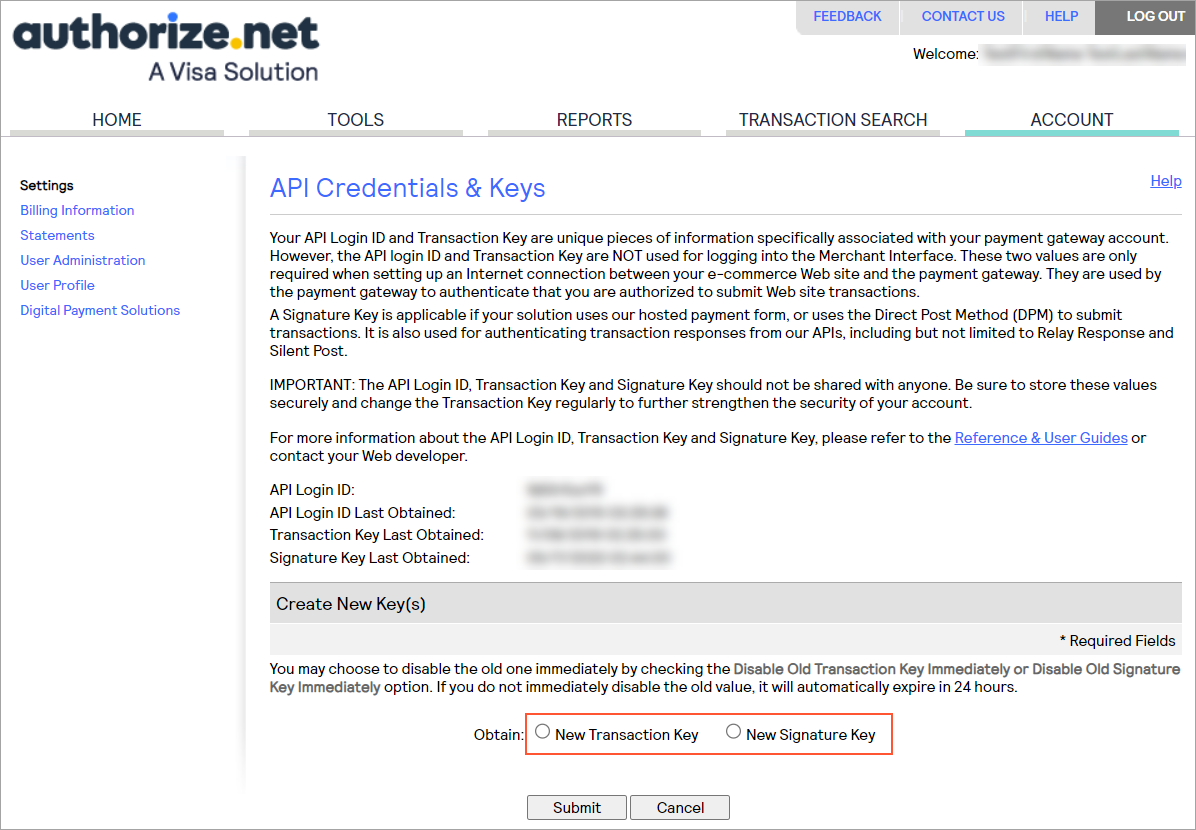
- Set up the connection with the payment gateway by using your credentials as
follows:
- On the Processing Centers (CA205000) form, select the AUTHNETUSD processing center, which has been preconfigured in the system. This processing center is associated with the VISA payment method, which is used in this example.
- To use the payment gateway in test mode (as opposed to live mode),
on the Plug-In Parameters tab, specify the
following settings and save your changes:
- MERCNAME: The API login ID of your sandbox account
- SIGNKEY: The signature key of your sandbox account
- TRANKEY: The transaction key of your sandbox account
Attention:The payment processing credentials—API login ID, transaction key, and signature key—are not the login ID or password that you receive from Authorize.Net to access the Merchant Interface. By using the sandbox account's login ID and password, you can sign in to the sandbox Authorize.Net Merchant Interface (https://sandbox.authorize.net/), where you can review the transactions that have been processed at the gateway and manage the registered credit cards. - On the form toolbar, click Test Credentials to check the connection settings.
If the test credentials are accepted by the processing center, the connection to the payment gateway is ready.
- To process the credit card payments of the customer you will work with in
this activity by using Authorize.Net, create a customer profile for this
customer in your Authorize.Net developer sandbox account as follows:
- In the Customer Information Manager tool of Authorize.Net on https://sandbox.authorize.net/, add a new customer profile. In the
Customer ID box of the new customer
profile, specify the ID of the customer in MYOB Acumatica: C000000003, as shown in the screenshot below.Tip:In your client application, you can create a customer profile by using the API that is provided by Authorize.Net. The integration between your client application and Authorize.Net is outside of the scope of this activity.
- In the Card Number box, type
4007000000027 as the card number (which
is the demo Visa card number you can use with Authorize.Net). In the
Expiration Date box, specify any date
that is later than the current date. Tip:You can use any other test credit card number that you have received with your Authorize.Net sandbox account.
Figure 3. Customer Information Manager 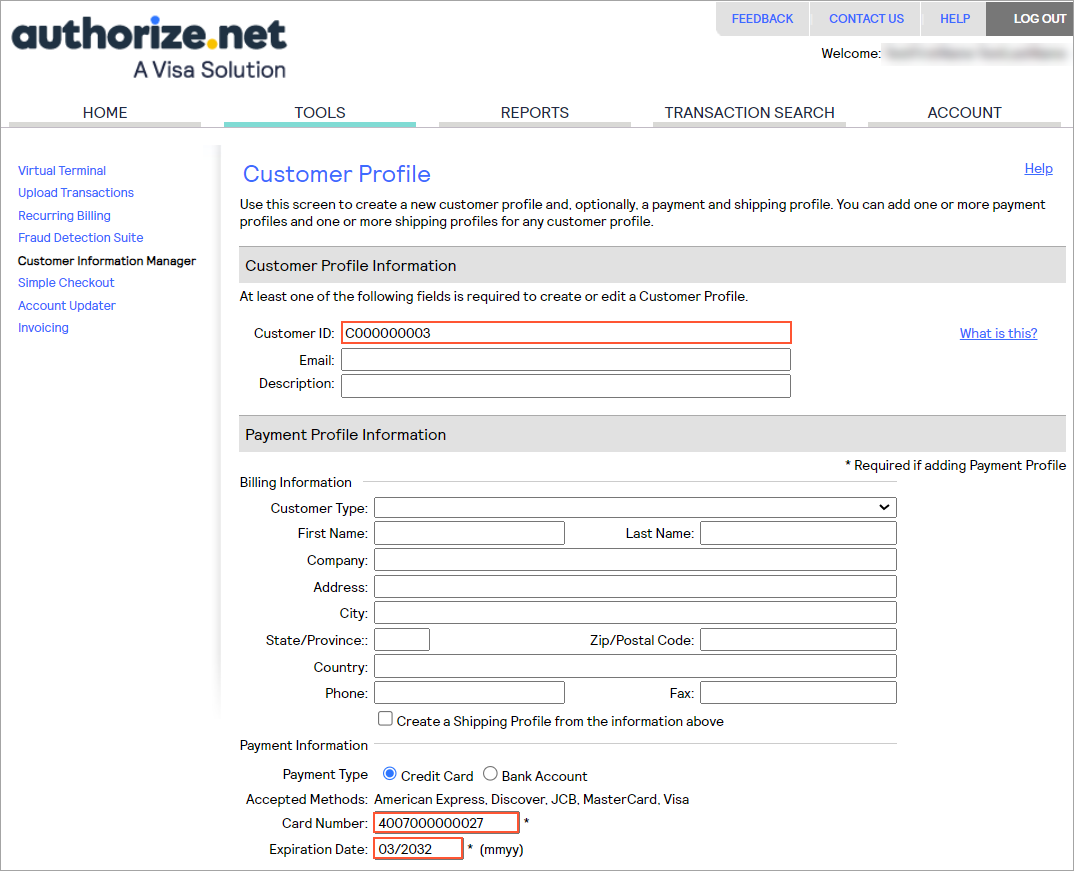
Important:Do not use the data of a real credit card in this example! If you do, the money for the testing operations will be charged to this card.
- In the Customer Information Manager tool of Authorize.Net on https://sandbox.authorize.net/, add a new customer profile. In the
Customer ID box of the new customer
profile, specify the ID of the customer in MYOB Acumatica: C000000003, as shown in the screenshot below.
Request
You can use the following request example to register a customer credit card through the contract-based REST API.
In the body of the request, you replace the values of the
CustomerProfileID field and the Payment Profile
ID detail with the values that you have received during the
registration of the customer payment method in Authorize.Net.
<MYOB Acumatica host> is the URL of the MYOB Acumatica
host (such as https://my.acumatica.com). You need to use the instance name in the
URL of the request (such as https://my.acumatica.com/MyInstance) if the instance
is not installed in the root of the website.PUT /CustomerPaymentMethod?
$select=CardAccountNbr,Details/Name&
$expand=Details HTTP/1.1
Host: <MYOB Acumatica host>/entity/Default/25.200.001
Accept: application/json
Content-Type: application/json
{
"PaymentMethod":{"value":"VISA"},
"CustomerID":{"value":"C000000003"},
"CustomerProfileID":{"value":"1510928386"},
"CashAccount":{"value":"102050MYST"},
"Details":[
{
"Name":{"value":"Payment Profile ID"},
"Value":{"value":"1516403307"}
}
]
}Usage Notes
To capture a payment through the contract-based REST API, you need to use the CaptureCreditCardPayment action, which is available for the Payment entity of the Default/25.200.001 endpoint. Because the capturing of a credit card payment is a long-running operation, you need to monitor the status of the long-running operation before retrieving the result of the capturing.