
To Import the WSDL File Into the Development Environment
When the WSDL file is generated, you must import it into your development environment to generate proxy classes. If necessary, see the documentation of your development environment to find out the correct way of building the proxy classes based on the WSDL definition.
The procedure below is described based on an example of the creation of a console project with the MyBIIntegrationSBAPI name that uses the MYBIINTEGRATION web service. You can create another type of Visual Studio project with another name and use any other web service define on the Web Services (SM207040) form in this procedure.
In this topic, you will find instructions on how to implement the proxy classes by using Visual Studio 2019.
Importing the WSDL File into a Visual Studio Project
- Open Visual Studio, and create a new Visual C# console application with the
MyBIIntegrationSBAPI name and the .NET Framework 4.8
target framework.Note:To create a console application, click on the main menu of Visual Studio. In the Create a new project dialog box, which appears, select the Console App (.Net Framework) C# template and click Next. In the Configure your new project dialog box, specify the name and location of the solution, select the .NET Framework 4.8 framework version, and click Create.
The MyBIIntegration application that you have created contains the Program.cs file with the
Programclass. - Add to the project a reference to the MYOB Acumatica web service as follows:
- On the main menu of Visual Studio, click .
- In the Add Service Reference dialog box, which appears, click Advanced.
- In the Service Reference Settings dialog box, which appears, click Add Web Reference.
- In the URL box of the Add Web Reference dialog
box, which appears, specify the URL of the MYBIINTEGRATION
web service (see item 1 in the following screenshot). Note:To copy the URL of the service, on the Web Services (SM207040) form, select MYBIINTEGRATION in the Service ID box, click Generate and then View Generated on the form toolbar, and copy the URL from the address line in the browser for the page that opens. In this example, the URL is http://localhost/MyStoreInstance/Soap/MYBIINTEGRATION.asmx.
- Click Go (2) to make Visual Studio connect to the web service.Note:If your MYOB Acumatica website uses a self-signed certificate, Visual Studio displays security alert windows with warnings on the certificate. Click Yes in these windows to proceed.
- In the Web reference name box, type MyBIIntegration (3). This name will be used as a namespace for the web service classes generated by Visual Studio based on the WSDL description of the service.
- Click Add Reference (4) to close the dialog box and add to the project the reference to the specified service.
Figure 1. Add Web Reference dialog box 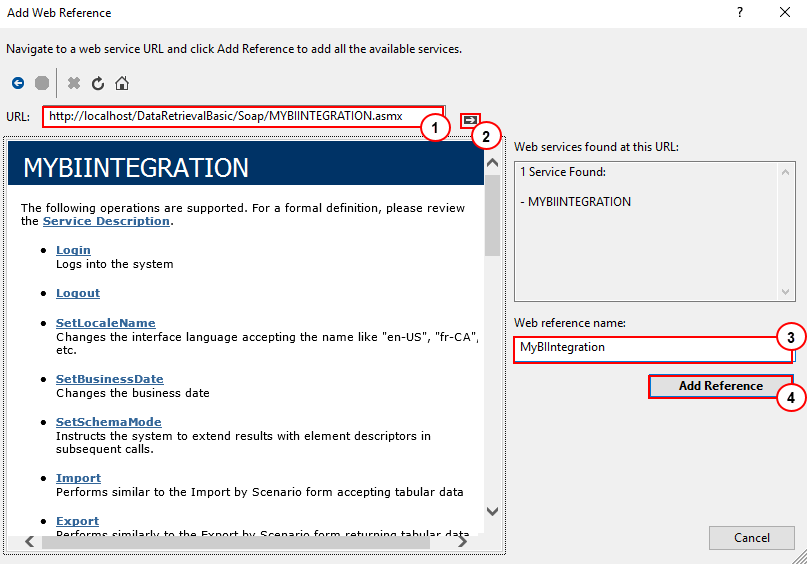 Visual Studio adds to the project the Web References project folder with the MyBIIntegration web service reference in it, as shown in the following screenshot.
Figure 2. Solution Explorer 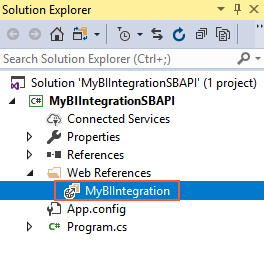
Note:If you need to update a web reference to the MYOB Acumatica web service in a Visual Studio project, you can update the WSDL description in MYOB Acumatica and update the web reference in the project by right-clicking the web reference in Solution Explorer and selecting Update Web Reference, as shown in the following screenshot.Figure 2. Update Web Reference menu item 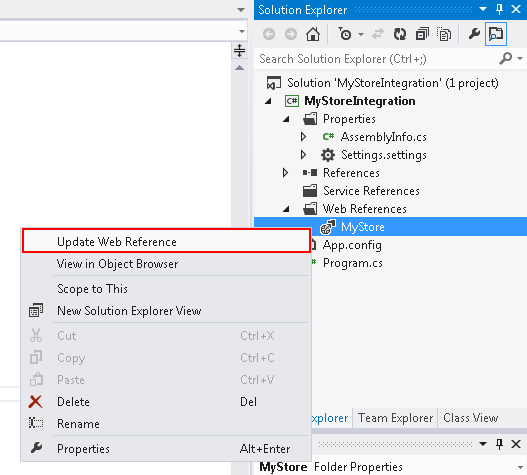
- Rebuild the project.