Workflow-Identifying Fields: To Add Conditions with User-Defined Fields
The following activity will walk you through the process of creating workflow conditions with user-defined fields.
User-defined fields are fields an organization can add directly to the MYOB Acumatica data entry forms to gather information that is important to the organization but does not already appear on the form. The fields can be displayed on the User-Defined Fields tab if the user should enter their values, or they can be hidden if they will be used internally. These fields are based on predefined and site-specific attributes that have been defined in the system. For details on user-defined fields, see Managing Attributes and User-Defined Fields.
Story
Acting as a technical specialist, you need to add the following conditions to the workflow of sales orders on the Sales Orders (SO301000) form:
- TotalMoreThan800, which will be used to automatically put a sales order on hold if its Order Total is greater than $800 and the sales order has not been yet reviewed
- TotalLessThan800, which will be used to automatically remove a sales order from hold if its Order Total is less than $800 and it has not been put on hold manually
The system does not store information about whether the sales order has been reviewed or whether it has been put on hold manually. Therefore, you need to create user-defined fields for the workflow of sales orders with the SO order type. One user-defined field will be used to check if a sales order has been put on hold manually, and another will be used to check whether it has already been removed from hold. Because these fields will be used only internally, you will define them to be hidden.
Process Overview
On the Attributes (CS205000) form, you will create the attributes that you will use for user-defined fields. You will then add user-defined fields for these attributes on the Edit User-Defined Fields (CS205020) form. As an optional step, you will add the created fields to the customization project on the User-Defined Fields page of the Customization Project Editor.
By using the Fields page, you will make the fields hidden on the Sales Orders (SO301000) form because these fields represent internal flags that should not be displayed to users.
By using the Conditions page, you will add the conditions that use the user-defined fields.
System Preparation
Before you begin adding a new state, do the following:
- Launch the MYOB Acumatica website with the U100 dataset preloaded, and sign in as a system
administrator by using the gibbs username and the 123
password.Tip:The gibbs user is assigned the Administrator role, which has sufficient access rights to customize workflows.
- Make sure that you have learned how to configure conditions, as described in Conditions and Transitions: General Information.
- Make sure that you have completed the Workflow-Identifying Fields: To Create an Inherited Workflow activity.
Step 1: Creating Attributes
In this step, you will create the attributes that will correspond to the user-defined fields. In MYOB Acumatica, perform the following instructions:
- On the Attributes (CS205000) form, create an
attribute with the following settings:
- Attribute ID: SOONHOLD
- Description: SO On Hold
- Control Type: Checkbox
You will use this attribute to check whether a sales order has been put on hold manually, and to keep the sales order on hold if its Order Total is less than $800.
- On the form toolbar, click Save.
- Add another attribute with the following settings:
- Attribute ID: SOREVIEW
- Description: SO Reviewed
- Control Type: Checkbox
You will use this attribute to check whether a sales order was manually removed from hold previously.
- On the form toolbar, click Save.
Step 2: Adding User-Defined Fields to the Form
In this step, you will add to the Sales Orders (SO301000) form the user-defined fields that correspond to the attributes you have created. In MYOB Acumatica, perform the following instructions:
- Open the Sales Orders (SO301000) form.
- On the form title bar, click .
- On the Edit User-Defined Fields (CS205020) form, which
opens, add user-defined fields for the created attributes as follows:
- On the form toolbar, click Add User-Defined Field.
- In the Attribute ID box of the User-Defined Field Parameters dialog box, which opens, select SOONHOLD.
- Click OK to save your changes and close the dialog box.
- On the form toolbar, click Add User-Defined Field again.
- In the Attribute ID box of the User-Defined Field Parameters dialog box, select SOREVIEW.
- Click OK to save your changes and close the dialog box.
- Click the back arrow to save the added fields and return to the Sales Orders form.
Step 3 (Optional): Adding the User-Defined Fields to the Customization Project
As an optional step, you can add the user-defined fields you have created to your customization project. In this case, it will be possible to export the customization project and then import and publish it on another instance without the need to create user-defined fields on this instance manually. To add the fields to the customization project, do the following:
- For the SalesOrdersCheckHold customization project, in which you have created a customized workflow in Workflow-Identifying Fields: To Create an Inherited Workflow, open the Customization Project Editor.
- In the navigation pane, click User-Defined Fields.
The User-Defined Fields page opens.
- On the page toolbar, click Add New Record.
- In the Add User-Defined Fields dialog box, which opens, select the unlabeled check boxes in the rows with the SOONHOLD and SOREVIEW attribute IDs.
- Click Save to close the dialog box and save your
changes.
The selected user-defined fields have been added to the customization project.
Step 4: Hiding the User-Defined Fields from the Form
To add the user-defined fields to the workflow and hide them on the Sales Orders (SO301000) form, in the Customization Project Editor for the SalesOrdersCheckHold customization project, perform the following instructions:
- In the navigation pane, click .
The SO30100 (Sales Orders) Fields page opens.
- On the page toolbar, click Add New Record.
- In the Add Field dialog box, which opens, specify the
following settings:
- Container: Document (Order Summary)
- DAC: PX.Objects.SO.SOOrder (Sales Order) (specified automatically)
- Field Name: SO On Hold
- Select the unlabeled check box in the added row.
- Click Add & Close to save your changes and close the
dialog
box.
The added field appears in the table on the SO30100 (Sales Orders) Fields page.
- On the page toolbar, click Add New Record again, and
specify the following settings:
- Container: Document (Order Summary)
- DAC: PX.Objects.SO.SOOrder (Sales Order) (specified automatically)
- Field Name: SO Reviewed
- Select the unlabeled check box in the added row.
- Click Add & Close to save your changes and close the dialog box.
- In the rows with the AttributeSOONHOLD and
AttributeSOREVIEW fields, select True in the
Hidden column.Tip:As an alternative to defining these fields as hidden in the field properties, you can select the Hidden check box for these user-defined fields on the Edit User-Defined Fields (CS205020) form.
- Save your changes.
The SO30100 (Sales Orders) Fields page with the added fields should look as shown in the following screenshot.
Figure 1. The SO30100 (Sales Orders) Fields page 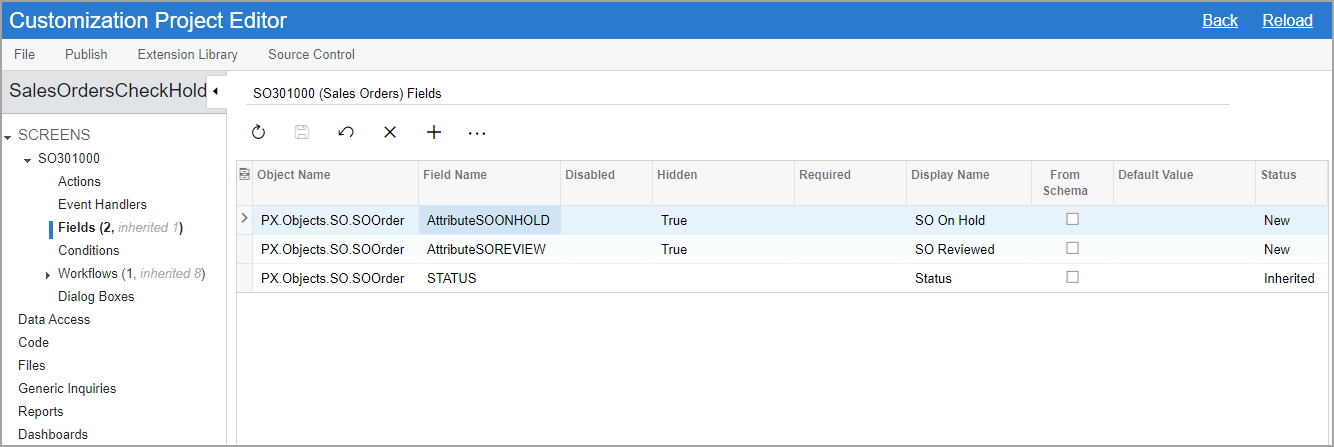
Step 5: Adding Conditions
In this step, you will add conditions to be used for SO sales orders in the SalesOrdersCheckHold customization project. In the Customization Project Editor for this customization project, perform the following instructions:
- In the navigation pane, click .
The Conditions: SO30100 (Sales Orders) page opens.
- On the page toolbar, click Add New Record.
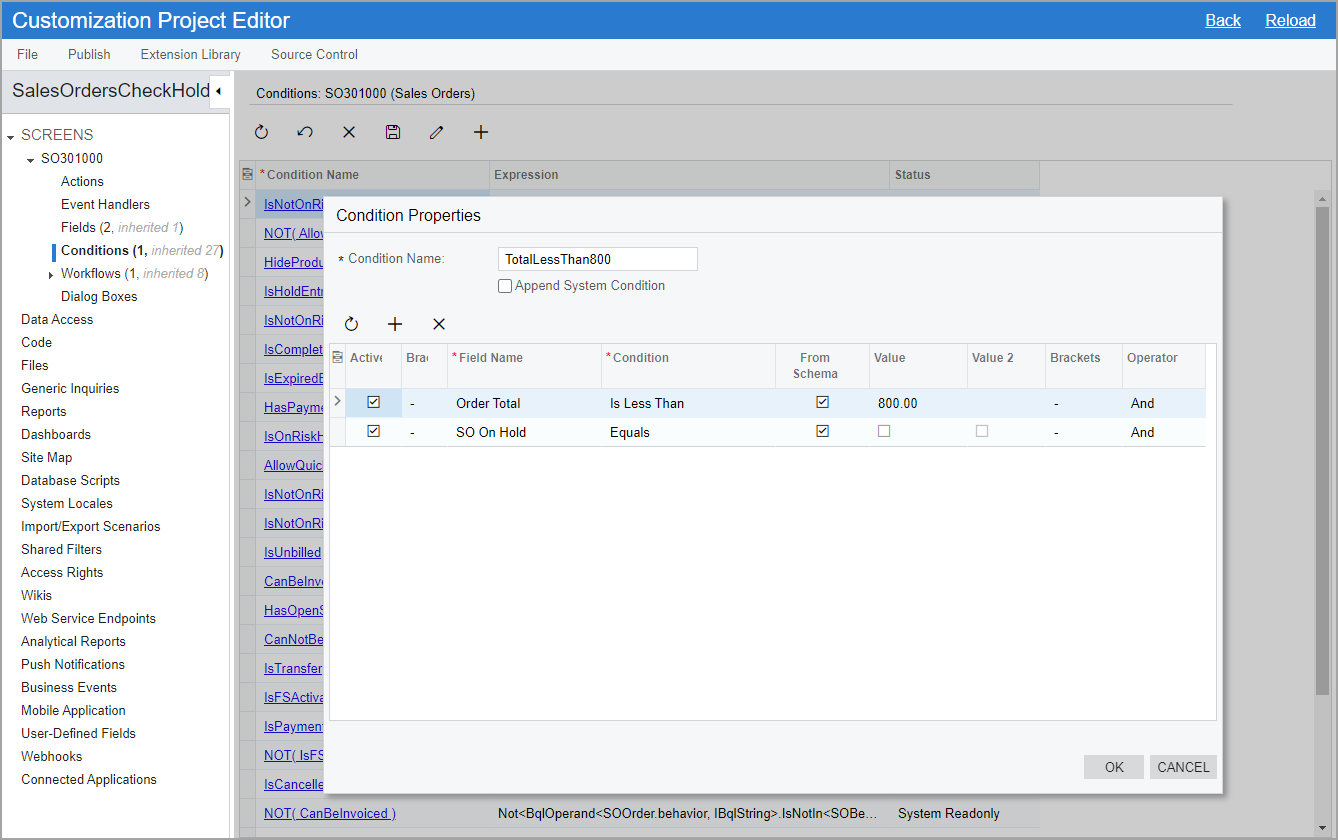
- In the Conditions Properties dialog box, which opens, type TotalMoreThan800 as the condition name.
- Add two rows with the following settings.
Field Name Condition From Schema Value Operator Order Total Is Greater Than or Equal To Selected 800 And SO Reviewed Equals Selected Empty And - Make sure that the Active check box is selected for the added rows.
- Click OK to save your changes and close the dialog
box.
The added condition appears in the list of conditions on the Conditions: SO30100 (Sales Orders) page.
- By using instructions that are similar to Instructions 2 through 6, add the
TotalLessThan800 condition to check whether the
Order Total is less than $800. Specify the following
settings in the rows of the Conditions Properties for
this condition.
Field Name Condition From Schema Value Operator Order Total Is Less Than Selected 800 And SO On Hold Equals Selected Empty And The condition should look as shown in the following screenshot.
Figure 2. The TotalLessThan800 condition