Testing of the Customization Project: To Test a Custom Workflow
The following activity will walk you through the process of testing a custom workflow.
Story
Acting as the technical specialist, you need to publish your customization project and then test the changes on the Task (CR306020) form and make sure that the new workflow works as expected.
Process Overview
On the Customization Projects (SM204505) form of MYOB Acumatica, you will publish your customization project. On the Task (CR306020) form, you will then test the new workflow.
System Preparation
Before you begin testing the customization, do the following:
- Launch the MYOB Acumatica website with the U100 dataset preloaded, and sign in as system
administrator by using the gibbs username and the 123
password.Tip:The gibbs user is assigned the Administrator role, which has sufficient access rights to customize workflows.
- Make sure that you have completed the Conditions and Transitions: To Add Transitions activity.
Step 1: Publishing the Customization Project
To publish the TaskWorkflow customization project, do the following:
- On the Customization Projects (SM204505) form, click the TaskWorkflow project name to open the customization project.
- On the menu of the Customization Project Editor, click .
The system starts publishing the customization project and displays the progress in the Compilation pane, which appears at the bottom of the Customization Project Editor window.
- After the system finishes updating the required data, click Close Compilation Pane in the Compilation pane.
Step 2: Testing the Draft State and State Diagram Dialog Box
In MYOB Acumatica, test the Draft state and the State
Diagram dialog box as follows:
- On the form toolbar of the Tasks (EP4040PL) list of records, click New Record.
- On the Task (CR306020) form, which
opens, notice the following:
- The value in the Status box is Draft.
- The Start Date box has been filled in automatically with the current date.
- The Completion (%) box is unavailable.
- On the More menu, two commands are available: Open and Postpone. Also notice that Open is marked with a green dot.
- On the form toolbar, the Open button is highlighted in green.
- On the form title bar, click .
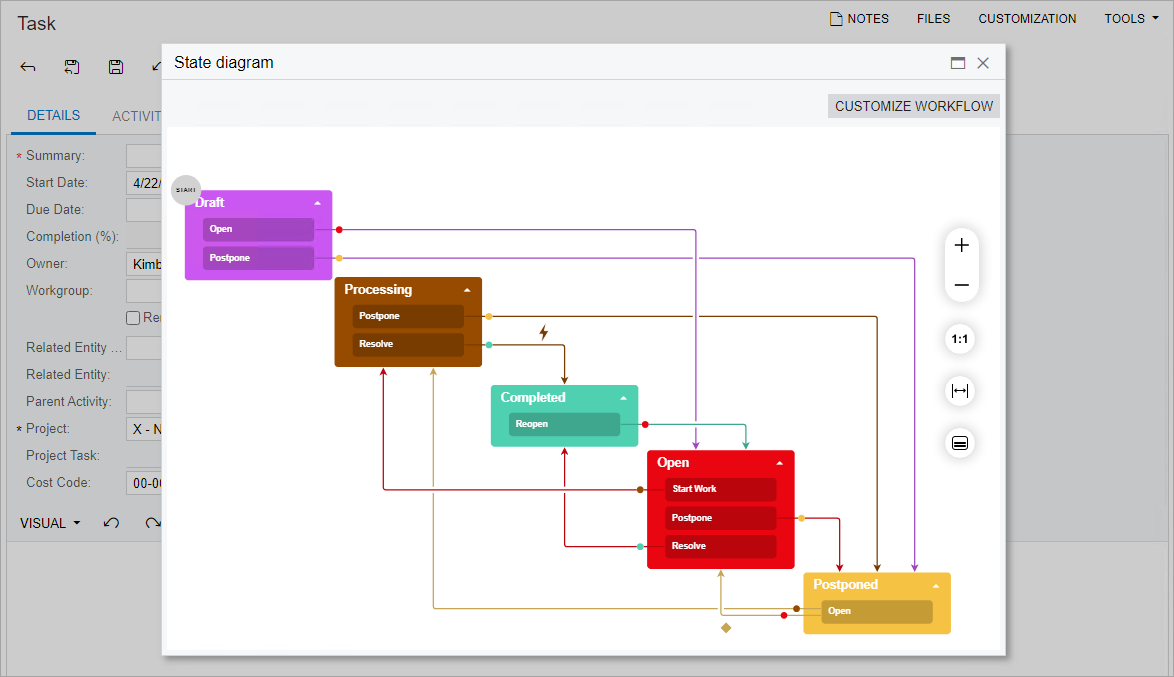
The State Diagram dialog box opens. The diagram should look like the one shown in the following screenshot.
Figure 1. The State Diagram dialog box 
- Close the dialog box.
Step 3: Testing the Open State
While you are still on the Task (CR306020)
form, test the Open state as follows:
- In the Summary box, enter Process customer request, and save your changes.
- On the form toolbar, click Open.
The status of the task changes to Open.
- Clear the Owner box, and try to save your changes.
The system displays an error for this box.
- In the Owner box, select Kimberly Gibbs, and save your changes.
- On the form, notice the following:
- On the More menu, three commands are available: Start Work, Resolve, and Postpone.
- On the form toolbar, the Start Work button is highlighted in green.
Step 4: Testing the Processing State and the Resolve Action
Test the Processing state and the Resolve action as
follows:
- While you are still on the Task (CR306020) form, on the form toolbar, click Start Work.
- On the form, notice the following:
- The status of the task has been changed to Processing.
- On the More menu, two commands are available: Resolve and Postpone.
- On the form toolbar, the Resolve command is highlighted in green.
- On the form toolbar, click Resolve.
- On the form, notice the following:
- The status of the task is Completed.
- On the More menu, only one command is available: Reopen.
Step 5: Testing the Reopen Action and the Completed Condition
While you are still on the Task (CR306020)
form, test the Reopen action and the Completed
condition as follows:
- On the form toolbar, click Reopen.
- In the Details dialog box, which is opened, enter 10 in the Completion (%) box.
- Click OK to close the dialog box.
The status of the task changes to Open, and the value in the Completion (%) box is 10.
- On the form toolbar, click Postpone.
The status of the task changes to Postponed, and on the More menu, only one command is available: Open.
- On the form toolbar, click Open.
The status of the task changes to Processing because the value in the Completion (%) box is 10 (which is greater than 0).
- In the Completion (%) box, enter 100.
- Save your changes.
The status of the task changes to Completed automatically.
