Prepayments for Purchase Orders: To Process Multiple Prepayments for a Purchase Order
In the following activity, you will prepare multiple prepayments for a single purchase order, and apply these prepayments to an AP bill prepared for the vendor.
Story
Suppose that on January 30, 2023, the SweetLife Fruits & Jams company has ordered a large quantity of eco-friendly reusable bags for SweetLife’s needs. The Ginkgo Tree Printing Company vendor has requested an advance payment in the amount of $500. Suppose that on February 7, 2023, the vendor notifies you that an additional prepayment in the amount of $200 is needed for the order. Also suppose that the first prepayment request has not been paid yet.
Acting as Regina Wiley, a purchasing manager in SweetLife, you have to enter the purchase order and record the prepayment request. Then you need to create the second prepayment for the same purchase order, and pay both prepayment requests with the same payment. Finally, you need to process the order to completion and make sure that both prepayments have been applied to the AP bill that you prepare for the purchase order.
Configuration Overview
In the U100 dataset, for the purposes of this activity, the following tasks have been performed:
- On the Enable/Disable Features (CS100000) form, the following features
have been enabled:
- Inventory and Order Management, which provides the standard functionality of inventory and order management
- Inventory, which gives you the ability to maintain stock items by using forms related to the inventory functionality and to create and process sales and purchase documents that include stock items
- On the Vendors (AP303000) form, the GINKGO (Ginkgo Tree Printing Company) vendor has been created. The Allow AP Bill Before Receipt check box has been selected for the vendor on the Purchase Settings tab (which means that for this vendor, accounts payable bills can be processed before purchase receipts).
- On the Stock Items (IN202500) form, the ECOBAG stock item has been created.
Process Overview
In this activity, to process a purchase order when multiple prepayments are required, you will start with creating a purchase order on the Purchase Orders (PO301000) form and adding the purchased items to it. Then you will create the first prepayment request by clicking Create Prepayment Request on the More menu; on the Bills and Adjustments (AP301000) form, you will specify the prepayment amount for each line copied from the purchase order. Then you will create a subsequent prepayment request, and release both prepayment requests on the Release AP Documents (AP501000) form.
Then you will pay two prepayment requests with a single AP payment; you will do this by clicking Pay/Apply on the More menu of the Bills and Adjustments form while viewing one of the prepayment requests, and adding the second prepayment request to the payment on the Checks and Payments (AP302000) form. Then you will print a check, and release the payment and its application to two prepayment requests.
To complete the processing of the purchase order, you will create a purchase receipt for the ordered items on the Purchase Receipts (PO302000) form, and an accounts payable bill to the vendor on the Bills and Adjustments form. On release of the AP bill, the system will automatically apply the prepayments to the bill and update the vendor's balance.
System Preparation
Before you start processing a purchase order when multiple prepayments are required, you should do the following:
- Make sure that you have completed the Prepayments for Purchase Orders: Implementation Activity.
- Launch the MYOB Advanced website with the U100 dataset preloaded, and sign in as purchasing manager Regina Wiley by using the wiley username and the 123 password.
- In the info area, in the upper-right corner of the top pane of the MYOB Advanced screen, make sure that the business date in your system is set to 1/30/2023. If a different date is displayed, click the Business Date menu button, and select 1/30/2023 on the calendar. For simplicity, in this activity, you will create and process all documents in the system on this business date.
- On the Company and Branch Selection menu, in the top pane of the MYOB Advanced screen, make sure the SweetLife Head Office and Wholesale Center branch is selected.
Step 1: Creating the Purchase Order
To create the purchase order to the GINKGO vendor, do the following:
- On the Purchase Orders (PO301000) form, add a new record.
- In the Summary area, specify the following settings:
- Type: Normal
- Vendor: GINKGO
- Date: 1/30/2023
- Promised On: 1/30/2023
- Description: Purchase of eco-friendly bags with company logo
- On the Details tab, add a row with the following
settings:
- Branch: HEADOFFICE
- Inventory ID: ECOBAG
- Warehouse: WHOLESALE
- Order Qty.: 15
- Unit Cost: 250
- On the form toolbar, click Remove Hold to save the purchase order and prepare for further processing.
Step 2: Creating Prepayment Requests
To prepare the two prepayment requests for the purchase order, do the following:
- While you are still viewing the purchase order on the Purchase Orders (PO301000) form, on the More menu, click Create Prepayment Request.
- On the Bills and Adjustments (AP301000) form, which opens, in the only
line of the prepared prepayment request, specify the following settings:
- Ext. Cost: 2000
- Account: 81000 - Other Expenses
- Make sure that the calculated Prepayment Amount is 500 in the prepayment request line.
- On the form toolbar, click Remove Hold.
- On the form toolbar, click Release to release the prepayment request.
- Close the prepayment request and return to the purchase order on the Purchase Orders form.
- On this form, review the Prepayments tab. The line with the prepared prepayment request in the amount of $500 is shown in the table.
- In the info area, in the upper-right corner of the top pane of the MYOB Advanced screen, click the Business Date menu button, and select 2/7/2023 from the calendar to change the business date.
- On the More menu, click Create Prepayment Request.
- On the Bills and Adjustments form, which opens, in the only line of
the prepared prepayment request, specify the following settings:
- Ext. Cost: 800
- Account: 81000 - Other Expenses
- Make sure that the calculated Prepayment Amount is 200 in the prepayment request line.
- On the form toolbar, click Remove Hold.
- On the form toolbar, click Release to release the prepayment request.
Step 3: Creating a Payment to Pay for the Prepayment Requests
To prepare an AP payment for both prepayment requests, do the following:
- On the Bills and Adjustments (AP301000) form, open the $500 prepayment request that you have prepared for the purchase order.
- On the form toolbar, click Pay/Apply.
- On the Checks and Payments (AP302000) form, which opens, review the
payment and verify that it has the following settings in the Summary area:
- Type: Payment
- Vendor: GINKGO
- Payment Method: CHECK
- Cash Account: 10200WH - Wholesale Checking
- Application Date: 2/7/2023
- Application Period: 02-2023
- Change Description to Prepayments for eco-friendly bags with company logo.
- Change the value of the Payment Amount box in the Summary area to 700. Notice that in the Unapplied Balance box, the value changes to 200.
- On the Documents to Apply tab, verify the details of the
row with the following settings:
- Document Type: Prepayment
- Reference Nbr.: The reference number of the $500 prepayment that you created in Step 2
- Amount Paid: 500
- On the table toolbar, click Add Row. In the new row, do
the following:
- In the Document Type column, select Prepayment.
- In the Reference Nbr. column, select the reference number of the $200 prepayment you created in Step 2.
- On the form toolbar, click Remove Hold. The payment is assigned the Pending Print status, which means that a check needs to be printed before the payment can be released.
Step 4: Processing the Payment
To apply the payment to the prepayment requests, do the following:
- While you are still viewing the payment on the Checks and Payments (AP302000) form, on the form toolbar, click Print/Process.
- On the Process Payments / Print Checks (AP505000) form, which opens, notice that the system has added a line with the payment and selected the unlabeled check box for it.
- On the form toolbar, click Process.
A new browser tab opens showing a printable check for the selected payment.
- Review the printable check for the printed payment. Notice that the check has
700 as Check Amount.Tip: In a production system, you would print out the check.
Close the browser tab.
- On the Release Payments (AP505200) form, which opens, click Process to process the line for which the unlabeled check box was selected automatically. The Processing dialog box opens. Wait for the system to complete the operation.
- Click Close to close the dialog box. Notice that the line with the payment is no longer displayed in the table.
You have created a payment and applied it to the prepayment requests that you created earlier. Now the prepayment is ready to be applied to the vendor's bill.
Step 5: Processing the Accounts Payable Bill with the Prepayments
To create an accounts payable bill for the purchase order, do the following:
- On the Purchase Orders (PO301000) form, open the purchase order that you have created earlier in this activity.
- On the Other tab, review the amount in the Unpaid Amount box: It is the order total minus the prepaid amount.
- On the More menu, click Enter AP Bill. The system generates an accounts payable bill for the vendor of the goods and opens the bill on the Bills and Adjustments (AP301000) form.
- On the Applications tab, make sure that two lines with the prepayments have been automatically added to the table. Make sure that in each line, the Amount Paid equal to prepayment balance is specified ($500 and $200, respectively).
- On the form toolbar, click Remove Hold.
- Click Release to release the bill. Make sure that the
bill now has the Open status, and that the bill's open balance has been
decreased by the prepaid amount (see the following screenshot).
Figure 1. Prepayments applied to the bill prepared for the purchase order 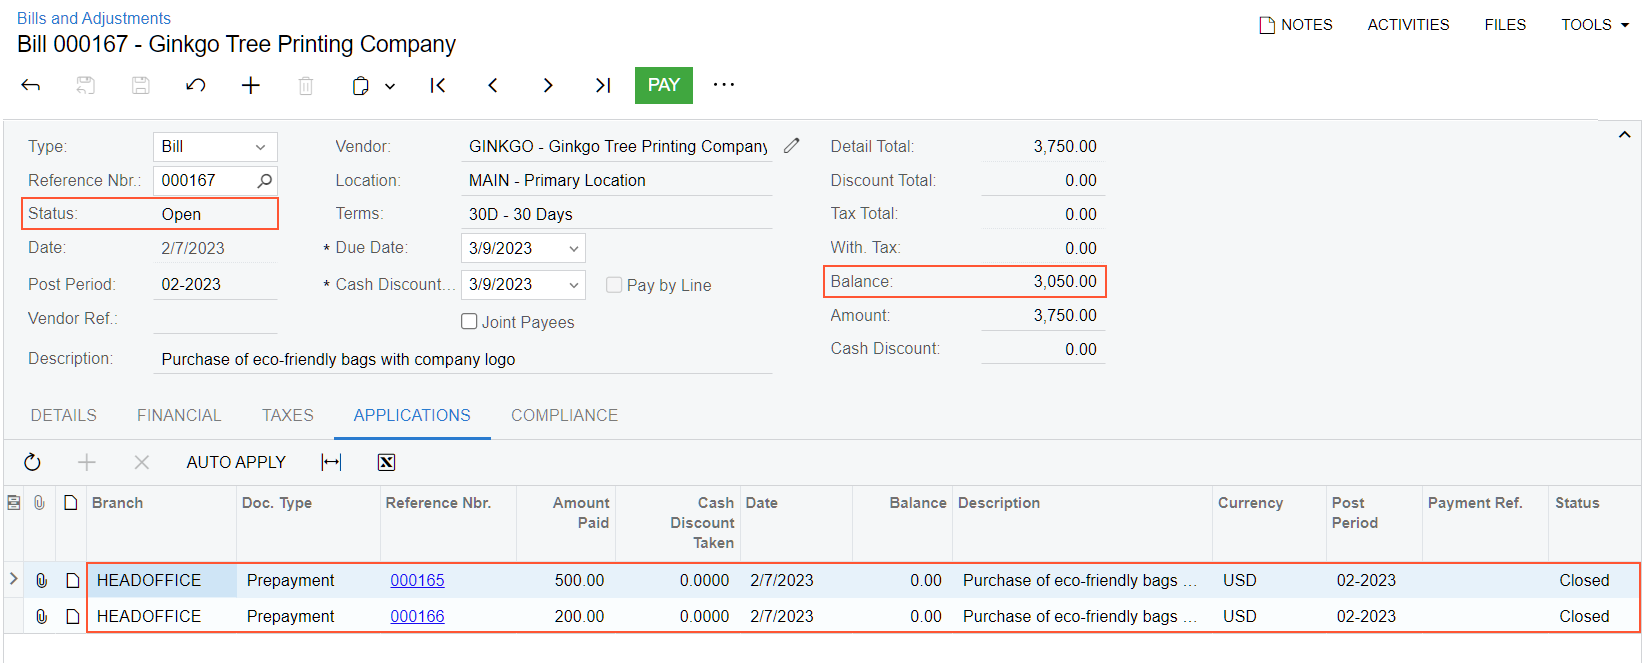
You have applied the prepayments you made for the vendor to the vendor's bill and released the application.
Step 6: Processing the Purchase Receipt
Now you need to complete the processing of the purchase order. To create the purchase receipt for the purchase order, do the following:
- Return to the purchase order to GINKGO on the Purchase Orders (PO301000) form, which still has the Open status, and open the Prepayments tab. Notice that the prepayments are now closed and that the full amount of the prepayments has been applied to the order (as the Applied to Order column displays).
- On the form toolbar, click Enter PO Receipt. The system prepares the purchase receipt for the selected purchase order and opens it on the Purchase Receipts (PO302000) form. In the Summary area, make sure the Create Bill check box is cleared (because you have already prepared a bill for the entire quantity).
- On the form toolbar, click Save.
- Click Release.
- On the Orders tab, make sure that the related purchase order now has the Closed status.