GL Transactions: Process Activity
In this activity, you will learn how to create a GL batch, release and post the batch, and review the statuses of the batch.
Video Tutorial
This video shows you the common process but may contain less detail than the activity has. If you want to repeat the activity on your own or you are preparing to take the certification exam, we recommend that you follow the instructions in the activity steps.
Story
Suppose that in January 2023, the SweetLife Fruits & Jams company paid its employees $12,600.
Acting as a SweetLife accountant, you need to enter a batch for a payment in the amount of $12,600 for the 01-2023 financial period for the salaries and wages of the employees of the SweetLife Head Office and Wholesale Center (HEADOFFICE) branch.
Process Overview
In this activity, you will enter a batch directly on the Journal Transactions (GL301000) form, release and post the batch, and note the status of the batch at each step. Then you will review the batch details in the GL Register Detailed (GL621000) report.
System Preparation
To prepare the system, do the following:
- Launch the MYOB Advanced website with the U100 dataset. Sign in as an accountant by using the following
credentials:
- Username: johnson
- Password: 123
- In the info area, in the upper-right corner of the top pane of the MYOB Advanced screen, make sure that the business date in your system is set to 1/31/2023. If a different date is displayed, click the Business Date menu button and select 1/31/2023. For simplicity, in this activity, you will create and process all documents in the system on this business date.
- On the Company and Branch Selection menu, also on the top pane of the MYOB Advanced screen, make sure that the SweetLife Head Office and Wholesale Center branch is selected. If it is not selected, click the Company and Branch Selection menu to view the list of branches that you have access to, and then click SweetLife Head Office and Wholesale Center.
Step 1: Creating a Batch of Transactions
To create a batch of GL transactions, do the following:
- Open the Journal Transactions
(GL301000) form,
and on the
form toolbar, click Add New Record to create a
document.Tip: To open the form for creating a new record, type the form ID in the Search box, and on the Search form, point at the form title and click New right of the title.
- In the Summary area, specify the following settings:
- Transaction Date: 1/31/2023 (inserted by default)
- Post Period: 01-2023 (inserted by default)
- Description: Salary payment Jan 2023
- On the table toolbar of the
Details tab, click Add Row and specify the
following settings in the row that appears:
- Branch: HEADOFFICE (inserted by default based on the selected branch)
- Account: 69500 - Salaries and Wages
- Debit Amount: 12600
- Click Add Row
again, and specify the following settings in the second row:
- Branch: HEADOFFICE (inserted by default based on the selected branch)
- Account: 10200 - Company Checking Account
- Credit Amount: 12600
- Click Save on the form toolbar, and note that the status of the batch is On Hold.
- Click Remove Hold on the form toolbar and save the batch. The batch's status has changed to Balanced.
Step 2: Releasing and Posting the Batch
To release and post the GL batch, do the following:
- On the form toolbar, click Release.
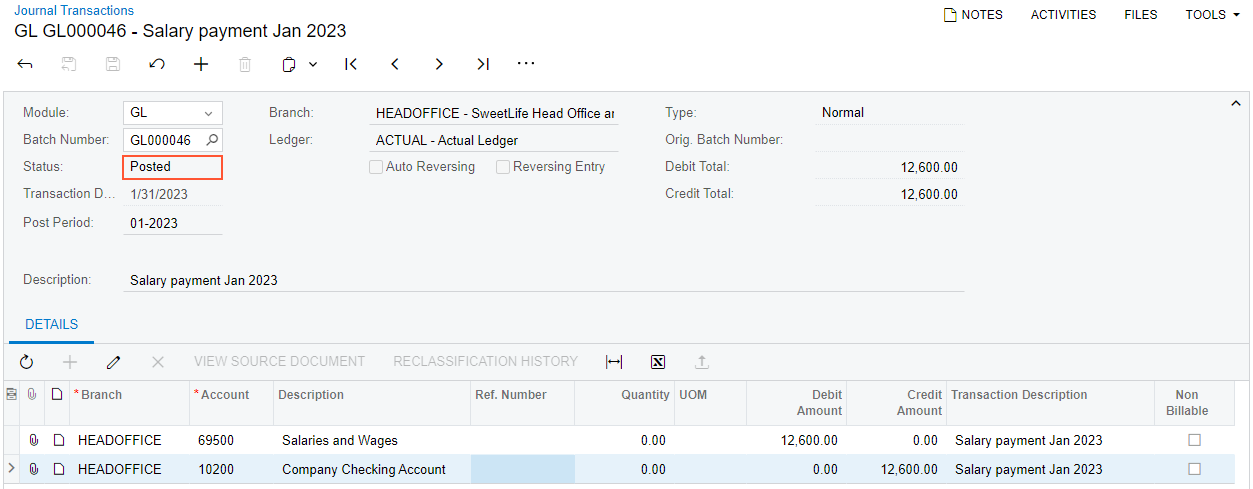
- Note that the batch's status has changed to Posted as shown in the following screenshot.

Step 3: Reviewing the Batch Details
To review the batch details, do the following:
- On the More menu (under Reports), click Batch Register Details.
- On the GL Register Detailed (GL621000) report, which is opened, review the details of the posted batch.
Activity Recap
In this activity, we have illustrated the following:
- The accountant created and posted a batch of payments directly to the general ledger.
- The accountant ran the GL Register Detailed (GL621000) report to review the batch details.
