Getting Started
Access the Greentree Desktop Designer from the System > Customisation menu.
Top Toolbar
These options and features are managed using the top toolbar:
|
|
New: Click this icon to clear the current report form and start working on a new report. |
|
|
Save: Click this icon to save the report you are working on. |
|
|
Copy: Click this icon to copy the report that is displayed. The Report field clears, and you can enter a new name for the copy of the report. The new report has all the details associated with the original report. |
|
|
Delete: Click this icon to delete the existing report. A message displays asking you to confirm the deletion. |
|
|
Print: Click this icon to print the report from the designer form. |
|
|
Import from File: Click this icon to import a .gtr file from a directory on your computer or network. |
|
|
Export to File: Click this icon to export the selected report as a .gtr file to the directory you specify. This can be imported into another Greentree Desktop system. |
|
|
Report Name: This field displays the name of the report you are working on. If you are created a new report, enter a name before you save the report. |
|
|
Properties: Click this icon to display the field or section properties form, depending on which part of the report you are positioned on when the icon is clicked. |
|
|
Report Palette: Click this icon to open the Available Fields Palette. |
|
|
Profiles: This field displays the name of the profile you are working on. For new reports, this defaults to Default profile. If you add multiple profiles to the report, you can select them here. When sorting and query options are set up, they are of the profile selected here. Click the spanner icon to access the Profile Maintenance form, if profiles are created and displayed. |
Side Toolbar
You can select these options using the Report Writer's side toolbar:
|
|
When the Report Writer opens, this is the default view. This is the view if reports are created and edited. |
|
|
Select this view to set up parameters for the selected report. |
|
|
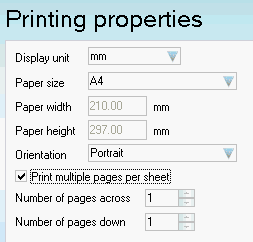
Select this view to set up the report printing properties as:
Display unit - Select one of 4 pre-defined display units to apply to the report: mm, pixels, inches, characters. These determine how the page ruler displays on top of the Report Design form. The ruler will help you to align fields on the report based on what you must display and your paper size. Paper size and dimensions - Select a paper size to apply to the report: A4, A5, Letter, Fax, and Other. The Paper width and Paper height defaults in read-only format unless you select the Other option, in which case you can enter the paper dimensions. The ruler that displays on top of the Report Design form is adapted using the size selected here. Orientation - Select Portrait or Landscape as the orientation to apply to the report. The ruler that displays on top of the Report Design form is adapted on the basis of the orientation selected here. Print multiple pages per sheet - Select this option to enable multiple pages per form on your report. Number of pages across - Enter the number of repetitions to print across the page. This will depend on the size of the report and the paper size. For example, if you are printing labels, you can decide how many labels print across the page. The report design only must have one label on it, which is repeated across the page. Number of pages down - Enter the number of repetitions to print down the page. This depends on the size of the report and the paper size. For example, if you are printing labels, you can decide how many labels print down the page. The report design only must have one label on it, which is repeated down the page. |
|
|
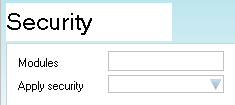
Select this view to set up security options:
Modules - To enabled users to select the report on a Module Control form, enter the module code here. For example, to make the report to be available to select on the Accounts Payable Module Control form as a default Cheque form to print, then you must add AP as a module code. There are no formatting requirements in this field as long as the module code is entered as a string. You can enter multiple module codes — for example, CMAP. Apply security - This field is only relevant if the Advanced Security module is in use. You can select the security view that defaults to reports at runtime. |
Base Toolbar
These options and features are managed using the base toolbar:
![]()
Alignment Icons: These icons are used to position and align fields within a section. They becomes active when two or more fields are selected, which is done by clicking the first field, holding down the Shift key, and clicking the second, and subsequent fields. Select fields in groups as for the alignment option you are selecting. For example, to align fields so they all sit on a baseline, highlight the fields:

then click the  icon (align bottom):

The fields align to the baseline associated with the last field selected (in this example, costAmount).
Alignment options available (respective to the icon images seen above) are: align right, align right, align top, align bottom, same width, same height, same width and height, space evenly across, space evenly down.
![]()
Field Formatting Icons: These icons
are used to format fields positioned within sections. They apply using
the formatting icons available in other Microsoft products. You can select
multiple fields for formatting b clicking the first field, holding down
the Shift key, and clicking the second, and subsequent fields. You can
also format individual fields.


