- Contents
- Index
- Search

Show results that include all search words
Receiving a Debtor Payment
When a debtor makes a payment, you must allocate that payment to the invoices on the account. You must also ensure that the credit control matches the payment made to the group of invoices.
If you are receiving payment when you generate the invoice, enter the payment on the Payments/Delivery tab of the Debtor Invoice window. You can either allocate the payment to the invoice(s) when the payment is received or at a later date. You can unallocate payments, and reallocate them.
Note: If this is a branch account (and you don't have Exo Business Configurator), the invoice transaction you are receiving a payment against displays in the branch account transaction grid. The New Payment button is not enabled. You can only receive a payment from the head office account. Click the Show Head Office button to receive the payment. If you do have Exo Business Configurator, you can send transactions to Head Office, and receipt payments in the branch account before transferring to Head Office.
To receive a debtor's payment:
-
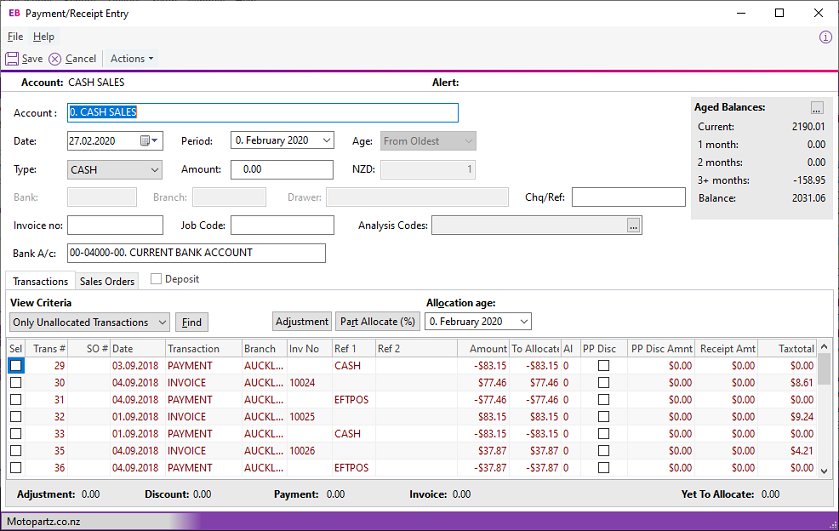
Select Debtors Receipts > Debtor Receipt from the Transactions menu. The Payment/Receipt Entry window displays:
-
Enter the name (or number) of the debtor account making the payment. Or enter ? and press Tab in the Account field to search for a debtor.
-
Click the ellipsis button […] in the Aged Balances area to open the Debtors Account Transaction window. Check the debtor’s transactions before entering the payment.
-
Select the payment type from the Type field.
-
Enter the payment amount. If you:
-
Enter the payment amount in this field, and don't select invoices in the grid below against which to allocate the payment, the payment remains unallocated. You can allocate it later.
-
Select the invoices to pay by selecting the checkbox beside the invoices, and then pressing the Spacebar in the Amount field. The total amount of the selected invoices displays in the Amount field. The invoices and payment allocate when you save the receipt.
-
Enter an amount which only partly pays an invoice, then click the Part Allocate button to allocate the payment to that invoice and leave an unallocated balance.
-
-
Enter the remaining payment details.
-
Choose the View Criteria for the grid below — for example, Only Unallocated Transactions.
The grid header fields are:
Column
Description
Sel
Click the checkboxes of all lines you want to receipt the payment against.
Trans #
The unique transaction ID.
SO #
The Sales Order number.
Date
The date of the transaction.
Transaction
The transaction type— for example, invoice, payment.
Branch
The branch of the transaction line. If this is the head office account, all branch transactions are listed; if you have Exo Business Configurator, and this is a branch account, you can only receipt a payment against your branch.
Inv No
The invoice number.
Ref 1
Reference text that Exo Business generates.
Ref 2
Reference text that Exo Business generates.
Due Date
The due date of the transaction, based on the credit terms of the debtor.
Amount
The transaction amount.
NZD / AUD
New Zealand or Australian Dollar. This shows the defined exchange rate.
To Allocate
When you click the Sel checkbox for the transaction line, this becomes zero. If this is a partial payment of the line, the amount to allocate displays in this field.
Al
1 indicates the transaction line has been allocated. 0 that it has not been allocated.
?
Right-click on the transaction line and choose Toggle Query Status to put a question mark on the transaction.
PP Disc
Select this checkbox to give a prompt payment discount for payment of this invoice. This uses the Prompt Payment Discount percentage information of the Debtor.
PP Disc Amount
The prompt payment discount amount, based on the previous percentage.
Receipt Amt
The total payment receipt amount for the line.
TaxTotal
The total tax on the transaction line.
-
If the payment is a deposit, select the Deposit checkbox. The Sales Order tab displays. Highlight the sales order for which the payment is a deposit and click Save.
-
If you are allocating the payment to one or more invoices, select the invoices by clicking checkboxes in the Sel column.
-
Click in the Amount field and press the Spacebar again. The total to pay displays in the Amount field.
-
Click Save.
Note: If the payment is in a foreign currency, a message confirming the conversion of the foreign currency to the local currency displays when you click Save.
Prompt Payment Discount
You can calculate and apply prompt payment discounts at the invoice level.
Each invoice has a checkbox that you can select to indicate that prompt payment should be calculated. When selected, the PP Disc Amnt column is calculated at the discount rate for the Debtor account. The line is also allocated when this is done. The receipt amount column shows net of discount.
Deselecting the invoice also clears the discount. Clicking the Discount checkbox cancels the discount calculation but leaves the row allocated.
Press the Spacebar on an invoice to select or deselect the prompt payment discount. Press Enter on an invoice to allocate or unallocated it.
The total discount is shown at the bottom of the window.
Small Balance Write-off
If you have allocations marked, and the Amount field is less than the total of these, when you click Save Exo Business will prompts you to discard the allocations and receipt the payment only.
As when allocating later, clicking the Adjustment button creates a debtor adjustment to balance the allocation set. The computation is based on the pending receipt transaction.
Note: The adjustment entry cannot exceed $5.00.
The Find Button
The Find button replaces the Auto and To Oldest buttons when the allocation grid is docked in the receipt window. Click this button to find an entry in the allocation grid that matches the payment value and set it to allocated.
Deposits
To change the receipt to a deposit (against Sales Order rather than invoice) either select the Deposit checkbox or click on the Sales Orders tab. A list of Sales Orders displays.
Note: You can only select one Sales Order for the deposit.
If you need to change the deposit back to receipt, clear the Deposit checkbox.
Note: Clicking the Sales Orders tab when you have pending on the Transactions tab does not change the deposit to a receipt. You must click the Deposits checkbox instead. This also clears the allocations.