- Contents
- Index
- Search

Show results that include all search words
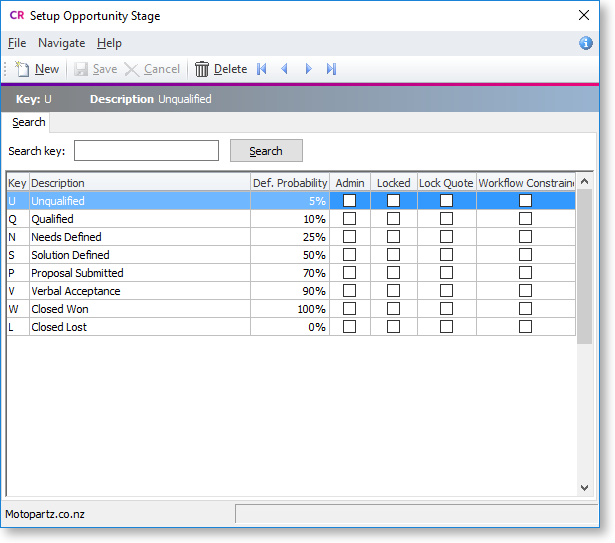
Opportunity Stages
Opportunity Stages indicate the point an Opportunity is at in the sales cycle.
For example, an Opportunity may be at the stage of Unqualified, Qualified, Solution Defined, Proposal Submitted, and Closed. That Opportunity could have two stages representing closed Opportunities: those that closed after being processed to a sale (Closed Won), and a stage that represents when an Opportunity did not result in a sale (Closed Lost). Both stages are non-active Opportunities, and probably Locked. You can differentiate between these two Closed stages in analysis reports.
To set up Opportunity stages:
-
Select either:
-
Setup > Setup Opportunity Stages from the Exo Business CRM menu, or
-
Edit List... from the Stage dropdown on the Opportunity window.
The Setup Opportunity Stage window displays:
-
-
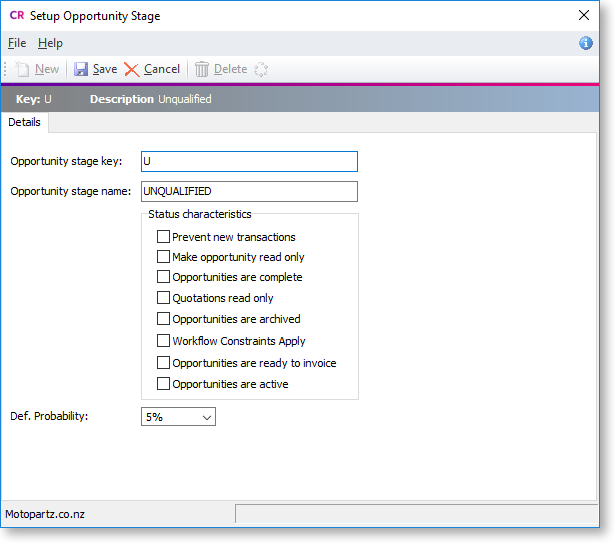
Click New. Enter the details about the stage.
Field
Description
Opportunity status key
A unique one-character short code to represent this stage.
Opportunity status name
A description of the stage — for example, Qualified.
Prevent new transactions
Select this option to prevent entry of additional transactions to Opportunities at this stage.
Make opportunity read only
Select this option to disable editing of the Opportunity while at this stage. This includes the Stage field.
Only a user who has administrator rights can modify this Opportunity (this is determined by the User has Opportunity Administrator Rights User-level profile setting).
Opportunities are complete
Select this option to indicate that Opportunities in this stage are complete.
Quotations read only
Select this option to lock the Quote tab to prevent changes while the Opportunity is at this stage.
The Quote tab is locked unless logged in as a user with administrator rights.
Opportunities are archived
Select this option to archive Opportunities in this stage.
Workflow Constraints Apply
Select this option to specify which stages the Opportunity can move to.
Opportunities are ready to invoice
Select this option to indicate that Opportunities in this stage are ready to invoice.
Opportunities are active
Select this option to indicate that Opportunities in this stage are currently active.
Def. Probability
Select the default Probability level for Opportunities at this stage.
-
If the Workflow Constraints Apply option is selected for a stage, click on the
 button
to open a screen on which you can specify workflow stage paths.
button
to open a screen on which you can specify workflow stage paths.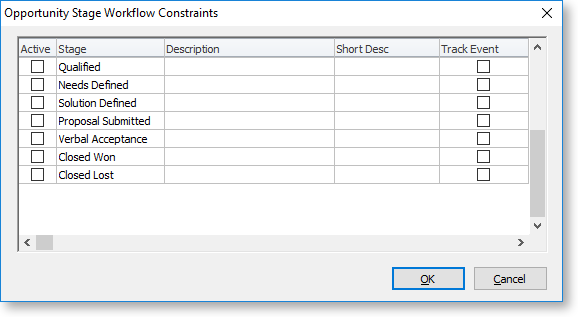
-
Select the checkboxes in the Active column to specify which stages you can move an Opportunity to.
-
Select the checkboxes in the Track Event column to record the history of changes to the stage in the Event Log.