- Contents
- Index
- Search

Show results that include all search words
Sales Team Budgets
Sales Team Budgets are intended for clients whose businesses are focused on selling to existing clients and who therefore manage their sales staff by comparing actual sales versus budgeted sales. As Exo Business CRM is integrated with the rest of the Exo Business system, it can use historical sales data as input into creating budgets and tracking budgets to current sales.
Sales Team Budgets can be defined at the following levels:
-
Account Group 1 and 2
-
Account
-
Stock Group 1 and 2
-
Stock item
Setting up Sales Team Budgets
Setting up Sales Staff
Staff members are set up as members in Exo Business Config at Staff > Profile Assignment > Staff > Sales Team tab.
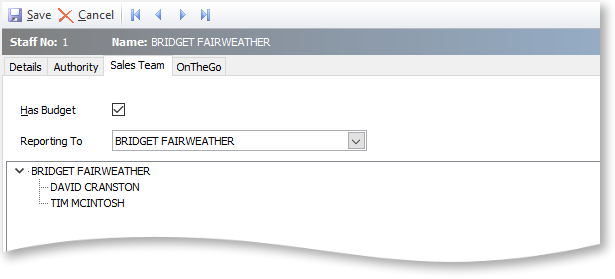
Tick the Has Budget option for each staff member who is to have a sales budget.
Use the Reporting To dropdown to select the sales manager that the staff member reports to (by default, staff members are their own managers). Specifying managers for staff members affects the budget generation process; when editing a budget, users can see the budgets for all staff members that report to them. This is hierarchical - if Staff Member A reports to Staff Member B, and Staff Member B reports to Staff Member C, then C will be able to see the budgets for both A and B. The area below the Reporting To option contains a tree view showing all staff members who report to the selected manager.
Setting up Sales Years
Sales Team Budgets use the same budgeting periods as the Exo Business Analytics module. These periods are set up in Exo Business Config at Admin > Analytics > Setup Sales Year.
Setting up Budget Models
Before creating Sales Team Budgets, you must define the models that the budgets will be based on. Budget models define the levels to budget at and the sales period to budget over.
Select Setup Sales Team Budgets from the Setup menu to set up budget models. All currently defined models are listed.
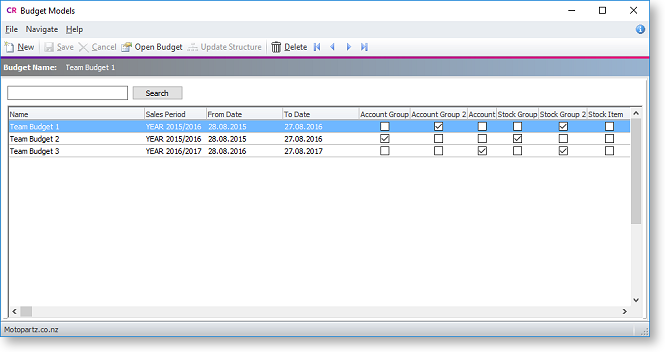
Click New to create a new model:
-
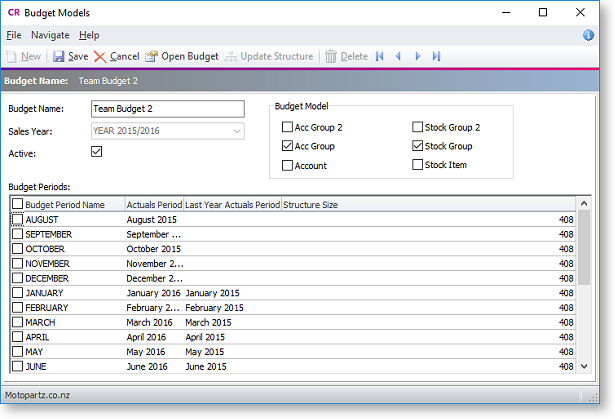
Enter a name for the budget model.
-
Select a Sales Year to create budgets for. Choose from the sales years set up set up in Exo Business Config at Admin > Analytics > Setup Sales Year.
-
Specify whether or not the budget is currently active by ticking or clearing the Active check box.
-
Select the levels to create budgets at by ticking the required boxes in the Budget Model section. It is only necessary to tick one box for each column - ticking the box for one level effectively selects all levels above it, e.g. selecting to budget by Account Group means that budgets will be created for Account Group 2 as well. It is not necessary to select an option from both columns; you could choose to budget by Stock Group only, for example.
-
Click Save to save the budget model.
Creating and Editing Budgets
Once all budget models have been set up, click the Update Structure button on the Budget Models window to generate the budgets specified by the models.
Once created, select a budget and click the Open
Budget button ( ![]() ). The
Budget window opens:
). The
Budget window opens:
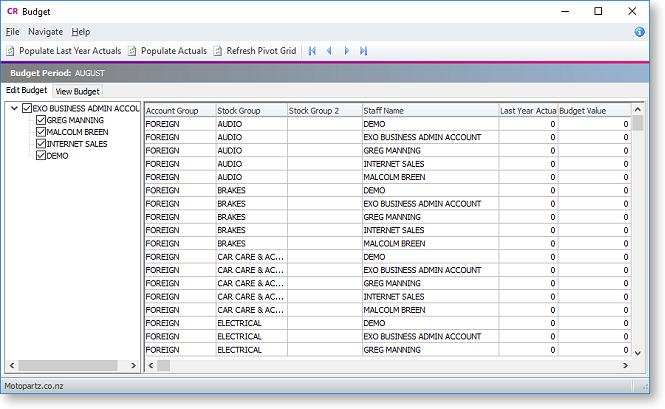
All users that report to the current user (directly or indirectly) are displayed in a hierarchy on the left of the window. Tick the boxes for all users that you want to edit budgets for.
Enter budget information into the Last Year Actuals and Budget Value columns. Clicking the Populate Last Year Actuals or Populate Actuals buttons automatically fills in the values in the Last Year Actuals columns with data from the Exo Business database.
Budget data can be viewed in a pivot grid on the View Budget tab (click the Refresh Pivot Grid button to refresh the grid contents after editing budget figures).
Budget figures can be entered directly into this window, or they can be copied and pasted into Microsoft Excel and edited there. Right-click on the column headings and select Copy to clipboard or Paste from clipboard to copy and paste data.
Note: The data copied to Excel can be manipulated as required; however, in order to be able to be pasted back into Exo Business CRM, the SEQNO column must remain the first column in the spreadsheet.