- Contents
- Index
- Search

Show results that include all search words
Creating a Task
The default Tasks on the Setup Tasks window can be copied and used as the basis of new Tasks, or a new Task can be created from scratch.
Copying a Task
To copy a task, select the existing Task you wish to copy and click the Copy toolbar button.
The system will create a new Task in the search grid with the words "Copy of" inserted at the start of the original name. This copied task may then be edited.
Creating a New Task
To create a new task, click the New button on the Setup Tasks window. The following screen is displayed:
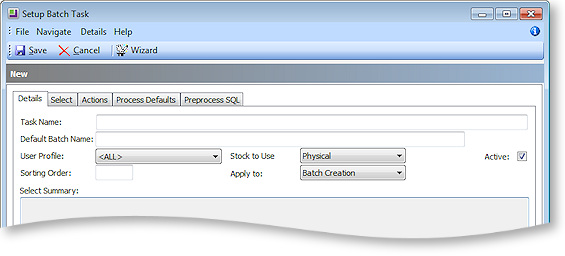
Task Name An informative task name should be entered here. This name is displayed when selecting the task to be used when creating a new batch.
Default Batch Name Enter a default name to be used in a created batch. The name will have the batch number appended for each batch created.
User Profile This defaults to All which means the task is available to anyone who may access the Batch Sales Order Line Processing. process. By choosing a user profile the task may be limited to only users who are set to that user profile (or one of its decedents).
Stock to Use Select the stock calculation you wish to display and use as default when running a batch of this task. As well as designating the stock figure shown on the stock status bar this also defines the default action when manually using the taskbar buttons Release, Pick, Supply and Invoice.
Sorting Order This field may optionally be left blank or if used it controls the order in which the tasks appear in the search window when creating a new batch.
Apply to This field defaults to a setting of Batch Creation for use with B.S.O.L.P but may be changed to Order Consolidation for use with the Sales Order Consolidation process described in chapter 5.
Active Clear this checkbox to prevent the task being offered when creating a new batch. The task will always be visible in the task setup function.
Before a task may be saved it must have some valid selection criteria to filter the Sales Order lines that will be added when creating a new batch. The selection criteria is maintained by the use of a wizard.
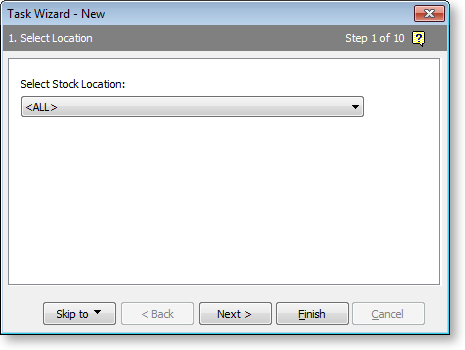
Run the wizard by clicking the Wizard toolbar button or select the Select tab. The Task wizard runs to set the sales order line selection criteria:
-
Select the stock location - all locations (the default) or a single location. Click Next.
-
Select the Sales Order Statuses to filter by. Order statuses are used when filtering by sales order header as opposed to sales order lines. Order statuses are defined and maintained by the system and are not user definable.
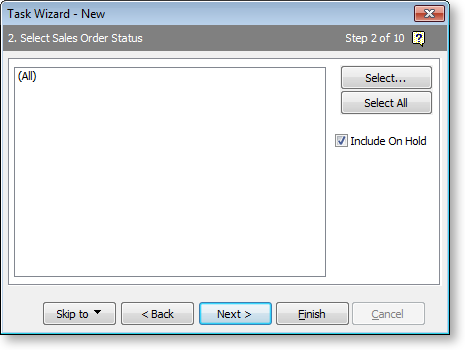
If filtering is required click Select to display a list of stock items. To select multiple statuses hold down the CTRL key and click multiple lines, then click Select & Close. Click Next to move to the next wizard screen.
-
Select Sales Order Lines. This is usually mutually exclusive with the previous Sales Order Statuses step. Usually one or the other is used.

To use any of these filters select the Select when sales order line option. The other checkboxes then become active provided their corresponding profiles are also active. These filters utilise a logical AND, in that all selected conditions must be true for the sales order line to be included.
- Has Backorders - selects when the lines back order quantity is non-zero.
- Has Unreleased - selects when the lines unreleased quantity is non-zero.
- Has Unpicked - selects when the line has released quantity that is not yet picked.
- Has Unsupplied - selects when the lines released quantity (or picked if active) has not yet been supplied.
- Has Uninvoiced - selects when there is quantity supplied but not invoiced.
Note: The filters in this step do not apply to the Sales Order Consolidation process, as consolidation always looks for picked but unsupplied. Settings at this step are ignored during consolidation.
Click Next to proceed to the next step.
-
Select Branches. By default, orders from all branches will be included in the order process.
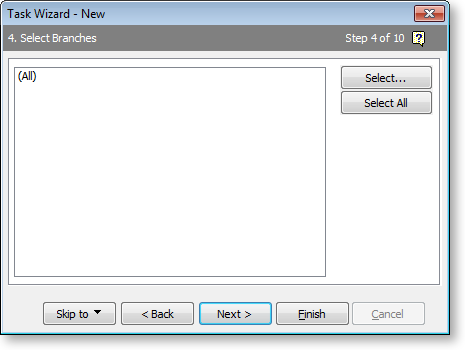
To restrict the order batch to specific branches click Select to display a list of branches. To select multiple branches hold down the CTRL key and click multiple lines, then click Select & Close. Click Next to move to the next wizard step.
-
Select Stock Codes. By default, all stock codes will be included in the order.
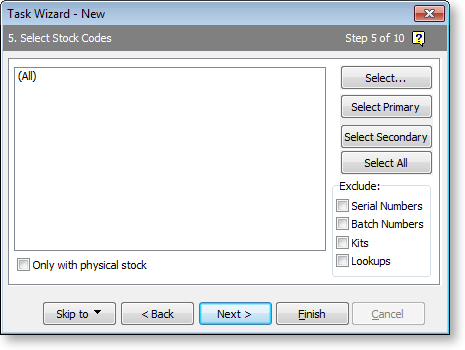
To restrict the order batch to specific stock items click Select to display a list of stock items. To select multiple items hold down the CTRL key and click multiple lines, then click Select & Close.
The Select Stock Codes screen has an additional option: Only with physical stock. Select this to exclude items that have no On Hand stock. The screen also has an Exclude panel. The options in this panel may be used to exclude items that are serial or batch tracked, are part of a kit, or are lookup items. Serial or batch numbered items require additional information and hence more manual input.
Click Next to move to the next wizard step.
-
Select Suppliers. By default, all suppliers are included.

To restrict the order batch by supplier, click Select to display a search window of suppliers. To select multiple suppliers hold down the CTRL key and click multiple lines. The grid may be sorted by clicking column headings. Click Select & Close. The selected list will show the appropriate descriptions of the selected accounts.
Click Next to move to the next wizard step.
-
Select Salespeople. By default, all salespeople are selected.
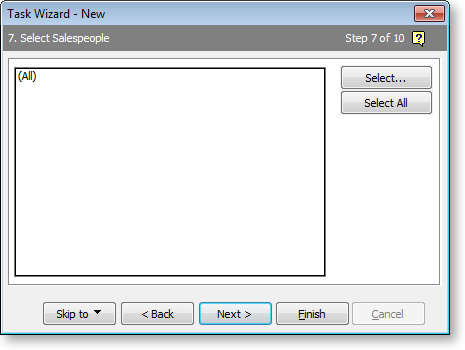
To restrict the list of orders by salespeople, click Select to display a search window of salespeople. To select multiple salespeople hold down the CTRL key and click multiple lines. Click OK to close the Select Salespeople dialog.
Click Next to move to the next wizard step.
-
Select Customers. By default, all customers are selected.

To restrict the list of orders by customer, click Select to display a search window of customer accounts. To select multiple accounts hold down the CTRL key and click multiple lines. Click Select & Close. The selected list will show the appropriate descriptions of the selected items.
Click Next to move to the next wizard step.
-
You can restrict the order list to a limited range of order due dates (not order placement dates). Dates specified here relative to an unknown "today's date” and actual dates are resolved when the task is run.
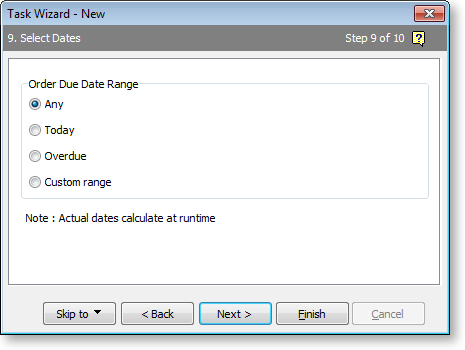
Select one of the following options:
- Any - No date selection will occur.
- Today - This will resolve to the system date at run time and include due dates for that single day.
- Overdue - At run time this will any due dates prior to the system date at run time.
- Custom range - This allows a range of dates either side of the run date to be specified. Select the number of days relative to the run date to set a date range. At run time this value will be used to calculate an actual date relative to the run date. A value of zero represents today. Positive numbers represent future dates and negative numbers represent past dates.
Click Next to move to the next wizard step.
-
The last stage of the wizard presents a summary of the selection criteria:
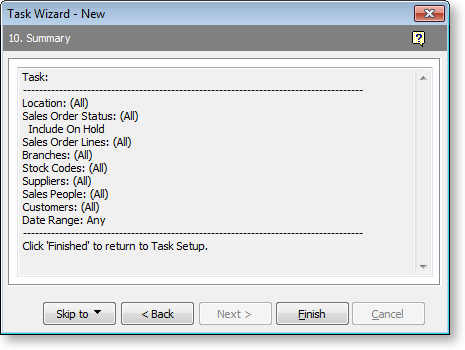
Click Finish to save the wizard result in the Task template. The summary information will now also be shown in the Select Summary area of the Details tab.
Entering Selection Criteria Manually
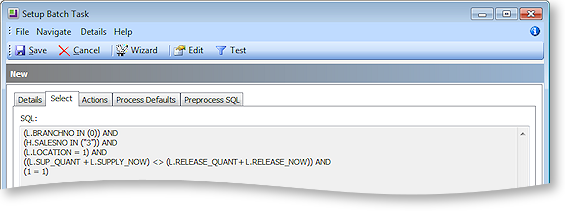
The SQL WHERE clause resulting from the Task Wizard appears on the Select tab. For users with SQL skills, this tab provides the capability to add criteria not encompassed by the questions within the wizard.
To edit the selection criteria manually:
-
Click the Select tab to reveal the current selection criteria:
-
Click the Edit button to enable editing for the SQL shown. If customising the SQL then it is recommended that you extend the WHERE clause after the (1=1) line.
-
Click the Test button to execute the SQL SELECT statement containing this clause to verify it will run.
Note: Table aliases must be used when referencing database fields. These are documented in the yellow information panel at the bottom of the screen.
Actions
Actions specify the batch-level functions to be run once the batch has been created. If quantities are only entered manually then no actions need be specified. It is usual practice to select at least one action to set quantities as a starting point.
To set up actions, click the Actions tab:
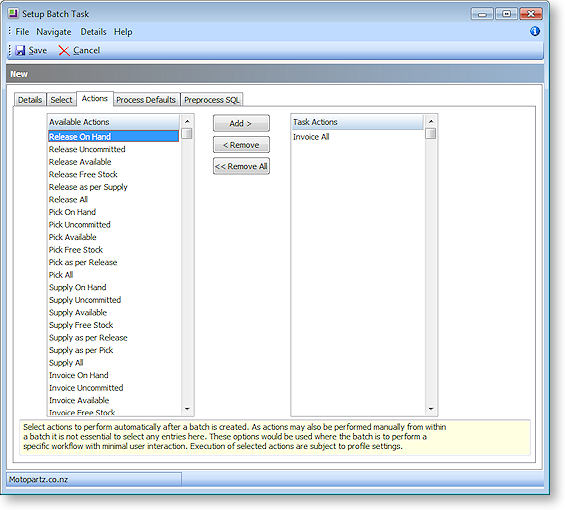
The available actions on the left are the same actions offered on the drop down menus of the toolbar buttons Release, Pick, Supply and Invoice. Actions therefore provide a way of automatically activating these buttons when creating a batch.
Use the Add, Remove or Remove All buttons to add or remove actions from the right hand list.
Note: Actions do not apply to the Sales Order Consolidation process.
Process Defaults
This tab is used to set the process settings that will be offered as default when the Process button is clicked within a batch. The defaults may be overridden when processing an individual batch.
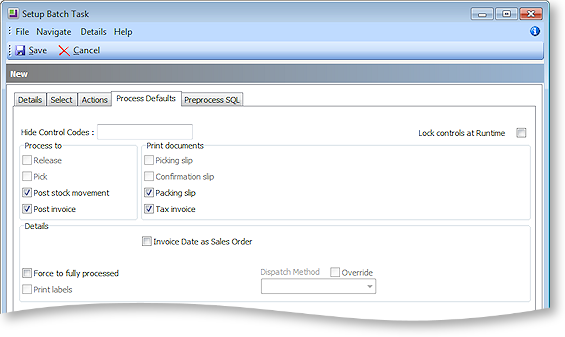
Lock controls at Runtime Select this option to prevent users overriding these settings at run time.
Process to The checkboxes in this panel designate the database activity that will be performed.
Print documents The checkboxes in this panel designates which documents will be printed in association with the selected Process to: functions. For some tasks you may not wish to print a document associated with the database activity, e.g. you may wish to update the database with released (authorised) quantities but not print individual picking slips per sales order.
Note: The Clarity form BSOLP_PICKSLIP.CLF is used rather than the PACKSLIP.CLF that is used by the Sales Order Supply screen. This allows for the format of picking documents to be different, if required.
Invoice Date as Sales Order Check this box to have the invoice date set to the order date of the sales order.
Force to fully processed This is usually only set in association with supply and invoicing to force the order to complete as part of the processing function.
Print labels This can be set to optionally print labels for each sales order line. The control will only be active if the Clarity document SOLINE.CLF exists.
Dispatch Method Tick the dispatch method override if you require to preset a dispatch method. A dispatch method may then be selected from the list.
Note: The profile setting Dispatch Information Prompt must be enabled before this setting can be defined and used. Dispatch methods must also be set up in the EXO Business Configuration Assistant at Administration > Couriers > Dispatch methods.
Note: Process Defaults do not apply to the Sales Order Consolidation process.
Preprocess SQL
The Preprocess SQL tab allows users with SQL skills to enter SQL statements to be performed before any other batch processing takes place.