- Contents
- Index
- Search

Show results that include all search words
Setting up Dashboard Widgets
Dashboards are customisable displays showing one or more information panes called "widgets".
Note: Video-based Help is available for this topic on the EXO Business Education Centre.
To create a new widget:
-
Open EXO Business Config and go to the Admin > Dashboards > Setup Widgets or Staff > Menus > Setup Widgets section.
Note: A Setup Widgets menu item is also available to be added to the menus for other modules.
-
Click the New button.

-
Enter a name for the widget.
-
Select the Refresh Frequency, which determines how often the data in report is automatically refreshed.
-
Select which EXO Business module(s) this widget should be available for. Choose from:
-
<All>
-
EXO Business
-
EXO Job Costing
-
EXO Business Analytics
-
EXO Business CRM
-
EXO Accountant's Assistant
Note: Checklist widgets can only be made available for the EXO Accountant's Assistant.
-
-
Widgets are not available to users until they have been added to their dropdown menus. You can add the widget to users' menus automatically by selecting one or more from the Menu Assignments dropdown. Widgets can be manually added to menus later using the Drop Down Menu Designer.
-
Select a Widget Type:
-
Select "Clarity Report" to create a widget that displays a Clarity report.
-
Select "URL" to create a widget that displays the target of a URL, e.g. a web page or a local file.
-
Select "Pivot Table" to create a widget that displays data in a pivot table.
-
Select "Grid" to create a widget that displays data in a standard ExoGrid.
-
Select "Checklist" to create a widget that displays a structured list of steps that must be performed and checked off.
-
Select "Form Widget" to create one of the pre-defined widgets installed with the EXO Business system.
-
Note: Once a widget is saved, its Widget Type cannot be changed.
-
-
Specify what information the widget should display:
-
If you are creating a Clarity widget, click the
 button to select a report file. Once a report is selected, this
button opens a window to set any necessary report parameters.
button to select a report file. Once a report is selected, this
button opens a window to set any necessary report parameters. -
If you are creating a URL widget, enter the URL to display into the URL field.
-
If you are creating a Pivot widget or Grid widget, enter a SQL statement to select the data to display into the SQL field.
-
If you are creating a Checklist widget, the items on the list must be set up on the Checklist Setup tab.
-
If you are creating a Form widget, select the Form Type, then set details on the Customize Widget tab.
-
-
For Clarity widgets, select Default Zoom Settings, which determine how large the report appears inside its frame.
-
Click Save.
Once a widget has been created, it is not available on dashboard interfaces until it has been added to one or more drop down menus using the Drop Down Menu Designer. Add the widget to the Widgets section of all menus for all users who should be able to use it.
Widget Parameters
The SQL statements defined for Grid and Pivot widgets can contain parameters that allow the displayed data to be specific to a particular record, e.g. a Debtor or Creditor account, a stock item or a job. The following parameters are available:
|
Parameter |
Description |
|
@STAFFNO |
The ID number of the logged in staff member |
|
@CURRENT_SNAPSHOTID |
The ID number of the currently selected snapshot (EXO Accountant's Assistant) |
|
@CURRENT_BRANCHID |
The ID number of the currently selected branch |
|
@CURRENT_CAMPAIGNSEQNO |
The ID number of the currently selected campaign (EXO CRM) |
|
@CURRENT_GLPERIODSEQNO |
The ID number of the currently selected GL period (EXO Accountant's Assistant) |
|
@CURRENT_CRPERIODSEQNO |
The ID number of the currently selected Creditor period (EXO Accountant's Assistant) |
|
@CURRENT_DRPERIODSEQNO |
The ID number of the currently selected Debtor period (EXO Accountant's Assistant) |
|
@CURRENT_STKPERIODSEQNO |
The ID number of the currently selected Stock period (EXO Accountant's Assistant) |
|
@CURRENT_JOBNO |
The ID number of the currently selected job (EXO Job Costing) |
|
@CURRENT_MASTER_JOBNO |
The ID number of the currently selected job's master job (EXO Job Costing) |
|
@CURRENT_LINKED_STOCKCODE |
The ID number of the currently selected stock item's linked stock code |
|
@CURRENT_STOCKCODE |
The ID number of the currently selected stock item |
|
@CURRENT_DEBTOR |
The ID number of the currently selected Debtor account |
|
@CURRENT_CREDITOR |
The ID number of the currently selected Creditor account |
Note: There are no limitations on which parameters can be used in any given widget; when writing SQL queries, you must ensure that any parameters you add will be relevant to the context, e.g. the @CURRENT_JOBNO parameter will only work on a widget that is used by EXO Job Costing.
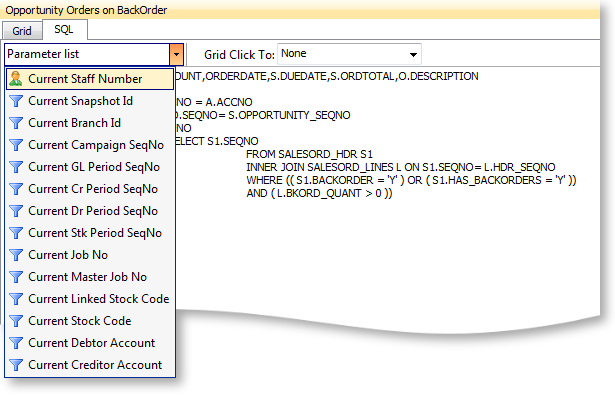
If the SQL tab has been enabled, you can add parameters by selecting them from the Parameter list dropdown at the top of the widget:
Saving and Loading Widgets
Widgets can be saved to a file by clicking the Save As button on the
Setup Widgets window toolbar ( ![]() ). Widgets are saved as a file with the .WDG extension. Widget files can
then be loaded into the Setup Widgets window by clicking the Load button
(
). Widgets are saved as a file with the .WDG extension. Widget files can
then be loaded into the Setup Widgets window by clicking the Load button
( ![]() ).
).
Restricting SQL Keywords in Widgets
Pivot and Grid widgets have a SQL tab, where the SQL statement that selects the data to display can be edited. To preserve the security and integrity of the system, profile settings are available to restrict what can be entered on the SQL tab:
-
Edit Pivot Widget SQL at runtime - this User-level profile setting determines whether or not the SQL tab is displayed. If it is disabled, the SQL tab is not available.
-
Restrict Widget SQL - if this User-level profile setting is enabled, the user will not be allowed to enter certain SQL keywords on the SQL tab.
-
Widget SQL reserved words List - this Company-level profile setting specifies the keywords that are disallowed. By default, the keywords DROP, INSERT, DELETE, UPDATE, TRUNCATE, MODIFY, and ALTER are disallowed.