Table Layout: General Information
In the following sections, you will find information about adjusting the layout of a table on an MYOB Acumatica form.
Learning Objectives
In this chapter, you will learn how to do the following:
- Hide and display table columns
- Rearrange columns in a table
- Adjust the width of table columns
Applicable Scenarios
You modify the default table layout on a form if you would like to view additional information or rearrange the data in a table according to your current work task.
Table Layout
On an MYOB Acumatica form, you can adjust the layout of any table to meet your needs. Specifically, you can hide or display table columns, rearrange columns by dragging them, and change column widths.
When you have adjusted the layout of a specific table on a particular form, your individual settings for the layout of this table are automatically saved to the server and applied in all your future user sessions. These changes are available to you on any browser or device and are applied to your user account only. Also, these changes are applied to only the specific table on the specific form that you changed; they are not applied to any other tables.
Column Configuration Capabilities
For each table, you can manage the set of columns to be displayed by using the
Column Configuration dialog box. You click the Column Configuration
button (![]() ), which is located in the
header row of the leftmost column of the table, to open the Column
Configuration dialog box.
), which is located in the
header row of the leftmost column of the table, to open the Column
Configuration dialog box.
You can adjust the table layout as follows:
- Hide columns
- Display columns that were previously hidden
- Change the order of columns
- Restore the default table layout
Setting the Visibility of the Table Columns
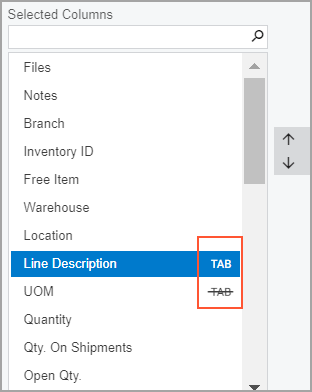
For each table of a data entry or mass processing form, you can define the visibility of the columns by using the Column Configuration dialog box. In the Selected Columns list of this dialog box, the system displays the columns that are visible on the table. These table columns may look like those in the following screenshot.

One of the following indicators (also shown in the previous screenshot) can be shown for each column:
 : Indicates that the
column is accessible through a keyboard (that is, a user can tab to the column).
This button is not visible by default and appears only when you point at the
column name.
 : Indicates that the
column is not accessible through a keyboard. In this case, when a user attempts
to tab to the column by pressing the Tab key on the keyboard, the system instead
skips the column (and any others that are inaccessible through a keyboard) and
goes to the next accessible column. If accessibility for a column has been
turned off, this button is visible by default and stays visible when you point
at the column name.
To change the state of the accessibility of a column, in the Selected
Columns list of the dialog box, you point at the column name and
click the ![]() or
or ![]() button.
button.
By default, changes in the column configuration are applied to the current user account. However, a user with administrative access to the system can configure the column accessibility; this administrative user can then share its configuration with specific users in the system or make it the default configuration for all users.
