M-Powered Payments > Making MYOB M-Powered payments > Sending MYOB M-Powered payments
MYOB M-Powered payments recorded in the Prepare Electronic Payments window are transferred to the M‑Powered Services Centre to be sent to employees and suppliers. In the M‑Powered Services Centre you can complete the payment authorisation (if not yet fully completed), change the bank processing date (if the payment has not yet been authorised) and send payment instructions via MYOB M‑Powered Services to your bank.
MYOB M-Powered payments made before banking cut-off times on a business day will be processed by your bank and posted to payee accounts that day. MYOB M-Powered payments made after banking cut-off times, on weekends or on Australia-wide public holidays will be processed the next business day and dated that day in the bank accounts of your payees.
 |
||
|
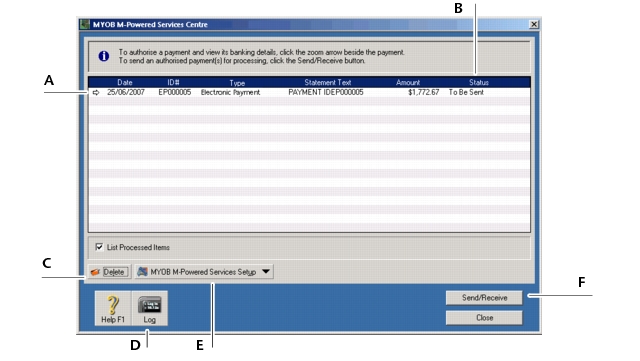
Click the zoom arrow next to a payment to display the Electronic Payments Details window. From the Electronic Payments Details window you can complete payment authorisation or view and print payment details.
|
||
|
Status column
|
Displays the current processing status of the payment. See Keeping track of your MYOB M-Powered payments for an overview of statuses.
|
|
|
Click this button to remove a selected payment from the list. Note that if you delete an unprocessed payment from the M‑Powered Services Centre, you should also delete or reverse the corresponding transaction in your company file. (See Deleting MYOB M-Powered payments.)
|
||
|
Click this button to view connection details from previous M‑Powered Services Centre transmission sessions.
|
||
|
Click this button and select M-Powered Payments to review or modify the current MYOB M‑Powered payments setup. (See Maintaining your M-Powered authorisers.)
|
||
|
1
|
|
2
|
Check the statuses displayed in the Status column. If there are any statuses reading To Be Authorised or Partially Authorised, then the person whose authorisation is required needs to complete Step 3 to Step 7below; otherwise, go to Step 8. For definitions of these statuses, see the table on Keeping track of your MYOB M-Powered payments.
|
|
3
|
Click the zoom arrow next to a payment with the status To Be Authorised or Partially Authorised. The Electronic Payment Details window appears.
|
You can enter a Bank Processing Date up to 45 days from the current calendar date. Once sent, the payment is stored until the requested processing date. To cancel a future-dated payment, see Cancelling future-dated payments.
|
4
|
|
5
|
Select your Authoriser Name, enter your Password and then click Authorise Now. The Electronic Payment Details window, with an updated Status, appears.
|
|
6
|
|
7
|
|
8
|
Make sure you are connected to the Internet and then click Send/Receive to transmit all payments with the status To Be Sent. The Transmission Summary window appears.
|
|
9
|

