Managing user accounts and company files > Backing up and restoring company files
Backing up and restoring company files
Backing up is the copying of a company file to some form of storage medium, such as a CD, different hard disk or other media. You can use the backup function in your software to create a compressed archive file with a .zip extension that takes up less space.
The Restore command closes the company file you’re currently using, decompresses a backup file so you can use it, and then opens the backup file.
caution : Single-user access required
[Network versions only—AccountRight Premier and AccountRight Enterprise] Making a backup file requires single-user access. For more information, see Single-user file locking for special tasks.
Precautions when backing up
Avoid common mistakes that can cause you to lose backups of company files:
|
▪
|
Take care when backing up multi-user company files [AccountRight Enterprise only]. If multiple users access a company file, you need to back up the company file on the host computer—including custom forms, letters and spreadsheet templates you have created. You can then copy the updated templates to each workstation and ensure the latest versions are used.
|
When you do a full backup, ensure that the most recent versions of custom forms and templates are backed up.
|
▪
|
Don’t store backups on the same hard disk as the currently used company file. A single disaster can wipe out all your records.
|
|
▪
|
Make separate backups. A disk failure can corrupt your data in such a way that you may not notice it during a session. If you accidentally copy some corrupted data over your previous backup file, that backup is no longer valid.
|
Without a valid backup, you would need to re‑create your company file. You can reduce the risk by making separate backups to protect your company data—for example, at the end of each business day.
|
▪
|
Store backups off site. Store monthly and yearly backups in a safe place, preferably away from your office. Except for daily rotational backups, do not re-use media.
|
|
1
|
caution : If the backup process does not work
When you installed your software, special software needed for the backup process was also installed. If a message appears when you try to use the Backup command, this software may have been removed from the location where it needs to exist. You may need to re-install your software to use this feature. Alternatively, you can contact MYOB Support for help.
|
▪
|
|
▪
|
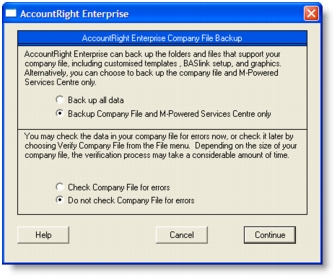
If you want to back up only your company file and M-Powered Services Centre, click Backup Company File and M-Powered Services Centre only.
|
|
3
|
Choose whether to check your company file for errors before making your backup by selecting one of the options.
|
For more information about checking your company file for errors, see Checking your company file for errors.
note : Maintaining data integrity
Check for errors so that if you need to revert to a backup, data integrity is ensured.
|
4
|
Click Continue.
|
|
5
|
If you selected the Do not check Company File for errors option, the Back Up window appears. Go to step 7.
|
|
6
|
If you selected the Check Company File for errors option, the verification process may take several minutes.
|
When the verification process has finished, click OK in the window that appears. (Note that this window appears whether or not errors have been found in the company file.)
The Back Up window appears.
A default filename is assigned.
|
MYOmmdd.zip
|
|
Note that you need to name all your backups with enough information to tell you when they are from and where you were up to in data entry—for example, ‘Wednesday, 16.12.09’ or ‘Backup as of 16.12.09’.
|
9
|
Click Save. The backup process begins.
|
|
10
|
If you are storing the backup file on a removable storage device, label all your backups with enough information to tell you when they were done and where you were up to in data entry—for example, ‘Wednesday, 16.12.09’ or ‘Backup as of 16.12.09’.
|
caution : Single-user access required
[Network versions only—AccountRight Premier and AccountRight Enterprise] Restoring a backup file requires single-user access. For more information, see Single-user file locking for special tasks.
|
1
|
If the backup file is on a removable disk, insert the disk into the disk drive.
|
|
2
|
If you have selected the Prompt for Data Backup When Closing option in the Preferences window (Security tab), a window appears asking if you want to back up your company file. If you want to back up your company file now, click Yes and follow the prompts; otherwise, click No.
|
3
|
If the backup file is on a removable disk, insert the disk into the disk drive.
|
4
|
Select the folder where you want to save the restored file. By default, the restored file will be saved in the same folder as the backup file.
|
|
5
|
Click Save. A message appears showing that the company file will be restored to the selected folder.
|
|
6
|
When you restore a file that has not been activated, the Company File Activation window appears. If you do not need to enter transactions into the restored file, click I want to mark this file as Read Only and then click Continue to open the file in read-only mode.
If, later, you need to activate the read-only file, go to the Help menu and choose Activate Company File.
note : Restoring from a CD or DVD
If you are restoring a backup file from a CD or DVD, the file will be read-only. To read data from the file, you need to change the file’s attributes. To do so, right-click the file, choose Properties and deselect the Read-only option.
Related Topics

