Preparing an Instance: To Enable Features and Activate the License
In the following activity, you will learn how to enable features in MYOB Advanced, activate the license, and review the license information.
Story
Suppose that the SweetLife Fruits & Jams company has purchased an MYOB Advanced subscription in Acumatica Business Cloud. The instance has been installed by SaaS engineers. You, as a system administrator, have received the instance URL and the credentials to the admin user. Now you need to prepare the instance for implementation. You are the first one to sign in to the instance, and activate and license it with the product key you have obtained from the sales representative. The company has purchased the S1 license tier with three concurrent users and five tenants. In addition to the default set of features, your company has purchased the basic functionality associated with the Inventory and Order Management group of features.
Process Overview
To begin using the system after the installation, you will use the Enable/Disable Features (CS100000) form to enable the standard set of features, which gives you the ability to access the Activate License (SM201510) form. When you enable the features, you are still in trial mode. To remove the restrictions of the trial mode, you need to activate the license and enable the features that you bought in addition to the standard set.
System Preparation
Before you perform the steps of this activity, make sure that the following tasks have been performed:
- You have installed an unlicensed MYOB Advanced instance in a tenant without any preloaded dataset (out-of-the-box).
- You make sure that the port 443 is open on the computer that is running the MYOB Advanced instance. You may have to open port 443 if the computer has a firewall enabled.
- You have signed in to MYOB Advanced with the following credentials:
- Username: admin
- Password: setup or the one provided to you by the person who did the installation
Step 1: Enabling Features for the First Time
To enable features in MYOB Advanced for the first time, do the following:
- Open the Enable/Disable Features (CS100000) form.
Notice that a number of features are selected by default and the activation status is Pending Activation, as shown in the following screenshot.
Figure 1. Activation status of initial features 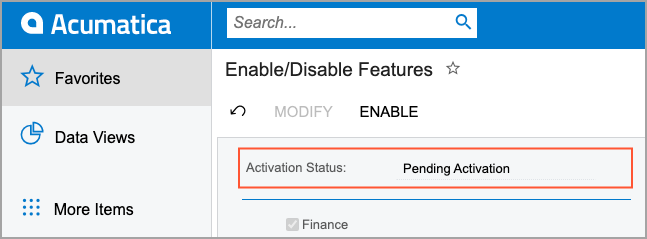
- On the toolbar, click Enable to activate the selected
features.
The status of the currently selected feature set is now Validated. On the main menu (the panel on the left side of the screen), notice that new workspace menu items (Time and Expenses, Finance, Banking, Payables, and Receivables) have appeared that correspond to the features you have enabled, as the following screenshot demonstrates. You can now navigate to the forms in these workspaces.
Figure 2. Activation status of the enabled features 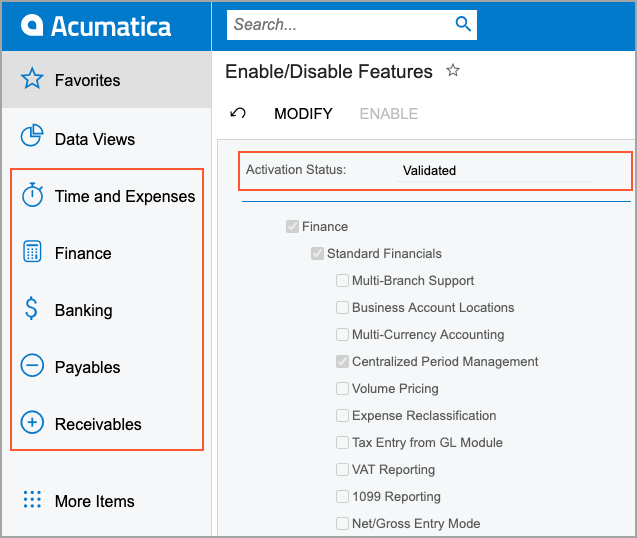
Step 2: Activating the License
To activate the license, do the following:
- Open the Activate License (SM201510) form and do the following:
- On the form toolbar, click Enter License Key.
- In the Activate New License dialog box, enter the 918B-A728-0569-7FC6-D058 license key.
- Click OK at the bottom of the dialog box.
The system contacts the licensing server and validates the license online.
Attention: The license key used in this activity is for training purposes only. The license will be deactivated in 24 hours and the instance will return to the trial mode. The license can be applied to an instance only once. - In the Agree to Proceed dialog box, which opens, click the link to read the software license agreement, and if you agree to the terms of the agreement, click Agree to proceed with activation, and close the dialog box.
- In the Summary area, review the license status (Valid), its validity period, and the number of users and tenants.
- In the table, review the features that this license supports.Tip: You can use the column filter for the Activated column to filter activated features.
- In the Summary area, click Apply License to activate your license, and the system will restart the instance.
Step 3: Enabling Additional Features
To enable additional features in MYOB Advanced, do the following:
- Open the Enable/Disable Features (CS100000) form.
Notice that the list of features is narrowed to the features allowed by the applied license.
- On the form toolbar, click Modify.
- In the list of features, select the check box next to the Inventory and Order Management feature.
- On the toolbar, click Enable to activate the selected
features.
The status of the currently selected feature set is now Validated. On the main menu, notice that new workspace menu items (Sales Orders, Purchases, and Inventory) have appeared that correspond to the feature you have enabled. You can now navigate to the forms in these workspaces.
Step 4: Reviewing the License Information
To review the license information—which includes the license status and limitations, statistics about the commercial transactions, warnings, and statistics for constraints—do the following:
- Open the License Monitoring Console (SM604000) form.
- On the License tab, which is shown in the screenshot
below, review the information about your license.
- In the License Status read-only box, verify that the license status is Valid, which means that the instance is licensed and has been activated.
- In the License Details section, review the instance limitations.
- In the Recommended Maximums section, notice that the value in the Concurrent Users box is set to 3. This means that three users can work in the system at the same time.
Figure 3. License Monitoring Console 