
- Contents
- Index
- Search

Show results that include all search words
Serial Number Processing
Serial numbers are maintained as part of the workflow whenever stock transactions are created for a serialised stock item. This is usually associated with a business document (e.g. Debtor invoice). When the document is saved using the Save & Exit or Save buttons, the stock items that should be serialised are determined based on the combination of the document class and the serial type of the stock items. The quantity of serials for each of these is computed. A serial numbers screen is displayed:
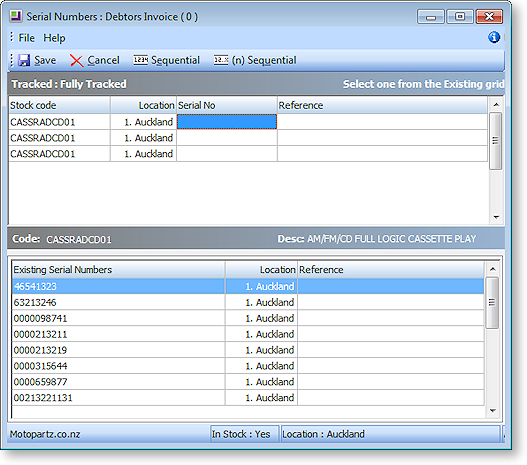
The top grid is populated with the required number of serialised rows. This is calculated from the line quantities of the parent document, and only items that should be considered serialised for this document class are displayed. If no items require serial processing, then the serials screen will not appear and the transaction will continue.
It is not possible to delete or insert rows, as this would require altering the quantities on the parent document. At any stage the Cancel button can be used to discard any serial information entered and return to the parent document that can then be amended as necessary. Clicking Save again will return to a fresh serials screen.
As the top grid is navigated:
-
The lower grey bar will show the stock item code and name, and the upper grey bar will show the serial number type and available actions.
-
The lower grid will show any applicable serial number list for the item in focus.
-
The status bar beneath shows the filters that were applied in presenting this list and stock the stock status, location selection, and account selection.
Usually the lower grid shows a list of available serials. When the item is for a contra (negative) quantity such as a credit note, the row in the upper grid will be coloured red and the lower grid typically shows a list of serials previously traded with this partner. The column header wording of the first column (e.g. Existing Serial Numbers in the above example) also changes to reflect this.
Navigation and Data Entry
For some serial number types and document classes the serial numbers must already exist in the list shown in the lower grid. In others they may be created.
The following points should be noted when navigating the serial number screen:
-
When the cursor focus is in a Serial No cell of the upper grid, the left and right arrows move along this upper grid row, while the up and down arrows move the selected line in the lower grid. If the cursor focus is in another upper grid column (e.g. Expiry or Reference) then the up and down arrows navigate the top grid.
-
Entering, scanning or selecting a serial number will move the focus line of the top grid down one row. This accommodates rapid entry.
-
If an entered serial number matches an entry in the lower list, it is selected. Selection can also be done using a mouse or navigating the bottom grid and pressing enter. A selected serial will copy all its static attributes such as Expiry and Reference.
-
Selected serials disappear from the bottom grid so that they may not be selected multiple times. If a serial is selected in error, simply select another. The newly selected serial will replace the previous selection, and the replaced serial will be returned as the last row on the bottom list (i.e. the lower grid is not automatically resorted).
Sequential Entry
After entering a serial number, sequential numbers can be automatically entered or selected for consecutive rows that have the same stock code. This is done using the Sequential or (n) Sequential buttons.
The Sequential button will recurse until a change of stock code is detected. The (n) Sequential button will request a quantity and recurse this many times or until a change of stock code (whichever comes first). These functions are also available on the right mouse click menu, or by pressing F12 or CTRL-F12 respectively
When using these functions to create new serials the right-most portion of the serial number in focus is used as the incrementing integer. For example if started with a serial in the form ABC-123-1001-Z, then 1001 will be the portion incremented. The next serial will be ABC-123-1002-Z. This function will also clone the Expiry and Reference fields from the starting row.
When selecting existing serials the system will select from the lower list in sequence. Expiry and Reference will be obtained from the selected serial.
Closing the Serials Window
When all rows of the upper grid are populated the Save button may be clicked to close the serials screen and continue with the transaction save.
Clicking Save without all rows populated will present a warning dialog before returning to the serials screen.
Clicking Cancel will return to the parent document. All serial number entry in the current session will be discarded.
Pre-assignment
When pre-assigning serials, the same workflow occurs as described previously for stock transactions.
If serials have been pre-assigned, then when the serial selection screen re-opens (either for review or subsequent stock transitions), the serials previously assigned will automatically populate the upper grid.
If the quantity required in the current session is less than the quantity pre-assigned then the pre-assigned serial will populate the upper grid in ascending Serial No. sequence (e.g. a Sales Order for ten items may have ten pre-assigned, but only four are being supplied for the current session). The additional assigned serials will show in the lower grid as rows with a different background colour. This allows easy identification for preferred substitution. A non-assigned serial may also be chosen as replacement if desired.
If insufficient serials have been pre-assigned, blank serial number cells will appear and will require entry.