
- Contents
- Index
- Search

Show results that include all search words
Setting up GL Accounts
You can set up your GL accounts based on your chart of accounts (a structured plan of how accounts are numbered), which is created to fit the needs of your business.
Entering GL Account Details
To enter GL details:
-
Account > General Ledger, this opens the GL (search) window.
-
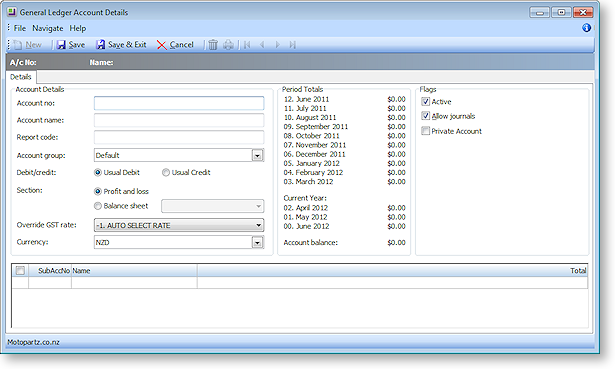
Click New to create a new GL account. The General Ledger Account Details window opens at the Details tab:
-
Complete the entries in each field, using the table below as a guideline.
|
Item |
Description |
|
Account no |
The account code for the GL Account from the chart of accounts. If you have branches and sub codes, these will be entered later, so just enter the main GL Account number here. The account number cannot be zero. Note: Once you have saved your account details, you cannot go back and edit the account number. |
|
Account Name |
The name or description of your GL account. |
|
Report Code |
Any alternate account codes. This is an optional alphanumeric field. You could use this field to store old account codes that may help you if you need to search for the old account at a later stage. This code can also be used by the Report Writer to group accounts. |
|
Account Group |
The Account Group to which the account belongs, for example (in the demo database) Trade, Retail or Foreign. Select a predefined account group from the list. |
|
Debit/Credit |
Select against the usual sign of the account, either a Usual Debit or a Usual Credit. |
|
Section |
Choose the GL report type for this account, Profit and loss or a Balance sheet. If the Balance sheet is selected additional options can be selected. These options are Asset, Liability and equity. |
|
Override GST rate |
Select the override GST rate from the list. |
|
Currency |
Select the currency that applies to this GL Account. Note: The option is available only when multi currency is enabled. |
|
SubAccNo |
A sub account number. This number is automatically assigned; however it can be overwritten with another number. |
|
Name |
This is the name of the sub account. |
|
Period Totals |
In MYOB EXO Business, transaction ages are numbered from current (0) backwards. This may be different from the system you are familiar with, however it does give you some useful logic consistency. Example: 0 = current period 1 = One period ago (last month) 2 = Two periods ago 54 = Fifty-four periods ago etc. EXO Business knows which period in the period table is the current one, and uses this as a point of reference to display the name of the period on reports and within data entry screens. It is important you are comfortable with this and that all users understand the approach. Note: For a Profit and Loss account, the period totals will display the account movement for the period; for a Balance Sheet account, the period totals are the accumulated balance for the period. |
|
Flags |
Note: Some GL accounts should have the Allow journals checkbox unticked, so accounts will be system-maintained, e.g. Debtors control account, Creditors Control Account, Stock on Hand. |
The other tabs on the General Ledger Account Details window become visible after a GL account is created and saved.
Viewing GL Account Details
Account > General Ledger > [Search] > {double click the GL Account name}
The field descriptions are the same as for creating a new account.
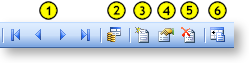
The only changes are to the toolbar menu buttons:
-
Transaction navigation. Previous, next, forward and last record.
-
Show amounts in foreign currency. If more than one currency is enabled for this account, this is only possible if it was enabled in the EXO Business Configurator.
-
Enter a new sub account. Use this option to create a Sub Account.
-
Edit the selected sub account. Use this option to delete a sub account's details.
-
Delete the selected sub account. Use this option to delete a sub account.
-
View delete and calculate movements. This opens the General Ledger Movements window.