- Contents
- Index
- Search

Show results that include all search words
Create a Debtors Banking Batch
Transactions > Debtors Receipts > Debtors Banking Batches
In the Debtors Banking Batches window, click the New button. This window displays:
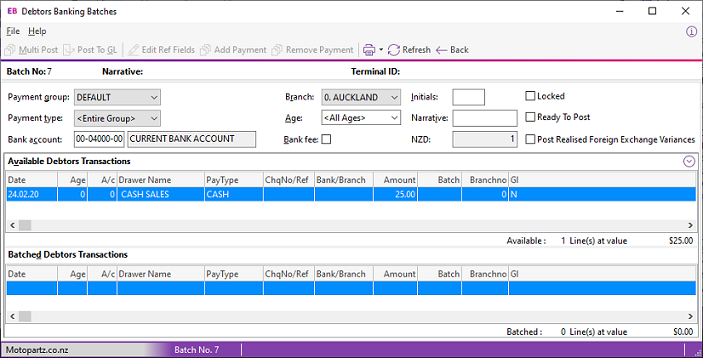
Complete these fields:
|
Field |
Description |
|
Payment Group |
The payment group for the batch. You can create a batch for one payment group only. Using one default group includes all transactions. If you use multiple payment groups, then create a batch for each payment group. |
|
Payment Type |
Specify the payment type, or select Entire Group. |
|
Bank account |
The bank account of the selected payment group. |
|
Branch |
The branch for which you are creating the batch. |
|
Age |
The current period. |
|
Bank Fee |
Select this option to include a bank fee for this banking batch. By default, this uses the bank fee setting for the payment group. You can change the setting. The bank fee does not create a transaction until the batch is posted to General Ledger. |
|
Initials |
The initials of the person creating the bank batch. |
|
Narrative |
Information about the banking batch. |
|
AUD/NZD |
The GL account's currency. |
|
Locked |
A new banking batch should be unlocked. Batches aren't locked until they are posted. |
|
Ready To Post |
Select this option if the batch is ready to be posted to the GL. |
|
Post Realised Foreign Exchange Variances |
This option is enabled if multiple currencies are enabled. Selecting this option posts realised foreign exchange gains or losses that are a part of the batched receipts to the General Ledger. Note: Set the Allow posting to GL from debtor receipt screens User-level profile setting in Exo Business Configurator to enable this option. |
There are two frames in this window:
-
Available Debtors Transactions, which lists transactions that have not yet been assigned to a batch, and
-
Batched Debtors Transactions, which have already been batched — for example, they have been receipted via the Debtor Receipts Batch Entry window.
To include a transaction in the batch, double click on a transaction to move it to the Batched Debtors Transactions frame.
To remove a transaction from the batch, double click on the transaction in the Batched Debtors Transactions frame, or click the Remove Payment button.
Posting Batches to the General Ledger
To post a batch, click the Post to GL button.
To post multiple batches, edit each batch and then click the Back button to return to the main Debtors Banking Batch window each time, which saves changes you have made to the batch.
-
Select the rows to post using the ctrl or shift key, then click the Multi Post button to post the selected batches.
-
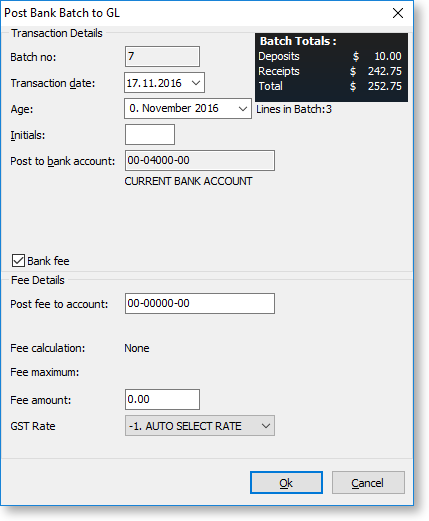
The Post Bank Batch to GL window displays. If you are posting multiple batches, a window displays for each batch in turn.

Click the Bank fee checkbox to enter bank fees for this banking batch:
-
Review and complete the fields in this window:
Field
Description
Batch Number
The batch number being posted. When using Multi Post, a separate dialog box displays for each batch.
Transaction Date
This is the date that displays for the posted GL transactions. The default is the current date.
Age
The General Ledger period to which the batch is posted.
Initials
The initials of the person performing the banking.
Post to bank account
This defaults to the bank account specified on the main window. You can't change it in this window.
Bank Fee
Select this option to generate GL postings for bank fees. The Fee details panel displays.
Post fee to account
The amount of the bank fee is posted to this GL account. This field defaults to the account established in the payment group. You can change the account.
Fee calculation
The method of fee calculation established in the payment group.
Fee maximum
The maximum value of fees set in the payment group.
Fee amount
This displays the amount of the calculated fee. If the calculation method is None, then the initial value in this field is 0.
GST Rate
This is the GST rate that applies to the fee. The list contains Creditor GST rates as they are being charged the fee.
Note: If the profile Post to GL from External database is enabled then you can post banking batches to a General Ledger in another database. In this case, an additional Destination field displays in the top panel. This defaults to the current database. You can select another database to receive the GL transactions.
-
Click OK. If you are posting multiple batches, this window displays for each batch in turn. Review the transaction details and enter bank fees for each batch.
-
A confirmation message displays, followed by a summary message. Click OK.
Multiple batches do not consolidate GL postings across banking batches.
On the Debtors Banking Batches window, the batch displays as posted and locked.
-
If you need a printed schedule of the batch to take to the bank, select File > Save as Report > Bank Batch (or POS Bank Batch).
Selecting Bank Batch prints the BankBatch.clf Clarity report (usually A4).
Selecting POS Bank Batch prints the POSBankBatch.clf Clarity report (usually 4" slip).
-
To save the batch as a:
-
CSV file, select File > Save as CSV to create a CSV file with the name <batchno>.csv.
-
Text file, select File > Save as Text to create a text file with the name <batchno>.txt.
-