- Contents
- Index
- Search

Show results that include all search words
Checklist Widgets
Checklist widgets are a dashboard widget that displays a structured list of nodes. Each node is a separate item that you can check off the list. Nodes can be a note to the user, or they can link to an Exo Business menu procedure, which opens on the checklist widget display:
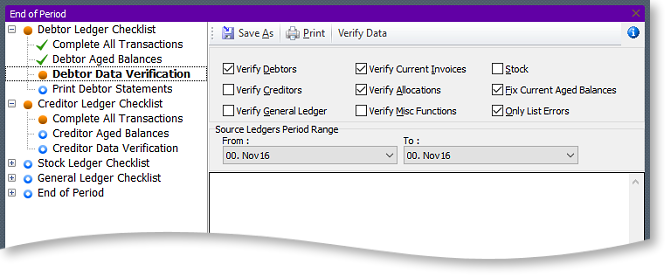
Selecting a node on the tree and clicking these buttons changes the node’s icon to indicate its status:
 - Not Started
 - In Progress
 - Complete
 - Requires Review
Note: There is no button for the Requires Review status. You can set this status using a stored procedure attached to the node.
Change the status of a node by right clicking on it. If you right click on a parent node, options to set the statuses of all child nodes display.
Selecting Checklist as the Widget Type enables the Checklist Setup tab:
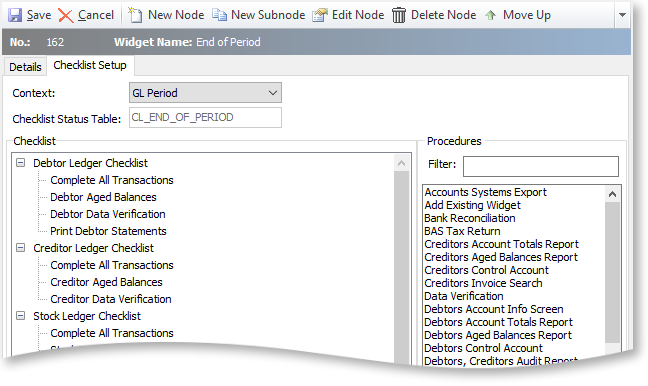
To add a:
- Blank node, click the New Node button.
- Node that links to an Exo Business menu procedure, drag the procedure from the Procedures list onto the checklist.
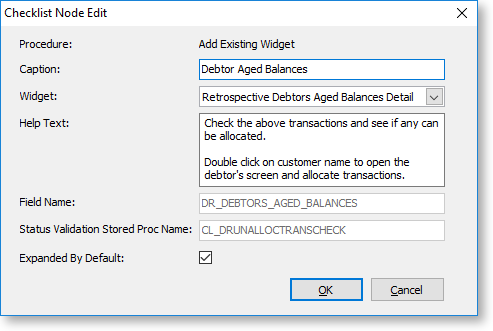
The Checklist Node Edit window displays. Enter details for the node and click OK.
|
Field |
Description |
|
Procedure |
If the node links to an Exo Business menu procedure, the procedure's name displays here. |
|
Caption |
Enter a name for the node. This name displays on the checklist widget when it displays on a dashboard. |
|
Parameters |
For procedures that require extra parameters — for example, Run Clarity Report or Add Existing Widget — enter the parameters here. |
|
Widget |
When using the Add Existing Widget procedure, select the widget to add from the available widgets in this dropdown. |
|
Help Text |
Enter a short description
for the node here, explaining what its purpose is, or giving instructions
on how to use it. This text displays at the bottom of the checklist
display when you click the Note: Any text that starts with www. or https:// displays as a hyperlink. |
|
Field Name |
The statuses of all nodes are stored in the Exo Business database, in the table specified by the Checklist Status Table property on the Checklist Setup tab. The status for this node is stored in the field you enter here. Once set, the field name cannot be changed. Note: Field names must be unique - if you enter a field name that is the same as another node's field name, it will be prefixed with a number to make it unique — for example, FIELD_1. If this node is deleted, the field will be removed from the database. |
|
The node's status is usually controlled by the buttons at the bottom of the checklist widget. You can use a custom stored procedure to set the node's status. This property specifies a stored procedure to run when the checklist is loaded or refreshed, when the node is clicked on, or when its status is manually changed to Complete. This procedure must take the parameters @CONTEXTID and @NODESTATUS, and return a new @NODESTATUS value, which must be one of:
If the stored procedure name you enter here does not exist, Exo Business creates a default procedure with inputs and outputs when the table is saved. Checklist procedures are prefixed with CL_. |
|
|
Expanded By Default |
Select this option to display all subnodes under this node. If you don't select this option, the subnodes are hidden until you click the + icon next to the node. |
 button.
You can add subnodes under any node (including other subnodes). Select the parent node or subnode, and then click New Subnode or drag a procedure from the Procedures list onto the parent node.
Editing Nodes
You can edit nodes and subnodes by double clicking on them or by selecting them and clicking the Edit Node button. You can re-order nodes and subnodes by dragging them drag them into a new position, or by clicking the Move Up and Move Down buttons.
Select a node and click Delete Node or press delete to remove that node and any sub-nodes below it.
Storing Checklist Node Statuses
The Checklist Status Table property on the Checklist Setup tab specifies the name of the table in the Exo Business database that stores the individual statuses of each node in the checklist. The table name you enter here must be unique. Exo Business creates it when you save the table when the table is saved (checklist tables are automatically prefixed with CL_). Once set, you cannot change the name of the table. The table contains a field for each node in the checklist – field names for each are specified by the Field Name property on the Checklist Node Edit window.
Context-Specific Checklists
You can make checklists in the Exo Accountant's Assistant context-specific to a particular period. A context-specific checklist saves the status of all nodes separately for each period. When you select a period is from the Financial Period dropdown in the Exo Accountant's Assistant, the checklist updates to show the node statuses for that period.
Select an option from the Context dropdown at the top of the Checklist Setup tab:
- None
- GL Period
- Debtor Period
- Creditor Period
- Stock Period
If you select None, the checklist widget is not context-specific. Otherwise, it is specific to the period for the selected ledger. When a checklist is context-specific, the table that stores checklist node statuses contains a separate line for each period.