- Contents
- Index
- Search

Show results that include all search words
Tidying Up
Even an advanced report writer will usually find several things that can be improved when previewing a new report. Let's fix the spacing to begin with.
-
Return to the design workspace by clicking on the Design tab.
-
Press the left mouse button and draw a square around the fields in the details band of your report. The fields should all have grey dots (“handles”) at each corner. This indicates that it is part of a selection of multiple items.
-
Move one of the fields and notice how all of the fields move in unison, remaining in their relative positions to the field you are dragging. Move the fields to the top of the Details band.
-
Place your cursor over the bar labelled Detail. Your cursor will change to an up/down arrow, indicating that you can drag the section divider up and down. (See below).
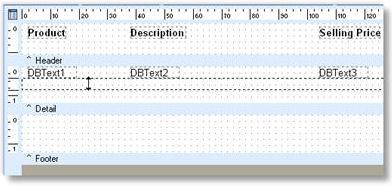
-
Drag the divider (grey band) up until it meets the bottom of the components in the detail band.
-
To change the formatting of the number fields, right-click on the DBText component and select display format option. Choose the format you require and click OK.
-
If any of the fields are truncating their data then right click and select the Autosize option.
-
You might wish to put the MYOB EXO Business user’s company name on the top of this report. See if you can do this based upon what you’ve just learned.
-
Close the Report Designer window by clicking the button at the upper right corner of the window.
-
A dialog box asking you to save changes will appear. Click Yes.
Congratulations! You've built your first MYOB EXO Clarity report!