- Contents
- Index
- Search

Show results that include all search words
Clarity Tech-Tips, FAQ and Troubleshooting
How do I force the Summary section to cover the whole of the last page of the report?
-
Enlarge the summary section to be the size of your page.
-
Set the header and footer to not visible if the page count has been reached.

-
When the summary prints – set the page limit property to the current page.

How do I set an image to print only on duplicate copies?
-
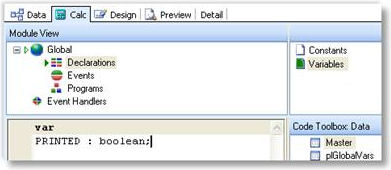
Declare a boolean global variable to hold the printed value.
-
Set the Printed variable to false at the start of the report.

-
Set the set the image to non-visible if Printed is True, otherwise show the image and set Printed to True.

How do I skip a group when a condition is met / start each group on a new page?
-
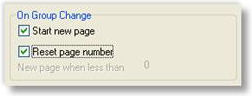
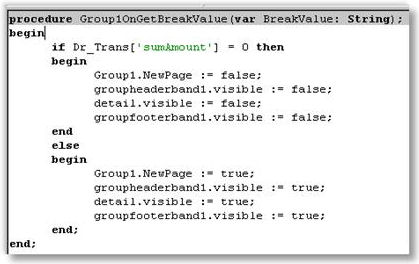
On the Groups window (Ctrl-G), set groups to start on new page.
-
On a group break check to see if the condition is met and if so cancel new page and set the group header, footer and detail to not visible.
How do I use Total Variables?
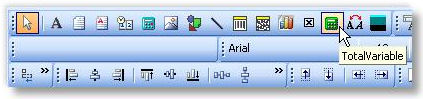
Total variables are used to obtain sums of variable-type component values (variables must be of a numeric data type).
-
Drop total variable onto form where total is required.
-
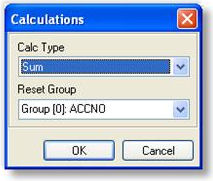
Right click > Grand total, then select the variable name that is to be totalled.
-
Right click > Calculations, and ensure value is reset to 0 at the correct time, or your totals will be wrong.
Why are my parameters not being passed though?
Check that the CLS file is in the default CLARITY directory (Custom or Masters, depending on which report you're trying to run). Check that you don't have spaces in your parameters
e.g. /S = MYPARAM = 12 will not work; remove the spaces: /S=MYPARAM=12
Why do I get the message 'Can't find Report Clarity.EXE'
You can get this message when trying to run a Clarity report from a button or from a menu option if you have entered "Clarity.EXE" in the Command Line or Parameters field when setting it up. These fields (in the case of menu items and custom buttons) should consist of the report name and parameters only.
Why do reports with the /I parameter still go to the default printer?
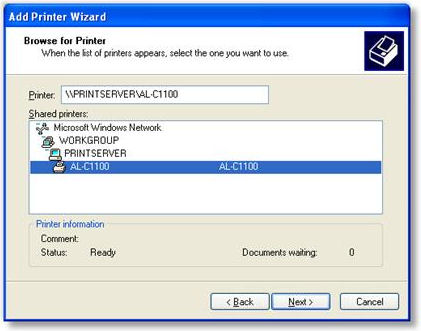
Check that you are using a valid UNC pathname as illustrated in the example below. If an invalid printer definition is given, Clarity will always resort to the default printer. See the example below for using /I=7:

These UNC names are derived from the list of available printers on my network as viewed by Windows explorer.
You may also need to specify Direct to (/D) when using the /I=parameter on a command line to tell Clarity to skip the printer/file dialogue that Clarity calls by default.
How do I set the number of copies to print at design-time?
On the Clarity Design tab: Tools menu >- Settings – Doc Copies property can be used to control this.
How do I make the second or subsequent copies print slightly differently?
Within one print session you can use the plGlobalVars Copies and CopyCounter to control the visibility of a label or content a variable type object on your form. One use of this is to print "Original" or "Copy" on various copies that are printed.
Example:
Add a label to your report and change the size, colour and position of the label to suit your needs. Change the label name to ShowCopy. Add this code in the ShowCopyOnGetText event handler:
|
|
if plGlobalVars['CopyCounter'] = 0 then ShowCopy.Visible := false; {Customer copy shows nothing} if plGlobalVars['CopyCounter'] = 1 then begin ShowCopy.Visible := true; Text := 'ACCOUNTS COPY'; end; if plGlobalVars['CopyCounter'] = 2 then begin ShowCopy.Visible := true; Text := 'FILE COPY'; end; |
With regards specifically to Tax Invoices and Copy Tax Invoices printed at a later date, you need to establish if there is a previous entry in the print log for this transaction from a previous print session. Note that this is quite different from duplicates within a single print session, where the print log entry is not made until the whole print session was successful.
Example:
Where the Print Log table is joined onto the DR_Trans.Seqno on your data tab, you can use this to establish if there has been a previous successful printout of an invoice document.
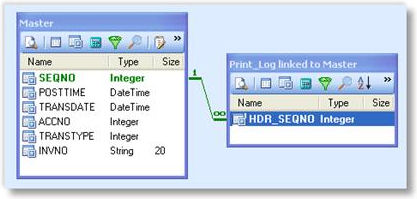
Then using the value returned you can incorporate this into a variable that provides the text for the title of your invoice document.

How do I print a second copy to a different printer?
There is a Custom Memo function called CUSTOM_SETTINGS designed for this scenario. Custom Memo functions provide for specific exceptional functionality by use of keyword named Memo or label object. You can place these memo objects anywhere on a report or sub-report, but you must specify the name of a MEMO or LABEL object to be the Keyword for the required function.
If you place a memo field on your form Memo field named CUSTOM_SETTINGS then you can force the document to inherit the profile set of another CLF that for the initial print of the form or any subsequent copies. The most common use for this might be to redirect a subsequent copy of a document to a different printer device or file.
Example: Packing slip prints in office with second copy to warehouse printer.
-
Add a new memo field to the report, and call it CUSTOM_SETTINGS.
-
Edit this field so that it contains the Inherited parameters for each copy that will determine where that copy is to go:
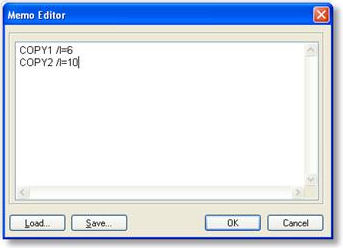
The '/I=' refers to CopyN inheriting the profile values of the FormID.
This also illustrates the point that even a single copy form can in fact be manually redirected to print on a different printer from its associated profile settings.
Used in conjunction with Invoice Form files settings or InvFileno functionality this can allow for different printers for each type of invoice.
This technique is intended for specific custom functions that MYOB EXO Business wish to introduce to solve very specific business problems, rather than an all encompassing and adaptable function for generic use. It is incorrect to assume that a Custom Memo Function supports the entire Clarity command line control set.
Please note - The current functionality is only designed to work where the document is being printed, it is not intended to work with any other output devices such as Viewer or File.
How can I direct a report to a different printer tray trays on a networked?
Answer: The Main difficulty with printing to different trays of a printer in lies with the convention of naming of Printers in Windows 2000 & XP, and the inability to be able to attach the same shared network printer twice on the client PC.
When you add a Shared printer in Windows it is added with the name of 'Printer Share Name' on 'Computer it is shared on' for example 'HP8000 on Server2'.

This means that when you try to add the printer again so you can use another tray, it won't let you because the printer already exists.
To get around this you need to add the printer alias and share it again on the computer that it is shared on.

When you have added the printer to the printer list on the print server, change the printing preferences so that the Paper Source uses the tray required. This will be different between the makes of printers, but clients connecting to this shared alias will inherit this change.
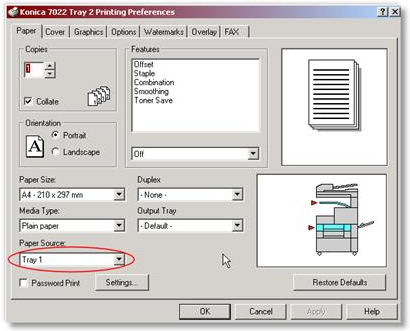
You can then add the new printer alias on the client PC's. Once the printers is set up you will now have to set your invoice to print 2 copies to the different trays.
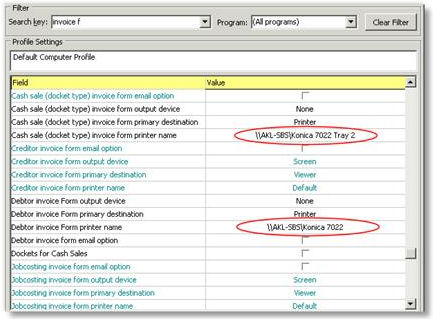
The first step is to set the print options in ExoConfg:
Then Change the Invoice Form to print 2 copies to different locations by selecting Settings from the Tools menu of Clarity when you have the Invoice.clf open.
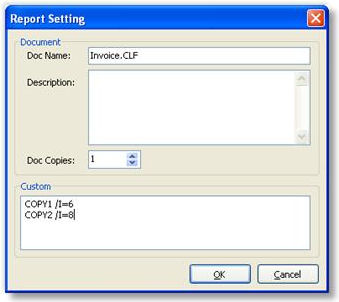
Once this is all done when you now print an invoice normally, 2 copies will be printed to the 2 locations that were set up.
What does the error 'Invalid SQL statement, Ambiguous column' mean?
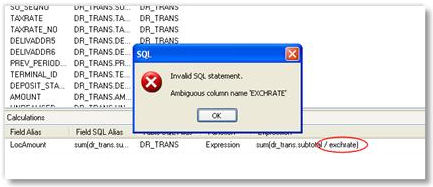
The query is not able to recognise which table the field belongs to, because you have only specified the field name, and there are two or more fields with the same name in the tables that you have selected. In this case you must explicitly specify the table name:
sum(dr_trans.subtotal / dr_trans.exchrate)
How do I set extra date fields to default to today's date?
Go to ExoConfig Profiles and type "date" to search date related profiles. In 'Company profile' you will see an option called 'Default Date for DateTime type Extra fields'. Type value 'Todays' against that field. See screenshot below.

Save this then refresh the settings in MYOB EXO Business to see the change.
How do I create a barcode on a clarity form as a concatenation of two fields?
Add an 'Expression' field in the query designer on the Data tab under the source data pipeline. Enter the following expression, or change it to match your particular needs:
|
|
stock_items.stockcode + ' ' + stock_items.description |
You may need to add some other control characters to the string, depending on the barcode type. Check your barcode documentation.
This expression joins the stockcode and description fields together from the stock_items table. Change the name of this expression to something meaningful (such as "ConcBarcodeField"). Load this concatenated field into the barcode.
How do I make the Footer appear only on the last page of the report?
Type the following code in the "BeforePrint" Event of the footer band
|
|
Footer.Visible := Report.SecondPass and (Report.Page = Report.PageCount); |
How do I force the Group Footer to appear at the end of each page?
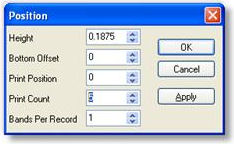
Right-click on your Group Footer bar and choose position. Set the PrintPosition property for the GroupFooter so that it aligns itself to the bottom of the page. The more you increase the value the further down the page the groupfooter band moves.
But remember that each group will show on a separate page. The default nature of the group footer is to appear at the end of each group. If the "Group Footer" is positioned at the bottom of the page, then each group will end at the bottom of a page. Therefore each group will occupy at least 1 full page.
How can I use $COMPUTERID and $USERID in Clarity?
You can add a parameter in clarity where you include $COMPUTERID in the default SQL. Type in the following statement in the Default SQL box:
|
|
SELECT BRANCHNO WHERE BRANCHNO = $COMPUTERID |
This will set the branchno to the default branchno stored for your computer and will run the report for that particular branch.
Click Save in the parameters editor and go back and preview the report.
Save the report. Next time when you login and preview, you will find the Branchno defaults to the ID of the computer.
How do I use the New Page option?
The New Page option allows you to force the summary onto a new page. Right-click on your summary band and select New Page.
How do I get a record count in the header rather than in the footer?
Place the DBCalc component in the header or group header band. Right click the DBCalc component that you are using and choose LookAhead Option. This will pre-calculate the lines before displaying the value. This could delay the preview of some complex or large reports while it calculates.
How do I count the number of records in each group at the end of the group?
Place a Dbcalc in your group footer. Right click on the DBcalc, click calculations – and choose 'count'. Select the field/column for which you want to do the count, from the Edit toolbar. By placing this in the group footer band will show the count of each group in the report. You can do the same to perform a sum and average calculations. Reset Group specifies when the calc is reset to zero.
Why can't I sort by a field in a child data pipeline?
This is one limitation of using data pipelines joined in master-child relationships. If it is a simple form, you may be able to combine the two pipelines into one and then go to the sort tab of the query designer and sort it by the field you wanted. Another method is to set up a SQL view that is sorted in the desired order then using that in a new pipeline.
How do I set the number of detail lines per page?
Right click on the Detail band and select Position. Under Print Count, type the number of records you want to be displayed per page in your report.
How do I draw column lines in the detail band?
-
Adjust the width of the detail band as required. Choose the line tool in the standard components palette. Choose right, left, top or bottom from the options combo box, depending on how you want the lines drawn.
-
Draw the line from start to the end of the detail band (top and bottom shaded areas of detail band), or right-click and select "Parent Height"
To show an end line in each page of the report, draw a horizontal line at the very top of the footer.
How do I set a watermark image or text in the background?
-
Ensure the Page Style band is visible by selecting it from the Report menu.
-
Place the 'image' component on the Page Style band. Load the picture by right clicking and choosing 'Picture'.
-
Right click on the image and choose 'Send to Back' which will set the image as a background for the whole report.
-
Right click on the other components and ensure Transparent is selected – this removes any foreground colour on the fields, allowing the background to be seen.
-
Right click and select 'Stretch' and 'Maintain Aspect Ratio', then set the required size. The picture will extend and spread along the whole page uniformly as the height increases. See the example below.
It is suggested that you lighten the image that you use for your background using an image editing program, otherwise it may make the lines hard to read.
How can I strip blank spaces from a database field on a clarity report?
Type the following piece of code in the OnGetText event handler of the DBtext component :
|
|
var newtext : string; x1 : integer;
begin newtext:=''; for x1:=1 to length(text) do begin newtext:= newtext + trim(copy(text,x1,1)); end; text := newtext; end; |
How do I set the number of copies to print from a database field?
Try the following code:
|
|
Procedure ReportBeforePrint Begin Report.PrinterSetup.Copies:= <value>; End;
{The line above could be any one of these: Report.PrinterSetup.Copies := 3; Report.PrinterSetup.Copies := Dr_accs['invfileno']; Report.PrinterSetup.Copies := plparams['CopiesValue']; } |
The only 2 conditions in which the above piece of code would fail are:
-
If there is a profile that controls the number of copies of a specific form.
-
If the form is not previewed and is called through a custom button that directly sends the report to the printer.
How do you set a total variable to blank when zero?
In the calcs tab > Totalvariable1> OnCalc event type in the following code:
if Value = 0 then TotalVariable1.Visible := false;
How do I cancel a report if a runtime parameter is not specified?
Type the following in the report's BeforeOpenDataPipelines event handler:
|
|
If (plparams.fieldobjects['PeriodValue'].isnull) then Begin ShowMessage('Please select a period'); Report.Cancel; End; |
How do I display an RTF file?
Add a rich text control to your report and use the following piece of coding to check for the existence of the file and then display it.
|
|
if fileexists('c:\RichTextFile.rtf') = true then RichText1.LoadFromFile('c:\ RichTextFile.rtf'); |
How do I dynamically map a printer based on the value of a field?
It is possible to dynamically map printers based on the value of a field in the master pipeline. For example, you could map printers based on the value of the Database field DEFLOCNO, so that all invoices from Auckland print in the Auckland office, even if they were entered elsewhere.
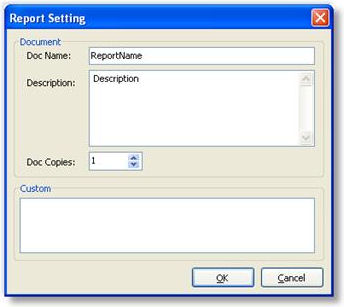
Edit the Custom section of the Report Setting window (Tools menu > Settings) as follows:
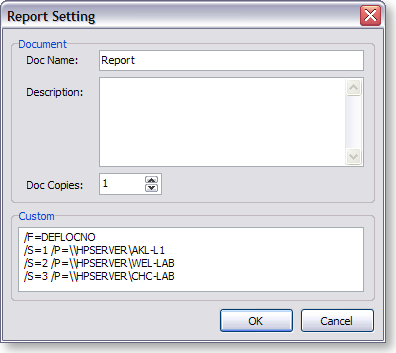
- /F specifies the field to use - in this example, the DEFLOCNO field is being used to determine which printer to use, but any field from the master pipeline can be used.
- /S specifies the value of the field.
- /P specifies the UNC name of the printer to map to.