Contact management > Keeping in touch with your contacts > Contact log
Contact log
The contact log enables you to keep a detailed log of all the phone calls you and your contacts make to each other, and any other type of correspondence.
For example, let’s say that you call customer A regarding an overdue invoice. You could create a log entry that records the date of the phone call, a summary of the outcome, and the date you will want to recontact them by if their invoice is still outstanding.
When a customer or supplier calls, you can use the contact log to retrieve a complete history of your business relationship with that contact.
Note that you can also automatically create contact log entries for each sale, purchase, payment and receipt you record.
To create a contact log entry
|
1
|
|
2
|
|
3
|
|
4
|
 |
|
|
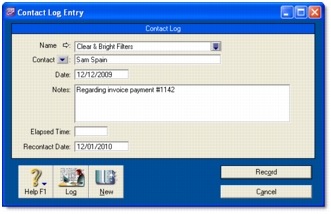
The name of the contact. To view the contact’s card, click the zoom arrow.
|
|
|
Type the name of the person that is associated with this entry. For example, you can record the name of the person you spoke to on the phone.
If you have specified a contact person in the contact’s card, you can click the down-arrow to choose that person.
|
|
|
Type the date you spoke to or wrote to the contact. If you are simply entering an appointment or reminder, you can enter today’s date.
|
|
|
Enter any information you want to save about the conversation or follow-up.
|
|
|
Elapsed Time
|
If you want to record the time you spend speaking to the contact, or working on a particular task related to the entry, type the time in hours and minutes. For example, if you spend 15 minutes, enter 15. If you spend 1 hour and 15 minutes, enter 1:15.
|
|
Recontact Date
|
If you want to be reminded to follow up the contact, type or select the date you want to be reminded to recontact them. The reminder will appear in the Contact Alert tab of the To Do List on this date. For more information, see Reviewing your contact information.
|
|
View all contact log entries for the selected contact.
|
|
|
Record the current log entry and to create a new entry for this or another contact.
|
|
To automatically create contact log entries
You can choose to automatically create log entries each time you record a sale, purchase or banking transaction. The log entry contains basic information about the transaction, such as the invoice number, cheque number and the amount.
If you record many transactions and choose to automatically create log entries for them, the size of your company file may increase significantly. If the company file size becomes an issue, you can purge old log entries and other data. For more information about purging information, see Purging information that is no longer needed.
|
1
|
|
2
|
Click the Banking tab.
|
|
3
|
If you want to create an automatic contact log entry for each payment you record, select the Make Contact Log Entry for Every Cheque option.
|
|
4
|
If you want to create an automatic contact log entry for each receipt you record, select the Make Contact Log Entry for Every Deposit option.
|
|
5
|
Click the Sales tab.
|
|
6
|
If you want to create an automatic contact log entry for each sale you record (including quotes and orders), select the Make Contact Log Entry for Every Sale option.
|
|
7
|
Click the Purchases tab.
|
|
8
|
If you want to create an automatic contact log entry for each purchase you record (including quotes and orders), select the Make Contact Log Entry for Every Purchase option.
|
|
9
|
|
1
|
|
2
|
From the Name list, select the contact for whom you want to view the contact log.
|
|
3
|
If you want to view or edit the detail of a log entry, select the entry and click Edit, or click the zoom arrow next to it.
|

