Banking > Spending money
In AccountRight software, the term spending money refers specifically to recording payments for transactions for which purchases have not been created. These include equity drawings, bank charges, telephone bills and so on. These types of payment can be entered using the Spend Money window or by selecting the Spend Money transaction type in the Bank Register window.
The Spend Money window lets you record more details about the payment and allocate the payment to more than one account. This is the procedure covered in this section. If you want to use the Bank Register window—which lets you record a payment with minimum details—see Entering transactions in the Bank Register window.
If you want to make a payment to a supplier for a purchase entered using the Purchases command centre, use the Pay Bills window or select the Pay Bill transaction type in the Bank Register window. For more information, see Paying bills.
If you want to pay suppliers or employees electronically, you first need to set up your accounts and cards in a particular way. For more information, see Setting up electronic payments.
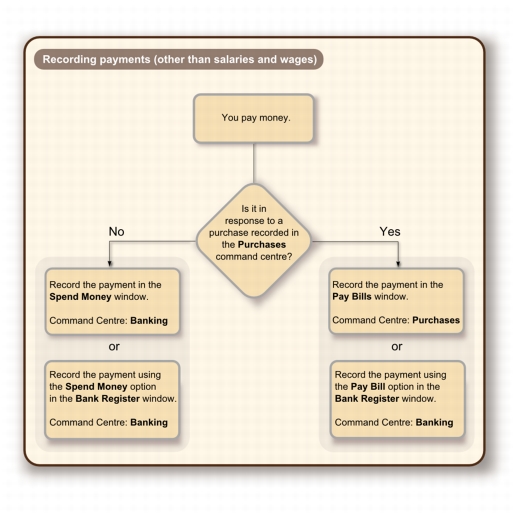
The options for recording payments are summarised in the following diagram.
To record money you spend
|
1
|
|
2
|
Select how the payment is to be made.
|
|
▪
|
If you are paying electronically—that is, if you will be generating an electronic payment file (ABA file) for this payment—click Group with Electronic Payments.
|
|
▪
|
If you are paying by some other means—such as by cash, cheque, credit card or Internet banking—type or select the account you are paying from in the Pay from Account field.
|
|
3
|
If the payment is tax inclusive, select the Tax Inclusive option.
|
note : Make your selection now
|
4
|
Fill in the information in the cheque area of the window, just as you would if you were writing a paper cheque. Enter the payee card, cheque number (or other identification number), amount, memo, etc.
|
If you are paying electronically, enter your own unique reference in the Statement Text field or accept the default. The text entered in this field will appear on the payee’s bank statement.
|
5
|
If you want to change the default payee address, type or select the payee’s address in the Payee field.
|
 |
|
|
The tax code that is linked to the allocation account appears here automatically. You change or delete it if necessary.
|
|
|
7
|
If your payment covers more than one account, repeat step 6. You would do this, for example, when paying for a purchase with a number of different types of purchases on it: postage, magazines, stationary, etc.
|
|
8
|
If you want to view or change the tax amounts assigned to the payment, click the zoom arrow (
|
|
9
|
If you want to assign the payment to a particular category, select a category from the Category list. For more information about categories, see Categories.
|
tip : Recap transaction
Before you record this transaction, you can use the recap transaction feature to view the journal entries that will be created when the transaction is recorded. This is useful for confirming that the journal entries are posted to the correct accounts. To recap, choose Recap Transaction from the Edit menu.
If you want to store the payment as a recurring transaction click Save as Recurring. In the Edit Recurring Schedule window, enter the necessary information and click Save. For more information, see Recurring transactions.
|
10
|
If you are paying by cheque and have already written a cheque, select the Cheque Already Printed option.
|
|
11
|
If you want to send remittance advice in a batch, select an option from the Remittance Advice Delivery Status list.
|
After you have recorded a number of payments, say, the day’s payments, you can print or email remittance advices in a batch. For more information, see Sending forms.
|
12
|
If you want to preview the remittance advice or cheque for this transaction, click Print and then choose Preview Cheque or Preview Remittance Advice. Note that the transaction is recorded before it is displayed.
|
|
13
|
If you want to print a cheque or remittance advice now, click Print and select the form type you want to print. Note that the payment is recorded before it is printed.
|
|
14
|
Click Record.
|

