
- Contents
- Index
- Search

Show results that include all search words
Activities
Activities can be set up in EXO Business to provide reminders and progress indicators for important events. An activity can be a Task or an Appointment:
-
A Task is a to-do item that must be completed in a specified time frame.
-
An Appointment is an event scheduled for a specific time.
Activities can be accessed in multiple ways:
-
Via the Activities tabs in the maintenance screens for Contacts, Debtors, Creditors and Non Accounts.
-
Via the Activity Search widget, which can be added to the EXO Business business flow menu.
-
Via the EXO Business CRM module.
When using the EXO Business CRM module, activities can be synchronised with Microsoft Outlook. Tasks are converted to Outlook Tasks and Appointments are converted to Outlook Appointments.
Creating an Activity
Click the New Activity ( ![]() ) toolbar button to create a new activity. Alternatively, right-click on the Activity Search widget's calendar in the time slot that you want to create the activity in.
) toolbar button to create a new activity. Alternatively, right-click on the Activity Search widget's calendar in the time slot that you want to create the activity in.
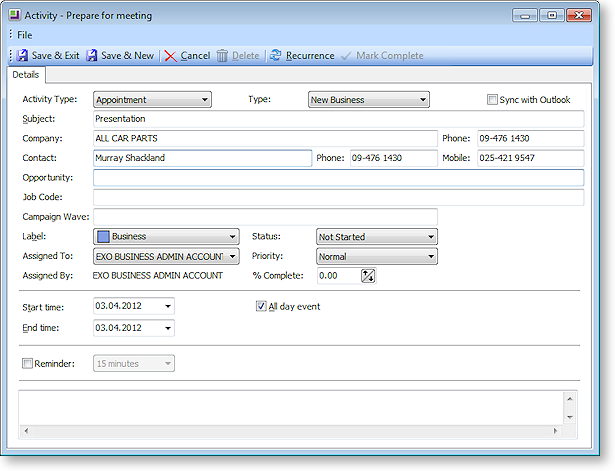
The Activity Window
Note: If Extra Fields have been set up for Activities, an Extra Fields tab will also be available on this window.
This is the window for entering new activities; use the table below as a reference for completing the fields in this window.
|
Field |
Description |
|
Activity Type |
Select whether the activity is a Task or an Appointment. |
|
Type |
This is a user-definable classification for the activity. Select a type from the list, or select "Edit List..." to create a new type. |
|
Sync with Outlook |
If this box is ticked, the activity will be synchronised with Outlook whenever a sync is performed. If this box is not ticked, the activity will not be included in synchronisation operations. |
|
Subject |
Type a brief description of the activity and its purpose. |
|
Company |
Assignment of an activity to a Company and/or Contact is optional. Where assigned, the activity will appear on the Activities tab of that company (Debtor, Creditor, Non Account) and/or the Contact screen. Note: When entering the Company name, use the search option by typing ? and pressing TAB. |
|
Opportunity |
This field is only available when the EXO Business CRM module is licensed. If the activity was created from an Opportunity, that Opportunity will be displayed here; otherwise, you can optionally specify an Opportunity to associate the activity with. |
|
Job Code |
This field is only available when the EXO Job Costing module is licensed. If the activity was created from a job, that job will be displayed here; otherwise, you can optionally specify a job to associate the activity with. |
|
Campaign Wave |
If the EXO Business CRM module is installed, activities can be associated with a campaign wave. Note: When creating an activity from the Details tab of the Campaigns window, the activity is associated with the first wave of that campaign. When creating an activity from the Waves tab, the activity is associated with the selected campaign wave. |
|
Label |
A label can be specified for the activity - this affects how it will appear on calendar displays. |
|
Priority |
A priority (Low, Normal or High) can be specified for the activity. Low and High priority tasks are indicated with an icon on calendar displays. |
|
Status |
The Status setting has predefined list entries, but these may be edited or added to using the "Edit List..." option. For Tasks, clicking the Mark Complete toolbar button automatically updates this property to "Completed". |
|
Assigned To |
The EXO Business Staff members that the activity was assigned to and by. |
|
% Complete |
This property applies to Tasks only. Specify the percentage completion by entering a number or using the arrow controls. Clicking the Mark Complete toolbar button automatically updates this property to 100%. |
|
Start Time |
The start and end time for the activity. |
|
All day event |
If this is selected, the selections for the time of day will disappear as they are no longer valid. |
|
Reminder |
If you tick this checkbox, the system will pop up a reminder from the system tray after adding a reminder icon. Reminders can be enabled or disabled using the Enable Reminders option on the Tools menu of the Activity Search window/Dashboard widget. |
|
Show time as |
This property applies to Appointments only. Select how to display the time for this activity on the Task Scheduler. Choose from:
|
Note: The relationship between the Status and % Complete properties is automatically maintained. For example, setting Status to "Completed" automatically updates the % Complete value to "100" and vice versa.
Once all properties are configured, click Save & Exit on the toolbar to save your changes and close the Activity window, or Save & New to save changes to this Activity and reset all fields so that a new Activity can be added.
Activity Recurrence
Click the Recurrence button to set an activity as recurring and establish the frequency.
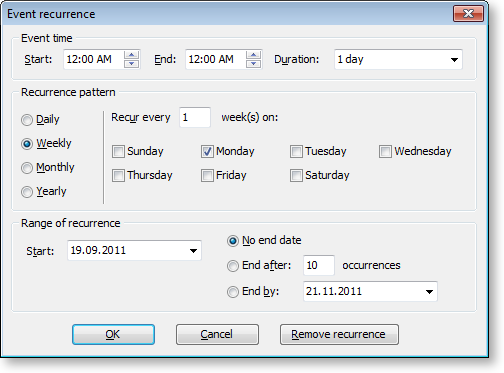
Configure the recurrence options and click OK to assign this to the new or edited task. If you are editing an existing task and no longer need this recurrence to continue, click Remove recurrence to remove this from the calendar.