
- Contents
- Index
- Search

Show results that include all search words
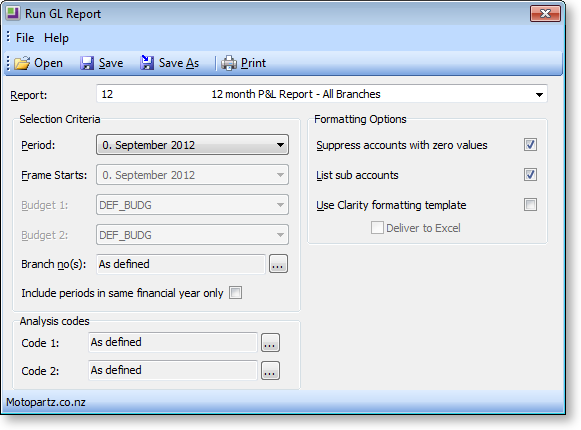
Running GL Reports
To run a predefined report, select General Ledger Reports > Run GL Reports from the Reports menu.
|
Item |
Description |
|
Report |
Select the report to run. Reports are listed with their Report Code and Report Name, as set up on the Settings tab of the Setup GL Reports window. |
|
Period |
The period selection box determines where the report starts with respect to a period = 0 selection. For example, if the period selected in the period list is period 2, the report adds 2 periods to each column where it has a period determined (0 will become 2, 1 will become 3, and so on). |
|
Frame Starts |
This field is only available if the report contains columns with the type "Moving frame of periods". It specifies the starting period for the frame of periods. The length of the frame, i.e. the number of periods to be reported on, is specified by the Frame Length column property. |
|
Budget 1 and 2 |
If the GL report being run has budgeting columns, the Budget list turns active and allows the user to select the budget to be reported against. |
|
Branch no(s) |
Use the branches either as defined or manually check the branch numbers from the window opened through the ellipsis [...] button. |
|
Include periods in same financial year only
|
This checkbox is only available if the "P&L Report - All Branches" Report Type is selected. If this option is ticked, then at run time fields set to rolling 12 months are limited to reporting the financial year only. Fields not set to rolling 12 months are not affected by this option.
|
|
Suppress accounts with zero values |
This setting determines if the report shows a row when all columns in that row equal 0. The default value is determined by the Suppress Zeros check box on the Setup GL Reports window. |
|
List sub accounts |
This setting determines if the report shows sub accounts, where they exist. The default value is determined by the List Sub Accounts check box on the Setup GL Reports window. |
|
Use Clarity formatting template |
Tick this option if a Clarity formatting template (CLF) is to be used. |
|
Deliver to Excel |
Tick this option if the generated report is to be exported to an Excel compliant format. |
|
Analysis codes |
If GL Analysis Codes have been set up, codes can be specified here. |
Once all settings are configured, click the  button to generate the report.
Saving GL Report Writer Settings
The settings on the Run GL Report window can be saved to a file, so that they can be re-used at a later time. Click the Save or Save As buttons ( or
or ![]() ) to save the settings as a file with the extension .GLR.
) to save the settings as a file with the extension .GLR.
To load settings from a .GLR file, click the  button and browse to select the file.
A .GLR file can also be specified as a parameter when adding the Run GL Reports menu item:
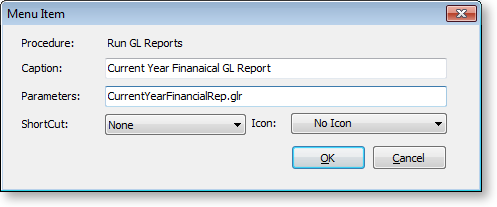
Specifying a .GLR file means that when the menu item is selected, a GL report will be automatically generated using the settings in the .GLR file (the Run GL Report window does not appear). It is possible to set up multiple GL Report menu items, each with different settings, so that a variety of GL Reports can be generated quickly.
Note: By default, .GLR files are saved in the directory specified by the Directory location for standard Clarity forms profile setting (several example .GLR files are installed in this directory). When running a GL Report from a menu item as illustrated above, the .GLR file is assumed to be in this directory.
Setting the Default Report
When adding the Run GL Reports menu item, it is possible to specify which report should be selected by default when the Run GL Reports window opens. Enter the parameter REPORTID=x into the Parameters field, where x is the Report No of the default report.