- Contents
- Index
- Search

Show results that include all search words
EXO Email Service
The EXO Email Service can be used to automate the sending of emails from the EXO Business system. For example, this service is used by the Business Alerts feature to send email alerts.
Installing the Service
You can install and set up the EXO Email Service using the MYOB EXO Business Services Setup Wizard and the MYOB EXO Business Service Configuration utility.
Run the MYOB EXO Business Services Setup Wizard, and when asked which features you want to install, make sure that the Messaging Service option is enabled. Once the wizard has completed, you are given the option of running the service configuration utility to set up the service. You can run the utility, MYOB.ED.EXO.Cloud.ServiceConfig.exe, at any time after installation.
Configuration of the EXO Email Service is performed on the EXO Business Alerts Configuration tab of the service configuration utility:
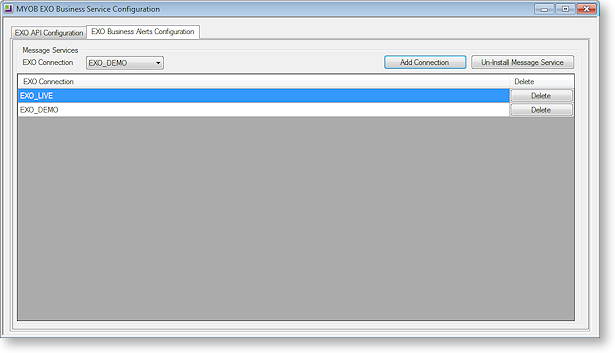
A single instance of the EXO Email Service runs on each PC. An instance can have multiple EXO Business database connections configured for it. To install the EXO Email Service instance, select a database connection and click Add Connection. This adds the service and sets up a connection to the selected database. To add new connections, select them from the EXO Connection dropdown and click Add Connection.
Installing the Service Manually
The service can also be installed manually:
- Copy the ExoEmailService.exe file to the main EXO Business install directory.
- Open a command prompt with administrative rights at this location.
- Enter ExoEmailService.exe /install [connection], where [connection] is the connection name for the instance of EXO Business that you are installing the service for.
You can install the service for multiple instances of EXO Business by specifying multiple connection names, separated by spaces, e.g.
ExoEmailService.exe /install Connection1 Connection2
Once the service is installed, you can update the list of instances that it is installed for by entering:
ExoEmailService.exe /config [list of connections]
Note: The EXO email service runs using the Local System account. This means that the EXO Business database connection must have been created while logged in as an administrator account; otherwise the service will not be able to find the connection details. If you receive the error “Failed to start service”, you may need to open the EXO Business Connection Editor window while logged in as an administrator, then delete and re-create the connection.
Configuring the Service
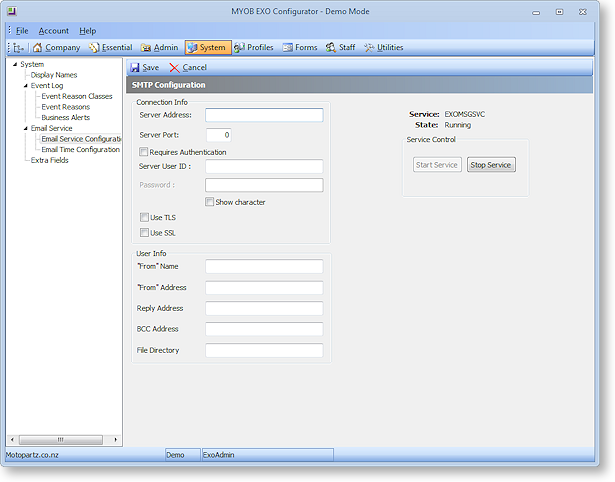
Once the service has been installed, you can configure it in EXO Business Configurator at System > Email Service. Two configuration screens are available. The first, Email Service Configuration, lets you configure the details of the email server, including address, authentication and default user information:
|
Setting |
Description |
|
Server Address |
Specify the host SMTP server. The entry can be a server or service name (Local Area Network host only), a URL, or an IP address. Note: IP addresses are usually only used with internal mail servers or ones that have no public DNS entry (registered domain). Ideally, a name or URL should be used. |
|
Server Port |
Specify the number of the port to send emails on. Consult your mail service provider or IT department for information on which port to use. This may depend on whether you want to use TLS or SSL encryption (see below). |
|
Requires Authentication |
If your mail server requires authentication to send mail, check this box and enter a password for your account. |
|
Server User ID |
For an internal mail server (such as Exchange Server) this will be the User ID as configured for the user account in the Mail program. For ISP-hosted mail account this is the account name. |
|
Password |
Only active/required if Requires Authentication is ticked. This is the password for your mail account. Tick Show character to show the characters of the password; if this option is not ticked, the password will be masked with asterisks. |
|
Use
TLS |
Tick these boxes to secure emails using TLS or SSL encryption, if the SMTP server supports them. Note: SSL takes precedence over TLS; if both boxes are checked, SSL encryption will be used. |
|
From Name |
This is the "friendly" name to appear in the Sender field of emails. |
|
From Address |
This is your email address. |
|
Reply Address |
Enter an address here if you would like replies sent to a different email address than the From Address. If this field is left blank the reply address will be set the same as the From Address. |
|
BCC Address |
This is the blind carbon copy email address. If you enter an email address here, all emails you send using this client will be secretly echoed to this address. |
|
File Directory |
This is the default directory used when adding attachments to emails. |
The second configuration screen, Email Time Configuration, lets you specify when the email service should and shouldn’t send emails, and the how often it should check for new emails to send:

|
Setting |
Description |
|
Don't send emails between |
Specify the period(s) when the service should not send emails by entering start and end times here. Click the New toolbar button to enter a new pair of times. Times are entered in the 24 hour format. |
|
Don't send emails on |
Tick the boxes for any days when the email service should not send emails. |
|
Frequency |
Specify how often the service should check for new emails to send. |