- Contents
- Index
- Search

Show results that include all search words
Configuring Business Flow Menus
Business Flow Menus are added and edited in the Configuration Assistant at Staff > Menus > Business Flow Menu.
Note: Video-based Help is available for this topic on the EXO Business Education Centre.
Default menus can be copied with the Copy Menu button and used as the basis of a new menu. To add a new Business Flow Menu:
-
Select the module whose menu you want to edit from the Program box, then click New to create a new menu. The Business Flow Menu editing screen appears:
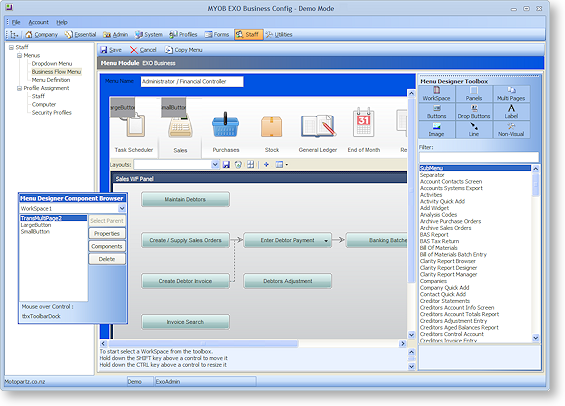
The left-hand pane is the designer area where the menu is created. The right-hand pane contains a toolbox of menu elements and a list of all available menu procedures. A floating Menu Designer Component Browser window lets you configure the properties of the currently selected item and its “child” component items. The Component Browser also displays the name of the menu item that the mouse is current over.
-
In the Menu Name field, enter a new name for the menu, which will be referred to when assigning the menu to users.
-
Click on the WorkSpace item on the Menu Designer Toolbox, then click on the design area on place it.
-
To change the size of the WorkSpace, hover the mouse over it and hold down CTRL. While CTRL is held down, moving the mouse resizes the WorkSpace. Alternatively, double-click on the WorkSpace to view its Properties dialog and enter Width and Height values.
-
To position the WorkSpace, hover the mouse over it and hold down SHIFT. While SHIFT is held down, moving the mouse resizes the WorkSpace. Alternatively, double-click on the WorkSpace to view its Properties dialog and enter Top and Left values.
Tip: To make the WorkSpace resizable, double-click on it and set the Custom property to "R" and the Align property to "Client".
The WorkSpace forms the base of the Business Flow menu, defining its size and shape. All other menu items are placed on it.
Tip: You can place Panel items on the WorkSpace, then place other items on the panel. This allows you to position multiple items at once.
To add a text link to a Business Flow Menu:
-
Enter text into in the Filter field to filter the list of available procedures.
-
Drag a procedure from the list to the WorkSpace. A window displaying the link’s parameters appears:
-
Enter any parameters that may be required, then click OK.
Tip: You can add links to an external file or executable by dragging the “External Program” procedure onto the WorkSpace, then changing its Name and entering the filename of the file/executable into its Parameters field. Similarly, you can add a link to a Clarity report by dragging the “Run Clarity Report” procedure onto the WorkSpace, then specifying the report.
To add a button to a Business Flow Menu:
-
Click on the Buttons item on the Menu Designer Toolbox.
-
Select the style of button (Standard, Focus or Transparent), then click anywhere on the WorkSpace to place it.
Note: Transparent buttons allow more than one image to be specified. These images correspond to the various states of the button, e.g. inactive, active, hover.
-
Enter any parameters that may be required, then click OK.
-
Size and position the button using the CTRL and SHIFT keys.
-
Enter some text into in the Filter field to filter the list of available procedures.
-
Drag a procedure from the list onto the button. This is the procedure that will be activated when the button is clicked.
-
Enter any parameters that may be required, then click OK.
Tip: You can set a button to link to an external file or executable by dragging the “External Program” procedure onto the button, then changing its Name and entering the filename of the file/executable into its Parameters field.
To add a drop-down menu to a Business Flow Menu:
-
Click on the Drop Buttons item on the Menu Designer Toolbox.
-
Select the style of button (Standard, Focus or Transparent), then click anywhere on the WorkSpace to place it.
Note: Transparent buttons allow more than one image to be specified. These images correspond to the various states of the button, e.g. inactive, active, hover.
-
Enter any parameters that may be required, then click OK.
-
Size and position the button using the CTRL and SHIFT keys.
-
Enter some text into in the Filter field to filter the list of available procedures.
-
Drag a procedure from the list onto the button. (To add a sub-menu, drag .)
-
Enter any parameters that may be required, then click OK.
-
Repeat steps 5 – 7 for all other procedures you want to be available from the drop-down menu.
Note: You can add sub-menus by dragging the “SubMenu” item onto the dropdown button. To add items to the submenu, select it so that its components appear on the Component Browser, then drag items onto its name at the top of the Component Browser.
The drop-down menu works in real time on the Menu designer: click on the menu to view the items that will appear under it.
To add graphical elements to a Business Flow Menu:
-
Click on the Label, Image or Line item on the Menu Designer Toolbox, then click anywhere on the WorkSpace to place the item.
-
Enter any parameters that may be required:
-
For labels, this includes the label text.
-
For images, this includes the image file to display.
-
For lines, this includes the line style and orientation.
-
-
Click OK.
-
Size and position the item using the CTRL and SHIFT keys.
To add a tabbed layout to a Business Flow Menu:
Two varieties of tabbed layouts are available: Standard and Enhanced. Enhanced layouts allow transparency and mouseover effects; Standard layouts do not allow these effects, but are more flexible with how tab buttons can be arranged.
-
Click on the MultiPage > Standard > MultiPage or MultiPage > Enhanced > MultiPage item on the Menu Designer Toolbox, then click anywhere on the WorkSpace to place it.
Tip: Standard MultiPages have a TabPos property that lets you specify which side of the MultiPage tabs will appear on. Enhanced MultiPages can only have tabs at the top.
-
Size and position the MultiPage using the CTRL and SHIFT keys.
-
Click on the MultiPage > Standard > Tabsheet or MultiPage > Enhanced > Tabsheet item on the Designer Toolbox, then click on the MultiPage. Enter a name an optionally an image then click OK. This adds a tab to the top of the MultiPage.
Note: Enhanced Tabsheets allow more than one image to be specified. These images correspond to the various states of the tab button, e.g. inactive, active, hover.
-
Repeat step 3 to add more tabs to the Multipage.
-
Click on a tab, then drag other items such as links and buttons onto the MultiPage. These items will only appear when that tab is clicked.
-
Click on another tab. The items you added to the previous tab will disappear. Drag more items to the MultiPage for this tab.
-
Repeat steps 5 and 6 for all tabs.
The tabbed layout works in real time on the Menu designer: click on a tab to view the items that will appear on that tab.
To add a Dashboard interface to a Business Flow Menu:
A procedure called "Dashboard" is available in the list of procedures; dragging this procedure onto a Business Flow Menu means that a Dashboard interface will be available when running the module. The Dashboard can be customised and widgets can be added to it at run time. Enter “D” into the Custom field for the procedure to indicate that it can be “docked” in the WorkSpace, so that it appears as part of the core EXO Business interface, rather than appearing in a new window. Enter “DR” to indicate that it is dockable and resizable. The Align property should be set to "Client".
It is also possible to add a working Dashboard interface that can be edited at design time:
-
Click on the Panels > Dock Panel item on the Menu Designer Toolbox, then click anywhere on the WorkSpace to place it. A Dashboard interface appears on the WorkSpace.
-
Size and position the Dashboard using the CTRL and SHIFT keys.
Tip: To have the Dashboard take up all of the available area, set its Align property to "Client".
-
Click on the Panels > Panel item on the Menu Designer Toolbox, then click on the Dashboard. This adds a panel and automatically converts it to a Dashboard widget.
-
Repeat step 3 to add more widgets to the Dashboard.
-
Click on a widget, then drag other items such as links and buttons onto the widget. Repeat for all widgets.
Menu Definition
A menu definition is a set consisting of a Dropdown Menu and a Business Flow Menu. Menu definitions are associated with users at Staff > Users, and determine which menus will be used for that user.
Tip: The definition assigned to the current user is highlighted in green.
To set up a menu definition:
-
Click New to create a new definition, or Edit to alter an existing one.
-
Enter a Name for the definition.
-
Select the Drop Down Menu for this definition.
-
Select a Business Flow Menu for this definition, or click Clear if you do not want to display a Business Flow Menu.
-
Click Save to save the settings.